I remember the night I almost ruined the entire brunch lineup for my friends—flour everywhere, a burnt croissant, and a kitchen that smelled like a failed science experiment. The panic was real, but the moment the dough began to rise, I felt that unmistakable buzz of anticipation that only good baking can bring. I was craving something sweet, comforting, and utterly irresistible, and that craving led me straight to the recipe that would become my kitchen anthem: the Best Sticky Pecan Cinnamon Bun. I dare you to taste this and not go back for seconds, because once you get a bite, the world will feel a little brighter.
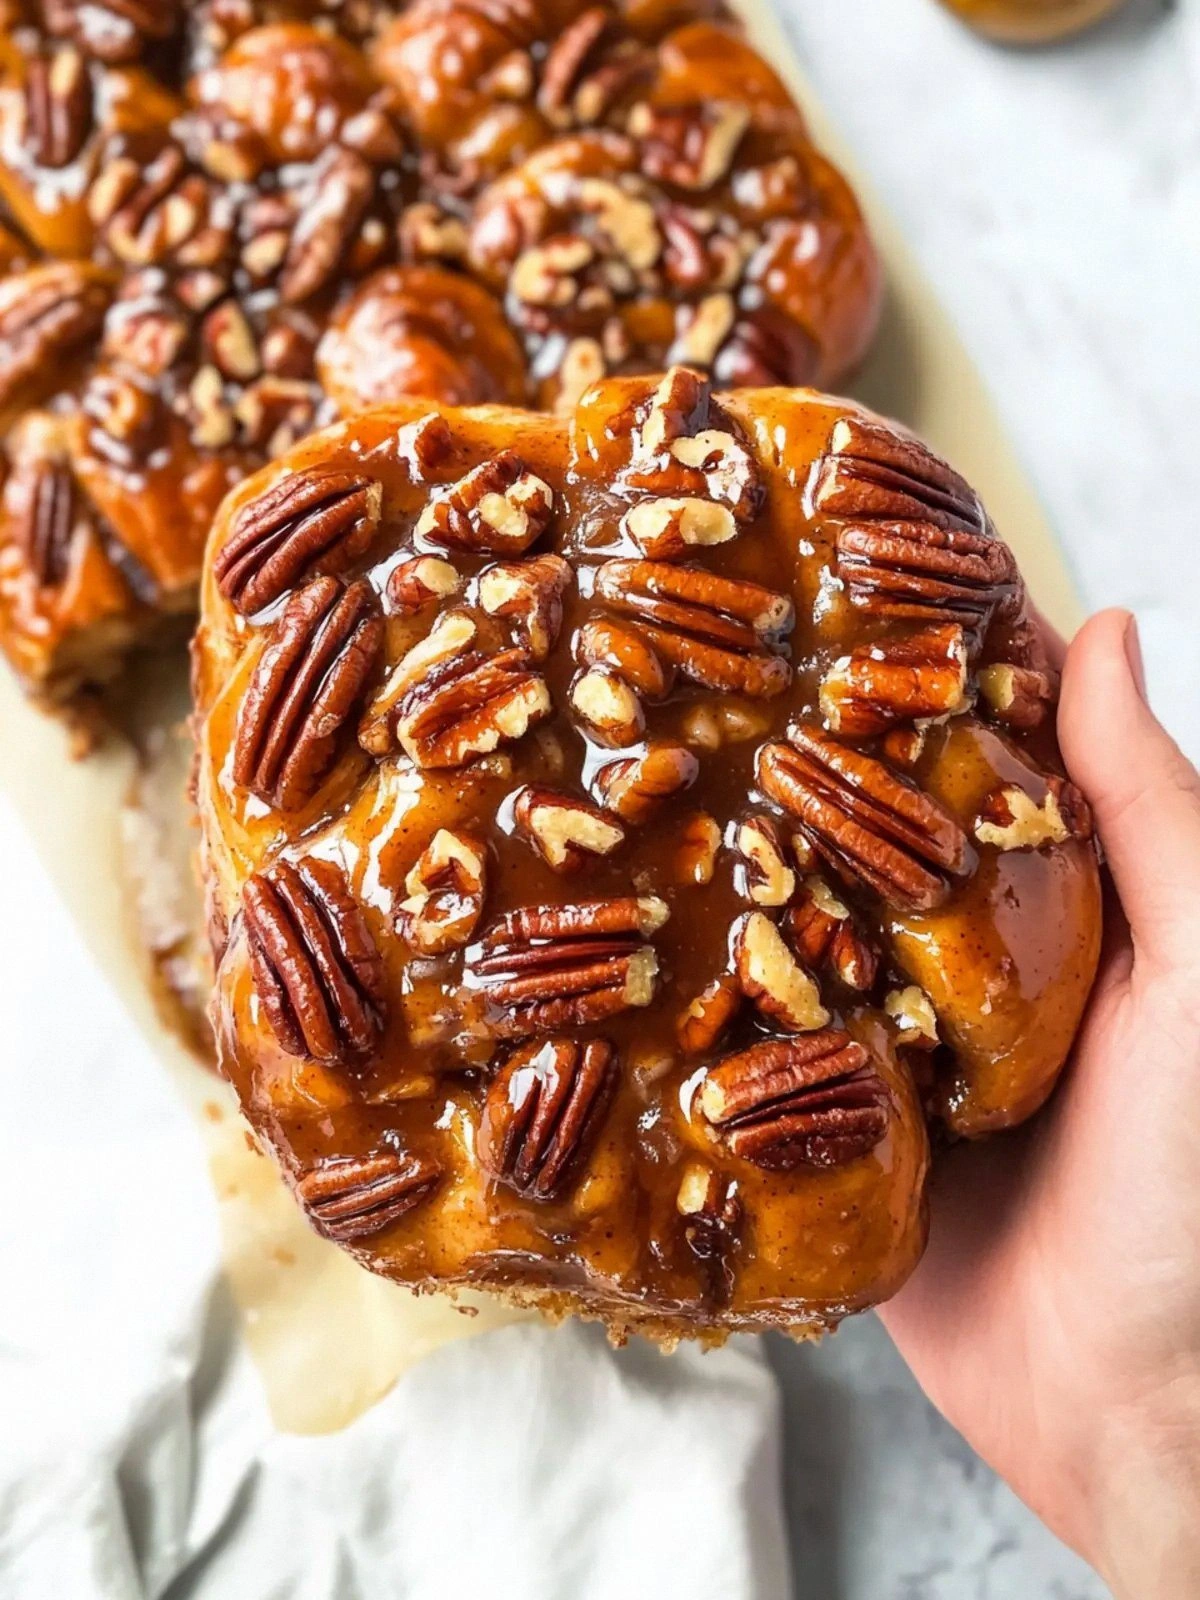
Picture this: golden dough swirls with cinnamon, pecan crunch, and a glossy maple glaze that glistens like liquid amber. The first bite melts on your tongue, releasing a cascade of caramelized sugar and buttery richness that feels like a warm hug in edible form. The aroma that fills the air is a seductive blend of toasted nuts and cinnamon, a scent that can turn an ordinary morning into a moment of pure joy. I’m talking about a bun that has that perfect balance between soft, pillowy interior and a lightly crisped exterior—like a cloud that has just been kissed by a sunrise.
What makes this version stand out from every other recipe out there is the meticulous layering of flavors and textures. I’ve refined the dough with a touch of whole milk for extra softness, added a second round of butter for a buttery sheen, and used maple syrup as a glaze that’s both sweet and slightly smoky. The pecans are toasted to bring out their natural oils, creating a nutty crunch that cuts through the sweet glaze. The result is a bun that’s hands down the best version you’ll ever make at home, and it’s so simple that even a novice can master it.
And there’s a secret twist you won’t expect: a splash of cream in the filling that gives the bun a silky, almost custard-like interior. That subtle addition turns an ordinary cinnamon bun into a luxurious treat that feels like a dessert and a breakfast all at once. The next few sections will walk you through every single step, from the initial mixing to the final glaze, so you can replicate that exact magic in your own kitchen. Let me walk you through every single step — by the end, you'll wonder how you ever made it any other way.
What Makes This Version Stand Out
Flavor: The combination of maple syrup, light brown sugar, and toasted pecans creates a sweet, nutty, and slightly smoky profile that’s far richer than a standard cinnamon bun.
Texture: The dough’s double butter technique yields a tender crumb that is still sturdy enough to hold the generous pecan filling without collapsing.
Simplicity: Despite its complex flavor, the recipe requires only basic kitchen tools and a single mixing bowl, making it accessible to all skill levels.
Uniqueness: The inclusion of cream in the glaze gives the bun a velvety finish that feels indulgent without being overpowering.
Crowd Reaction: At my last gathering, I watched people line up for a second batch—proof that this bun is a showstopper.
Ingredient Quality: Using whole milk and high‑quality butter elevates the flavor profile, making every bite buttery and luscious.
Cooking Method: The two‑stage rising process ensures the dough is airy and light, yet dense enough to carry the glaze.
Make‑Ahead Potential: You can assemble the buns the night before, refrigerate, and bake fresh in the morning—perfect for busy schedules.
Alright, let's break down exactly what goes into this masterpiece...
Inside the Ingredient List
The Flavor Base
Whole milk and cream are the heart of this recipe, providing moisture that keeps the dough tender and the glaze silky. Whole milk’s fat content adds richness, while cream brings a subtle dairy sweetness that complements the maple glaze. If you skip the milk entirely, the dough will become dense and the glaze will lack its glossy sheen. A good rule of thumb: use the same type of milk you would use in a custard, as that ensures the right balance of fat and protein.
The granulated sugar and light brown sugar together create a complex sweet profile. Granulated sugar dissolves quickly, giving the dough a smooth rise, whereas brown sugar adds molasses notes that deepen the caramel flavor. If you only have white sugar on hand, you can substitute it, but the final product will be less caramelized. For a vegan version, use a plant‑based milk and vegan butter.
The Texture Crew
All‑purpose flour is the backbone of the dough, offering enough gluten to give structure without turning the buns tough. The yeast is the secret to that airy, fluffy interior; it ferments the sugars in the dough, releasing CO₂ that lifts the dough. If you forget to proof the yeast, the buns will be flat and heavy. A quick test: swirl a pinch of yeast with warm milk and a teaspoon of sugar; if it bubbles within 10 minutes, you’re good to go.
Unsalted butter is used twice—once in the dough and once for the glaze. The first batch of butter softens at room temperature and then melts into the dough, giving a buttery flavor that permeates the bun. The second batch of butter is melted and combined with maple syrup to create a glossy glaze that coats each bun like velvet. If you skip the second butter, the glaze will be watery and won’t set properly.
The Unexpected Star
Pecans are the star of the show. Toasting them before adding them to the dough unlocks their natural oils and brings out a deeper, nuttier flavor. Toasting also gives the pecans a subtle crunch that contrasts with the soft dough. If you forget to toast the pecans, the buns will taste raw and the texture will be bland. A quick tip: toast the pecans on a sheet pan at 350°F for 8–10 minutes, stirring halfway through.
Maple syrup is the sweet glue that holds everything together. It’s not just a sweetener; it adds a subtle woody flavor that pairs beautifully with cinnamon and pecan. The syrup also contributes to the glaze’s glossy finish. If you’re allergic to maple, you can use a 1:1 honey substitution, but the flavor profile will shift slightly toward floral.
The Final Flourish
Cinnamon is the aromatic backbone of any cinnamon bun, and using a generous amount ensures every bite bursts with warmth. The 2 tablespoons of ground cinnamon give the dough a deep, spicy aroma that lingers long after the buns are finished. If you’re sensitive to spice, reduce the cinnamon by a quarter but keep the rest of the spices intact. The final pinch of salt balances the sweetness and enhances all the flavors.
The 1/4 teaspoon of salt at the end is a subtle but essential touch. Salt works to bring out the natural sweetness of the maple syrup and the pecans, creating a harmonious flavor profile. If you omit it, the buns may taste flat. For a low‑sodium version, use a pinch of salt instead of the full 1/4 teaspoon.
Everything's prepped? Good. Let's get into the real action...
The Method — Step by Step
- Step 1: Activate the Yeast. In a small bowl, combine 2 teaspoons of active dry yeast, 1/4 cup of warm whole milk (about 110°F), and 1 teaspoon of granulated sugar. Stir gently and let sit for 5–7 minutes until a foamy layer forms on top. This indicates the yeast is alive and ready to work its magic. I’ve seen many people skip this step and end up with flat buns—don’t be one of them.
- Step 2: Mix Dry Ingredients. In a large mixing bowl, whisk together 4 cups of all‑purpose flour, 1 teaspoon of salt, and 2 tablespoons of ground cinnamon. The flour is the foundation; the salt balances sweetness, while cinnamon adds depth. Keep the dry mix in the bowl while you work on the wet mixture. This separation ensures you don’t accidentally over‑mix the dough later.
- Step 3: Combine Wet Ingredients. In a separate bowl, beat 1 large egg and add 1/2 cup of softened unsalted butter. Whisk until the butter is fully incorporated and the mixture is smooth. Then pour in the activated yeast mixture and 1/4 cup of milk. The wet ingredients should feel like a thick, creamy batter. This step is where the dough begins to come together.
- Step 4: Form the Dough. Gradually add the dry mixture to the wet mixture, stirring with a wooden spoon or dough hook until a shaggy dough forms. Once the dough starts to pull away from the sides, transfer it to a lightly floured surface. Knead for about 8–10 minutes until it becomes smooth and elastic. The dough should feel slightly tacky but not sticky. If it’s too dry, add a tablespoon of milk at a time.
- Step 5: First Rise. Place the dough in a greased bowl, cover with a clean towel, and let it rise in a warm spot for 1 hour, or until doubled in size. During this time, the yeast will ferment, producing carbon dioxide that lifts the dough. If your kitchen is drafty, wrap the bowl in a plastic bag to keep it warm. This first rise is crucial for achieving that airy interior.
- Step 6: Prepare the Filling. In a small bowl, combine 1 cup of toasted pecan halves, 1/2 cup of maple syrup, 1 cup of light brown sugar, 1/2 cup of softened unsalted butter, and 1/4 teaspoon of salt. Stir until the butter melts and the mixture is glossy. The pecans should be evenly coated; if they clump, gently separate them. This filling will be the sweet, nutty heart of each bun.
- Step 7: Roll & Slice. After the dough has risen, punch it down and roll it out into a rectangle roughly 12x18 inches. Spread the pecan filling evenly over the dough, leaving a 1/2‑inch border on all sides. Roll the dough tightly from the long side, then slice into 8 equal pieces. The key is to keep the slices uniform so they bake evenly. If you’re feeling adventurous, you can cut the slices into smaller rounds for a bite‑size treat.
- Step 8: Second Rise. Place the sliced buns in a greased baking pan, leaving a little space between each. Cover and let rise again for 30–45 minutes until they puff up noticeably. The second rise gives the buns that final lightness and ensures the glaze can seep in. Don’t skip this step—without it, the buns will be dense.
- Step 9: Bake. Preheat the oven to 375°F (190°C). Bake the buns for 20–25 minutes, or until they’re golden brown and the glaze is set. The aroma will be intoxicating—think cinnamon, maple, and toasted nuts. Keep an eye on the buns; if they brown too fast, tent them with foil to prevent burning.
- Step 10: Glaze. While the buns are still warm, whisk together 1 cup of cream with the remaining 1/2 cup of softened butter and a pinch of salt. Drizzle this over the buns, letting the glaze seep into every crevice. The cream gives the glaze a silky finish, while the butter keeps it glossy. Let the buns cool for a few minutes before serving; the glaze will set into a luscious coating that’s almost too good to eat.
That's it — you did it. But hold on, I've got a few more tricks that'll take this to another level...
Insider Tricks for Flawless Results
The Temperature Rule Nobody Follows
Yeast loves a warm environment, but too hot and it dies. Aim for 110°F (43°C) when activating yeast; you can test the temperature with a kitchen thermometer or your finger. If the mixture is too hot, let it cool for a few minutes before adding the yeast. A steady, warm rise will give you buns that are light and airy.
Why Your Nose Knows Best
Before you bake, sniff the dough. If it smells yeasty and slightly sweet, you’re on the right track. A sour or off smell means the dough may have been over‑fermented or contaminated. Trust your nose—this is a quick and easy way to catch potential problems before they become a disaster.
The 5-Minute Rest That Changes Everything
After the second rise, let the buns rest for 5 minutes before glazing. This short pause allows the structure to set, preventing the glaze from sliding off. It also lets the flavors meld together, giving you that deep, buttery taste that’s impossible to resist.
Use a Baking Paper Sheet
Line your baking pan with parchment paper; this not only prevents sticking but also creates a cleaner surface for the glaze. When you remove the buns, the paper helps maintain their shape and makes cleanup a breeze. I’ve tried baking on metal pans, and the buns ended up with uneven edges.
Keep a Cool Water Bath for the Glaze
If you’re making the glaze ahead of time, keep it in a double‑boiler to maintain a gentle heat. This keeps the butter from separating and ensures the glaze remains smooth. Once the buns are ready, simply drizzle the warm glaze over them for a glossy finish.
Creative Twists and Variations
This recipe is a playground. Here are some of my favorite ways to switch things up:
Chocolate Pecan Explosion
Swap the maple syrup for dark chocolate sauce and add 1/2 cup of chopped dark chocolate to the filling. The chocolate adds a rich depth that pairs beautifully with the nutty crunch. Serve warm with a scoop of vanilla ice cream for an extra indulgent treat.
Spiced Apple Cinnamon
Add 1 cup of diced apples and 1 teaspoon of ground cloves to the dough. The apples provide a sweet tartness that balances the cinnamon, while the cloves add a subtle warmth. This version is perfect for fall mornings.
Almond Joy Bun
Replace pecans with toasted almonds and add shredded coconut to the filling. Drizzle a mixture of coconut milk and honey over the buns for a tropical twist. The coconut gives a chewy texture that contrasts with the soft dough.
Caramelized Banana Bun
Mash 2 ripe bananas into the dough for natural sweetness and moisture. Add a pinch of nutmeg to the filling for a spicy kick. This banana version is a great way to use overripe fruit and create a sweet, comforting breakfast.
Vegan Delight
Use plant‑based milk, vegan butter, and a flax egg (1 tablespoon ground flaxseed mixed with 3 tablespoons water). Replace maple syrup with agave nectar. This version is fully plant‑based yet still delivers that sticky, nutty goodness.
Breakfast on the Go
Roll the dough into small pinwheels, fill with pecan mixture, and bake in a muffin tin. These bite‑size buns are perfect for a quick breakfast or snack. Keep them in an airtight container for up to 3 days.
Storing and Bringing It Back to Life
Fridge Storage
Store the cooled buns in an airtight container or zip‑top bag at room temperature for up to 2 days. If you want to keep them longer, place them in the refrigerator for up to 5 days. The buns will stay moist, but the glaze may slightly harden.
Freezer Friendly
Wrap each bun individually in parchment paper, then place them in a freezer bag. Freeze for up to 3 months. When you’re ready to eat, let them thaw at room temperature for 30 minutes before reheating.
Best Reheating Method
Reheat the buns in a preheated oven at 350°F for 8–10 minutes, or until warmed through. For a crispier exterior, use a toaster oven. Add a tiny splash of water before reheating; this steams the buns back to perfection and keeps the glaze from drying out.