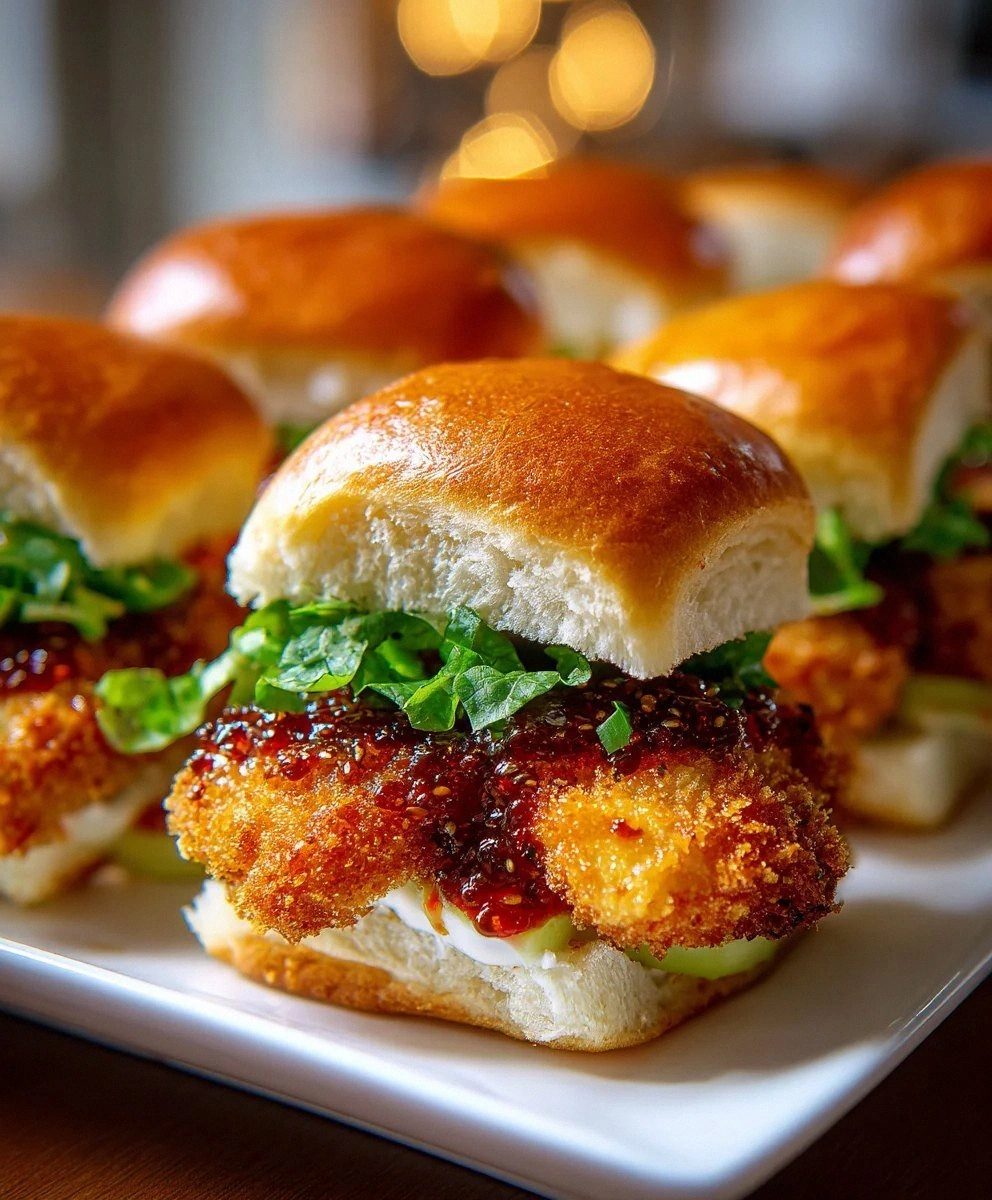
Picture this: it's 11:47 PM on a Tuesday night, and I'm standing in my kitchen wearing mismatched socks and a t-shirt with a questionable stain, staring at a half-eaten bag of stale potato chips. My stomach is staging a full-scale rebellion, demanding something that'll make my taste buds do backflips. In that moment of desperate hunger-fueled clarity, I remembered the first time I tasted those addictive chicken sliders at that sketchy food truck downtown — you know, the one with the questionable health rating but lines wrapping around the block. That sauce, that crunch, that perfect balance of creamy and spicy that made me question everything I thought I knew about bar food. I became obsessed, spending weeks reverse-engineering that Bang Bang magic in my tiny apartment kitchen, much to my neighbor's dismay (sorry about the 3 AM blender sessions, Mrs. Chen).
After seventeen attempts, three minor oil fires, and one incident involving a smoke alarm and a very angry cat, I finally cracked the code. What emerged from my kitchen wasn't just a copycat recipe — it was something better, something that made my friends cancel dinner plans just to come over and hover around my stove like vultures. These Chicken Bang Bang Sliders became my culinary claim to fame, the dish that got me invited to potlucks and the reason my coworkers suddenly became very interested in having lunch with me. The combination of perfectly crispy chicken, that addictive creamy-spicy sauce, and the way it all comes together in a handheld package is nothing short of magical.
But here's the thing — most recipes you'll find online get this completely wrong. They'll have you drowning chicken in a sauce that separates into an oily mess, or they'll skip the crucial step that makes the coating stay crispy instead of turning into a soggy disaster. I've seen recipes that call for baking the chicken (blasphemy!), or worse, using pre-cooked chicken strips. If you've ever been disappointed by a lackluster version of these sliders, you're not alone — and I've got the fix. This isn't just another recipe; this is the result of obsessive testing, countless taste tests, and a few very understanding friends who endured my kitchen experiments.
What makes this version different? We're talking about chicken that's crispy enough to make noise when you bite into it, coated in a sauce that's creamy, tangy, and spicy in perfect harmony. The kind of sliders that'll have you making excuses to "test the recipe one more time" even though you know it's perfect. By the end of this post, you'll understand exactly why certain steps matter, how to avoid the common pitfalls that ruin most attempts, and why your kitchen is about to become the most popular spot in your neighborhood. Let me walk you through every single step — by the end, you'll wonder how you ever made it any other way.
What Makes This Version Stand Out
Taste Explosion: This isn't just spicy mayo on chicken — it's a carefully balanced symphony of sweet, tangy, creamy, and spicy that hits every corner of your palate. The sauce clings to every ridge of the crispy chicken, ensuring that explosive flavor in every single bite. I've had people close their eyes and groan (in a good way) after the first bite, which is always the ultimate compliment.
Texture Heaven: We're achieving something most recipes miss entirely — that perfect contrast between shatteringly crispy chicken and soft, pillowy slider rolls. The panko breadcrumbs create these incredible jagged edges that get super crunchy, while the sauce softens just enough to create this perfect textural dance. It's like the difference between watching TV in standard definition versus 4K — once you experience it, there's no going back.
Weeknight Simple: Despite tasting like something from a trendy gastropub, these come together in under 45 minutes with ingredients you probably already have. No special equipment, no overnight marinades, no complicated techniques that require a culinary degree. If you can operate a frying pan without setting off your smoke alarm, you can make these sliders.
Party MVP: I've served these at game days, birthday parties, and that one awkward work function where nobody knew what to bring. They're always the first thing to disappear, and I inevitably end up giving out the recipe to at least three people. The sliders are perfectly sized for mingling, and they somehow taste even better when you're standing around chatting with friends.
Ingredient Integrity: Every component matters here — from the quality of the chicken to the brand of sweet chili sauce. I've tested this with everything from premium organic chicken to the budget stuff, and let me tell you, the difference is real. This recipe respects your ingredients and your time by making sure every element pulls its weight.
Versatility Champion: Want to make these for two people or twenty? Easy. Need them gluten-free? Got you covered. Want to prep everything ahead for a party? I'll show you exactly how. This recipe adapts to your life instead of demanding you rearrange everything around it.
The Crowd Reaction: I dare you to serve these at your next gathering and watch what happens. Within minutes, people start clustering around the plate, doing that thing where they try to be polite but they're actually calculating how many they can grab before someone else gets them. By the time the plate's empty (which won't take long), you'll have new best friends and possibly a few marriage proposals.
Alright, let's break down exactly what goes into this masterpiece...
Inside the Ingredient List
The Flavor Foundation
The chicken is obviously the star here, but not all chicken is created equal. I'm talking about boneless, skinless chicken breasts or tenders that haven't been injected with that weird salt solution that makes everything taste like a salt lick. Look for chicken that's pale pink and firm to the touch — if it smells like anything other than, well, chicken, walk away. The size matters too; you want pieces that'll fit comfortably on your slider rolls without hanging over the edges like an awkward dinner guest. And please, for the love of all that's crispy, pat your chicken dry before you start the breading process. Moisture is the enemy of crunch, and wet chicken will steam instead of fry, leaving you with sad, soggy sliders.
The Texture Crew
Panko breadcrumbs are non-negotiable here — they're larger, flakier, and infinitely crispier than those sad, sandy regular breadcrumbs your grandma used. When you open the container, they should look like little shards of crispy heaven, not uniform pellets. The egg is your glue, but it needs to be properly beaten until it's a homogenous mixture with no streaks of white or yolk. Think of it as the mediator between your chicken and its crispy coating, creating a bond stronger than most reality TV relationships. The flour might seem like an afterthought, but it's actually crucial — it creates a dry surface for the egg to grab onto, ensuring your breadcrumbs don't slide off like a bad toupee.
The Unexpected Star
Now, let's talk about the oil because this is where most home cooks mess up. You need an oil with a high smoke point that won't turn your kitchen into a scene from a disaster movie. Vegetable oil is my go-to, but canola or peanut oil work beautifully too. The key is maintaining the right temperature — too low and your chicken absorbs oil like a sponge, too high and the outside burns while the inside remains dangerously raw. I use a thermometer because I'm a control freak, but you can test by dropping a breadcrumb in; it should sizzle immediately but not go dark brown within seconds.
The Final Flourish
The slider rolls matter more than you'd think. You want something soft enough to compress when you bite down but sturdy enough to hold up to the sauce without dissolving into mush. Hawaiian rolls are fantastic for their subtle sweetness that plays beautifully with the spicy sauce, but any soft slider roll will work. And don't even think about toasting them — I know it seems counterintuitive, but untoasted rolls absorb just enough sauce to become flavor bombs without getting soggy. The lettuce isn't just there for color; it provides that crucial fresh crunch and creates a barrier between the saucy chicken and the bun. Use something crisp like romaine or iceberg — none of that wimpy spring mix that wilts faster than my motivation on a Monday morning.
Everything's prepped? Good. Let's get into the real action...
The Method — Step by Step
1. First things first — set up your breading station like you're preparing for surgery. You'll need three shallow dishes: flour seasoned with salt and pepper in the first, beaten egg in the second, and panko breadcrumbs in the third. This isn't just about organization; it's about creating an assembly line that prevents your fingers from becoming breaded monstrosities. Place a sheet pan lined with parchment paper at the end for your finished chicken pieces. Trust me, trying to bread chicken without this setup is like trying to text while wearing oven mitts — technically possible but unnecessarily frustrating.
2. Now comes the fun part — transforming plain chicken into crispy gold. Take your dried chicken pieces and season them generously with salt and pepper on both sides. Don't be shy here; this is your only chance to season the chicken itself before it gets coated. Dredge each piece in flour, shaking off the excess like you're trying to remove glitter from your clothes. Dip it in the egg, making sure it's completely coated, then press it into the panko breadcrumbs. Really press it in there — you want those breadcrumbs to adhere like they're trying to save themselves from falling off a cliff.
3. Heat about half an inch of oil in a heavy-bottomed skillet over medium-high heat. This is where patience pays off — wait until the oil shimmers and a breadcrumb dropped in sizzles enthusiastically. If it sinks to the bottom like a disappointed teenager, your oil isn't hot enough. If it browns immediately like it's been tanning for too long, it's too hot. The right temperature is around 350°F, but since most of us don't have deep-fry thermometers, use the breadcrumb test. That sizzle when the chicken hits the pan? Absolute perfection.
4. Carefully place your breaded chicken pieces in the hot oil without crowding the pan. This isn't a party — give each piece space to crisp up properly. Cook for about 3-4 minutes per side, until golden brown and crispy. Don't poke, prod, or flip constantly; let the chicken develop its crust in peace. You'll know it's ready to flip when the edges start turning golden and the chicken releases easily from the pan. If it's sticking like a stubborn sticker, it's not ready yet. Be patient, grasshopper.
5. While your chicken is achieving crispy perfection, whisk together your Bang Bang sauce in a bowl. Combine mayonnaise, sweet chili sauce, sriracha, and rice vinegar. Start conservative with the sriracha — you can always add more, but you can't take it away once it's in there. The sauce should be creamy, slightly sweet, with a gentle heat that builds rather than punches you in the face. Taste and adjust — this is your signature, so make it yours. Some days I want more heat, others I want it milder. The rice vinegar is crucial — it cuts through the richness and brightens everything up.
6. Once your chicken is cooked through and crispy as autumn leaves, transfer it to a wire rack set over a baking sheet. This isn't just for looks — letting the chicken drain properly keeps it crispy instead of turning it into a greasy mess. Resist the urge to place it on paper towels; they create steam that'll undo all your hard work. Let the chicken rest for about 5 minutes — this allows the juices to redistribute and prevents molten chicken lava from burning your mouth. Plus, slightly cooled chicken holds onto sauce better than piping hot pieces that make everything slide right off.
7. Time for assembly — the moment where everything comes together in beautiful harmony. Split your slider rolls (don't you dare toast them), and add a bed of lettuce to the bottom half. This isn't just for nutrition; it creates a barrier that prevents the bun from getting soggy while adding that crucial fresh crunch. Place your crispy chicken on top, then drizzle with the Bang Bang sauce. Don't drown it — you want to complement the chicken, not create a sauce soup. Add pickles if you're using them, then cap with the top bun. Press down gently — that soft squish is the sound of success.
8. Here's where I become brutally honest with you — I dare you to taste one of these sliders and not immediately go back for seconds. The combination of crispy, juicy chicken with that addictive sauce is downright dangerous. I've watched grown adults hover around the serving platter like sharks, calculating the optimal time to grab another without looking greedy. They're best served immediately while the chicken is still crispy and warm, but here's a confession: I ate half the batch before anyone else even got to try them. I couldn't help myself. They're that good.
That's it — you did it. But hold on, I've got a few more tricks that'll take this to another level...
Insider Tricks for Flawless Results
The Temperature Rule Nobody Follows
Most people think room temperature chicken is just for fancy restaurants, but here's why it matters: cold chicken hitting hot oil drops the temperature dramatically, leading to greasy, undercooked results. Let your chicken sit out for 15-20 minutes before cooking. I know, I know — the food safety police are already writing angry comments. But as long as you're not leaving it out for hours, you're fine. This small step ensures your chicken cooks evenly and achieves that perfect golden color instead of being burnt outside and raw inside. A friend tried skipping this step once — let's just say it didn't end well, and we still refer to that dinner as "The Great Chicken Disaster of 2019."
Why Your Nose Knows Best
That moment when the oil starts to smell like, well, oil instead of raw cooking oil? That's your cue that it's ready. Oil undergoes subtle chemical changes as it heats, and your nose can detect these better than any thermometer. When it starts to smell slightly nutty and you can feel gentle heat when you wave your hand over the pan, you're in the sweet spot. This is the kind of kitchen wisdom that can't be taught in cooking schools but gets passed down from people who've fried enough chicken to know. Trust your senses — they've been keeping humans alive for thousands of years, and they're pretty good at telling you when hot oil is ready for action.
The 5-Minute Rest That Changes Everything
After your chicken is cooked, resist every fiber of your being screaming "EAT NOW!" and let it rest for exactly five minutes. This isn't some arbitrary torture — it's science in action. The juices redistribute throughout the meat, the coating sets and becomes even crispier, and the temperature drops to that perfect "won't burn your mouth but still hot" zone. During this eternal wait, you can prep your buns, make your sauce, or just stand there drooling like I do. Those five minutes feel longer than waiting for your crush to text back, but they're absolutely worth it. The difference between rested and unrested chicken is like the difference between a good hair day and a great hair day — subtle but transformative.
The Double-Dredge Secret
Remember how I mentioned pressing the breadcrumbs into the chicken? Take it further with a double-dredge. After your first coat of flour-egg-breadcrumbs, let the chicken rest for 5 minutes, then go back through the egg and breadcrumbs again. This creates these incredible crispy layers that'll make you wonder why you ever settled for single-coat chicken. The second coating adheres to the first, creating these nooks and crannies that get super crunchy and hold onto sauce like they're storing treasure. It's like the difference between a regular photo and an HDR photo — more depth, more detail, more everything.
The Sauce Timing Sweet Spot
Add your sauce to the chicken when it's warm but not hot — we're talking about 5 minutes after it comes out of the oil. Too hot and the sauce melts and slides off like a bad toupee. Too cold and it doesn't meld with the chicken properly, sitting on top like an awkward hat. Warm chicken absorbs just enough sauce to become flavor-infused while maintaining its crispy integrity. This is the kind of detail that separates good cooks from great ones — understanding that timing isn't just about when to flip or when to remove from heat, but when to combine elements for maximum impact.
Creative Twists and Variations
This recipe is a playground. Here are some of my favorite ways to switch things up:
The Heat Seeker's Dream
For those who think sriracha is for beginners, swap out the sweet chili sauce for gochujang and add a teaspoon of cayenne to your flour mixture. The gochujang brings this incredible fermented depth that makes the sauce taste like it's been aging in a Korean grandmother's pantry for years. Top with kimchi instead of pickles for a slider that'll clear your sinuses and warm your soul. Fair warning — I made these for my spice-loving friends and they actually started sweating, which in their world is the highest compliment possible.
The Tropical Vacation
Add a tablespoon of mango puree to your sauce and top with fresh cilantro and thinly sliced jalapeños. The sweetness of mango plays beautifully with the spicy elements, creating this vacation-in-your-mouth experience. Use King's Hawaiian rolls for extra sweetness, and if you're feeling fancy, add a slice of grilled pineapple. These taste like summer regardless of the weather outside, and they've become my go-to for combating seasonal depression during those bleak winter months.
The Low-Carb Life
Skip the buns and serve these babies over a bed of crisp lettuce with the sauce as a dip. You can also use almond flour and crushed pork rinds instead of panko for a keto-friendly version that actually tastes good, not like diet food. I've served these to my carb-counting friends, and they couldn't believe they were eating "diet food." The key is not advertising it as a healthy alternative — just serve it and watch them devour it before mentioning the nutritional swaps.
The Breakfast Champion
Mini breakfast sliders! Use smaller pieces of chicken and serve on mini croissants with a fried egg on top. Add a slice of cheese and a hash brown patty for the ultimate hangover cure. I invented these after a particularly memorable New Year's Eve, and they've since become legendary among my friend group. Something about that combination of crispy chicken, creamy sauce, and runny egg yolk is pure magic at 8 AM on a Sunday.
The Vegetarian Victory
Use thick slabs of cauliflower that have been steamed until just tender, then bread and fry them the same way. The cauliflower develops this incredible meaty texture that satisfies even the most devoted carnivores. I've converted several "I need meat" friends with these, and they couldn't believe they weren't eating chicken. The sauce works just as beautifully on vegetables, proving that sometimes the star of the show isn't the protein but the preparation.
The Fancy Pants Version
Add a tablespoon of truffle oil to your sauce and serve on brioche slider buns with arugula and shaved parmesan. Suddenly these humble sliders become cocktail party material. I've served these at actual dinner parties where people were drinking wine and discussing politics, and they fit right in. Sometimes you want trashy bar food, sometimes you want elevated comfort food — this variation scratches the fancy itch while maintaining the soul of the original.
Storing and Bringing It Back to Life
Fridge Storage
Store leftover chicken in an airtight container in the refrigerator for up to 3 days, but keep the sauce separate or you'll end up with soggy sadness. The chicken will lose some crispiness, but we can fix that. Place it on a wire rack in a 400°F oven for 8-10 minutes until heated through and crispy again. Add the sauce after reheating, not before — trust me on this one. I've made the mistake of reheating sauced chicken, and it was like eating wet cardboard with spicy mayo.
Freezer Friendly
You can freeze the cooked, unsauced chicken for up to 2 months. Freeze pieces on a baking sheet first, then transfer to a freezer bag — this prevents them from becoming one giant chicken ice block. When you're ready to eat, bake from frozen at 425°F for 20-25 minutes until hot and crispy. It's like having a stash of homemade chicken tenders that are actually good, not those sad frozen things that taste like disappointment and freezer burn.
Best Reheating Method
The air fryer is your best friend here — 375°F for 4-5 minutes brings back that crispy magic better than any other method. Second best is the oven method mentioned above. The microwave is a last resort and should only be used in emergencies, like when you're late for work and need protein fast. Even then, microwave for just 30 seconds, then finish in a hot skillet for a minute per side to restore some crisp. Add a tiny splash of water before reheating in the oven — it creates steam that prevents drying while the hot air restores crispiness.