Picture this: a frantic Saturday night, the oven humming, a half‑finished batch of store‑bought chocolate‑coated nuts sitting smugly on the counter, and a sudden, irrational craving for something that feels like a hug from the inside out. I was mid‑argument with my roommate about whether caramel or chocolate deserved the crown when I realized I could combine them into a single, unstoppable bite‑size marvel. The kitchen was a battlefield of spilled sugar, a rogue peanut that rolled under the fridge, and the unmistakable scent of burnt butter that made my eyes water—yet the moment I tasted the first cluster, I knew I had stumbled onto a holiday secret weapon. This isn’t just another candy; it’s a symphony of salty crunch, buttery caramel, and glossy chocolate that sings louder than any Christmas carol you’ll hear on the radio.
When I first tried to recreate the classic carnival‑style chocolate‑covered peanuts, everything went sideways: the caramel hardened too fast, the chocolate seized, and the peanuts ended up soggy like a wet sock. I dared myself to keep tweaking until the texture hit that perfect snap‑and‑chew balance, and after a dozen failed attempts, the recipe finally clicked. The breakthrough? Adding a splash of heavy cream at just the right moment, then letting the mixture cool to a glossy, pliable sheen before coating it in dark chocolate that’s tempered to a glossy finish. That glossy coating is the difference between “meh” and “wow” – it catches the light, the eye, and the imagination, turning a simple snack into a centerpiece for any festive spread.
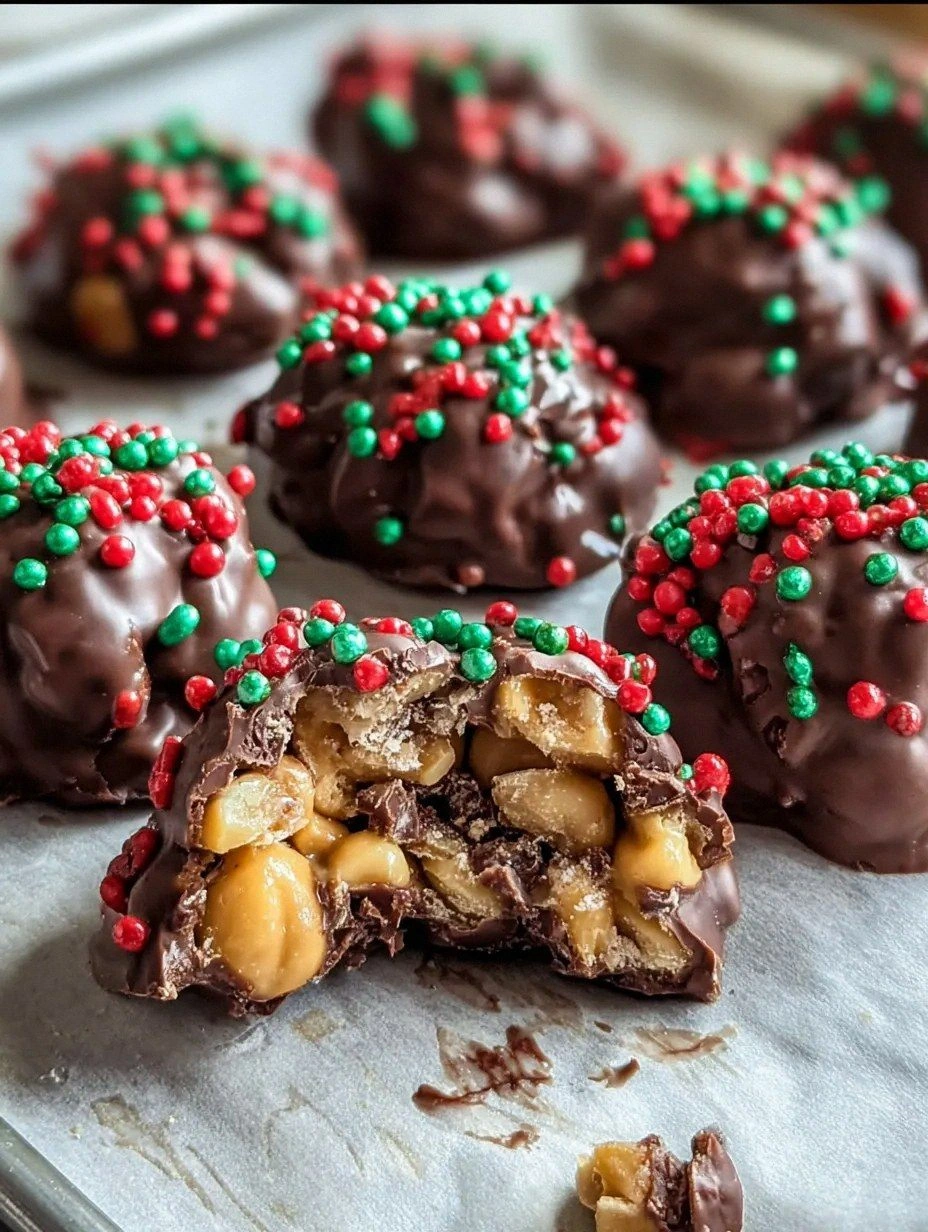
What really sets this version apart is the intentional layering of flavors. I start with roasted peanuts that are lightly salted, then swirl them into a caramel that’s butter‑rich and infused with a whisper of vanilla. Once the caramel sets, I enrobe each cluster in a dark chocolate that’s been tempered just enough to give you that satisfying snap when you bite into it, followed by a final sprinkle of flaky sea salt that crackles like tiny fireworks on your tongue. The result? A bite that starts with a crunchy peanut, melts into buttery caramel, and finishes with a silky chocolate kiss that lingers just long enough to make you sigh in contentment.
And here’s the kicker: this recipe is built for scalability and simplicity. You don’t need a professional kitchen, just a sturdy baking sheet, a couple of saucepans, and a willingness to get a little messy. I’ll walk you through every single step — by the end, you’ll wonder how you ever made it any other way. Ready to become the holiday hero of your own kitchen? Let’s dive in.
What Makes This Version Stand Out
- Flavor Fusion: The caramel‑butter base mingles with dark chocolate, creating a harmonious contrast that dances on the palate.
- Texture Triumph: Each cluster offers a triple‑layered crunch‑soft‑smooth experience, from the roasted peanut to the gooey caramel to the snap of chocolate.
- Simplicity: All steps use common kitchen tools; no fancy equipment or hard‑to‑find ingredients required.
- Ingredient Quality: Using high‑cocoa dark chocolate and freshly roasted peanuts elevates the entire profile.
- Crowd Reaction: These clusters disappear faster than holiday cookies, and guests keep asking for the “secret” ingredient.
- Make‑Ahead Magic: They store beautifully, staying fresh for weeks, making them perfect for gifting or stocking the pantry.
- Visual Appeal: The glossy chocolate coat and glimmering sea‑salt specks make them look as good as they taste.
- Seasonal Versatility: While they shine at holidays, they’re delightful any time you crave a decadent treat.
Inside the Ingredient List
The Flavor Base
Butter (½ cup, unsalted) is the silent hero that gives the caramel its silkiness; it melts into a golden pool that carries the sugar into a deep, caramelized hue. If you substitute margarine, you’ll lose that buttery depth and end up with a flatter flavor profile. Choose European‑style butter for a higher butterfat content, which translates into a richer mouthfeel that clings lovingly to each peanut.
The Texture Crew
Roasted peanuts (1 cup, lightly salted) provide the essential crunch and a salty counterpoint to the sweet caramel. Skipping the roasting step results in a soggy, bland bite that never achieves that satisfying snap. For extra crunch, opt for honey‑roasted peanuts, but remember to reduce the added sugar in the caramel to keep balance.
The Unexpected Star
Heavy cream (½ cup) is added at the end of the caramel stage, turning a simple sugar‑butter mixture into a glossy, pour‑able sauce that coats each nut like velvet. Without the cream, the caramel would set too hard, making it difficult to coat evenly. If you’re dairy‑free, substitute with coconut cream, but expect a subtle coconut undertone that can actually complement the chocolate.
The Final Flourish
Dark chocolate (12 oz, 70% cocoa) is tempered just enough to achieve a glossy finish and a firm snap; this is the crown jewel that locks in the caramel and adds a bittersweet finish. Using milk chocolate will make the clusters too sweet and cause the coating to melt quickly at room temperature. A pinch of flaky sea salt (½ tsp) sprinkled after the chocolate sets adds a pop of flavor that makes the palate dance.
Everything's prepped? Good. Let's get into the real action...
The Method — Step by Step
Start by preheating your oven to 350°F (175°C). Spread the peanuts on a baking sheet and roast for 8‑10 minutes, stirring halfway, until they’re golden and emit a nutty aroma that makes your stomach rumble. Once roasted, set them aside to cool; this step is crucial because warm peanuts will melt the caramel prematurely, ruining the texture.
Kitchen Hack: Toss the peanuts with a pinch of sea salt before roasting – the salt draws out moisture, giving a deeper crunch.In a medium saucepan, melt the butter over medium heat until it foams, then add the brown sugar and stir until it dissolves, creating a thick, amber‑colored syrup. At this point, you’ll hear a gentle sizzle that signals the sugar is caramelizing; let it cook for about 2 minutes without stirring, just to develop that deep caramel flavor.
Slowly drizzle the heavy cream into the caramel while whisking continuously. The mixture will bubble up dramatically – that’s the “magic” moment where the caramel becomes silky. Keep whisking for another 2‑3 minutes until the sauce thickens enough to coat the back of a spoon.
Watch Out: If the cream is added too quickly, the caramel can seize and become grainy. Pour in a thin stream and keep the heat moderate.Now fold the roasted peanuts into the caramel, ensuring each nut is fully cloaked in the buttery sauce. Let the mixture sit for 5 minutes; this allows the caramel to thicken just enough to hold together when you form the clusters.
While the caramel‑peanut mixture rests, melt the dark chocolate in a heat‑proof bowl over a pot of simmering water (bain‑marie) or in short bursts in the microwave, stirring every 20 seconds. You’re aiming for a smooth, glossy liquid that’s just warm enough to coat but not so hot that it burns the caramel.
Kitchen Hack: Add a teaspoon of coconut oil to the chocolate to improve flow and give a shinier finish.Using a small cookie scoop or two spoons, drop generous mounds of the caramel‑peanut mixture onto a parchment‑lined tray, spacing them about an inch apart. This is the moment of truth: the clusters should be about the size of a walnut, but feel free to make them larger if you’re feeling generous.
Immediately drizzle or dip each mound into the melted chocolate, ensuring a complete coating. The chocolate should harden within a minute, forming a glossy shell that seals in the caramel. While the chocolate is still wet, sprinkle a pinch of flaky sea salt over each cluster – the salt will stick to the chocolate and create those delightful little crystals.
Transfer the tray to the refrigerator for at least 15 minutes, or until the chocolate is fully set. When you pull the clusters out, you’ll notice the chocolate has a firm snap, and the caramel inside remains soft and gooey – that contrast is what makes these treats unforgettable.
Finally, use a silicone spatula to lift the clusters from the parchment and arrange them on a serving platter. They look like tiny, glossy jewels, and the aroma that fills the kitchen at this point could convince even the Grinch to join your holiday party.
That's it — you did it. But hold on, I've got a few more tricks that'll take this to another level...
Insider Tricks for Flawless Results
The Temperature Rule Nobody Follows
Always keep your caramel temperature between 240‑250°F (115‑120°C). If you overshoot, the caramel will harden too quickly, making it impossible to coat the peanuts evenly. I once let the sugar climb to 280°F, and the result was a brittle, candy‑like shell that shattered before it even hit the chocolate. Use an instant‑read thermometer and trust the numbers, not just the color.
Why Your Nose Knows Best
The moment you hear that caramel start to “sing” – a low, steady bubbling sound – it’s an indicator that the sugar has reached the perfect stage. If the scent turns smoky, you’ve passed the sweet spot and are heading toward burnt bitterness. Trust your nose; it’s the most reliable sensor in the kitchen.
The 5‑Minute Rest That Changes Everything
After folding the peanuts into the caramel, let the mixture rest for exactly five minutes. This short pause allows the caramel to thicken just enough to hold its shape, preventing the clusters from spreading too thin when you drop them onto the sheet. Skipping this rest leads to sloppy, uneven clusters that lose that satisfying bite.
Chocolate Tempering Shortcut
If you don’t have a tempering machine, use the “seed” method: melt two‑thirds of the chocolate, then stir in the remaining third chopped pieces until the temperature drops to about 88°F (31°C). This creates stable crystals, giving you that glossy snap without the need for fancy equipment.
Salt Sprinkling Precision
Use flaky sea salt rather than fine table salt. The flakes sit on the surface, providing bursts of salty crunch that contrast the sweet chocolate. A light dusting is enough; over‑salting can overwhelm the delicate caramel flavor.
Creative Twists and Variations
This recipe is a playground. Here are some of my favorite ways to switch things up:
Spicy Heat
Add a pinch of cayenne pepper to the caramel for a subtle heat that awakens the palate. The spice pairs surprisingly well with dark chocolate, creating a sophisticated sweet‑heat combo that’s perfect for adult gatherings.
Nut‑Free Delight
Swap peanuts for roasted pumpkin seeds or toasted sunflower seeds. The smaller seeds create a lighter texture, and the caramel‑to‑chocolate ratio remains the same, delivering the same indulgent experience for those with nut allergies.
White Chocolate Elegance
Replace the dark chocolate with high‑quality white chocolate and sprinkle toasted coconut flakes on top. The resulting clusters have a creamy, tropical vibe that feels like a beach‑side treat during the winter months.
Espresso Infusion
Stir a teaspoon of finely ground espresso into the caramel before adding the cream. The coffee notes deepen the chocolate’s bitterness, producing a mocha‑like flavor that’s perfect for coffee lovers.
Holiday Spice Mix
Incorporate a pinch of ground cinnamon, nutmeg, and cloves into the caramel. The spices turn the clusters into a festive, warm‑spiced treat that pairs beautifully with mulled wine or hot cocoa.
Double‑Coat Crunch
After the first chocolate coating sets, dip the clusters a second time for an extra thick shell. Then roll them in crushed pretzel pieces for a salty‑sweet crunch that adds another dimension of texture.
Storing and Bringing It Back to Life
Fridge Storage
Place the clusters in an airtight container lined with parchment paper, separating layers with additional parchment sheets. They’ll stay fresh for up to two weeks in the refrigerator, maintaining their snap and chew.
Freezer Friendly
For longer storage, freeze the clusters in a single layer on a tray, then transfer them to a zip‑top bag. They’ll keep for three months. When you’re ready to serve, let them thaw at room temperature for 20 minutes.
Best Reheating Method
To revive the chocolate’s gloss, place the clusters on a microwave‑safe plate, add a tiny splash (about a teaspoon) of water to the plate, and microwave on low for 10‑15 seconds. The steam generated gently re‑melts the chocolate, restoring its shine without melting the caramel.