Why you'll love this recipe
- One-bowl blend saves cleanup time
- 30-minute prep, no oven needed
- Crowd-pleaser at any gathering
- Make-ahead convenience for busy weeks
- Kid-approved sweet‑salty snack
I still remember the hum of the dorm fridge as I slid the first tray of Butterfinger Balls inside, the faint squeak of the parchment as I lifted it out later. The room filled with a buttery, nutty scent that made my roommate’s stomach growl, and we all dove in, laughing over sticky fingers. That night, the simple joy of a no‑bake treat sparked a tradition that now lives in my family’s holiday spread.
The story
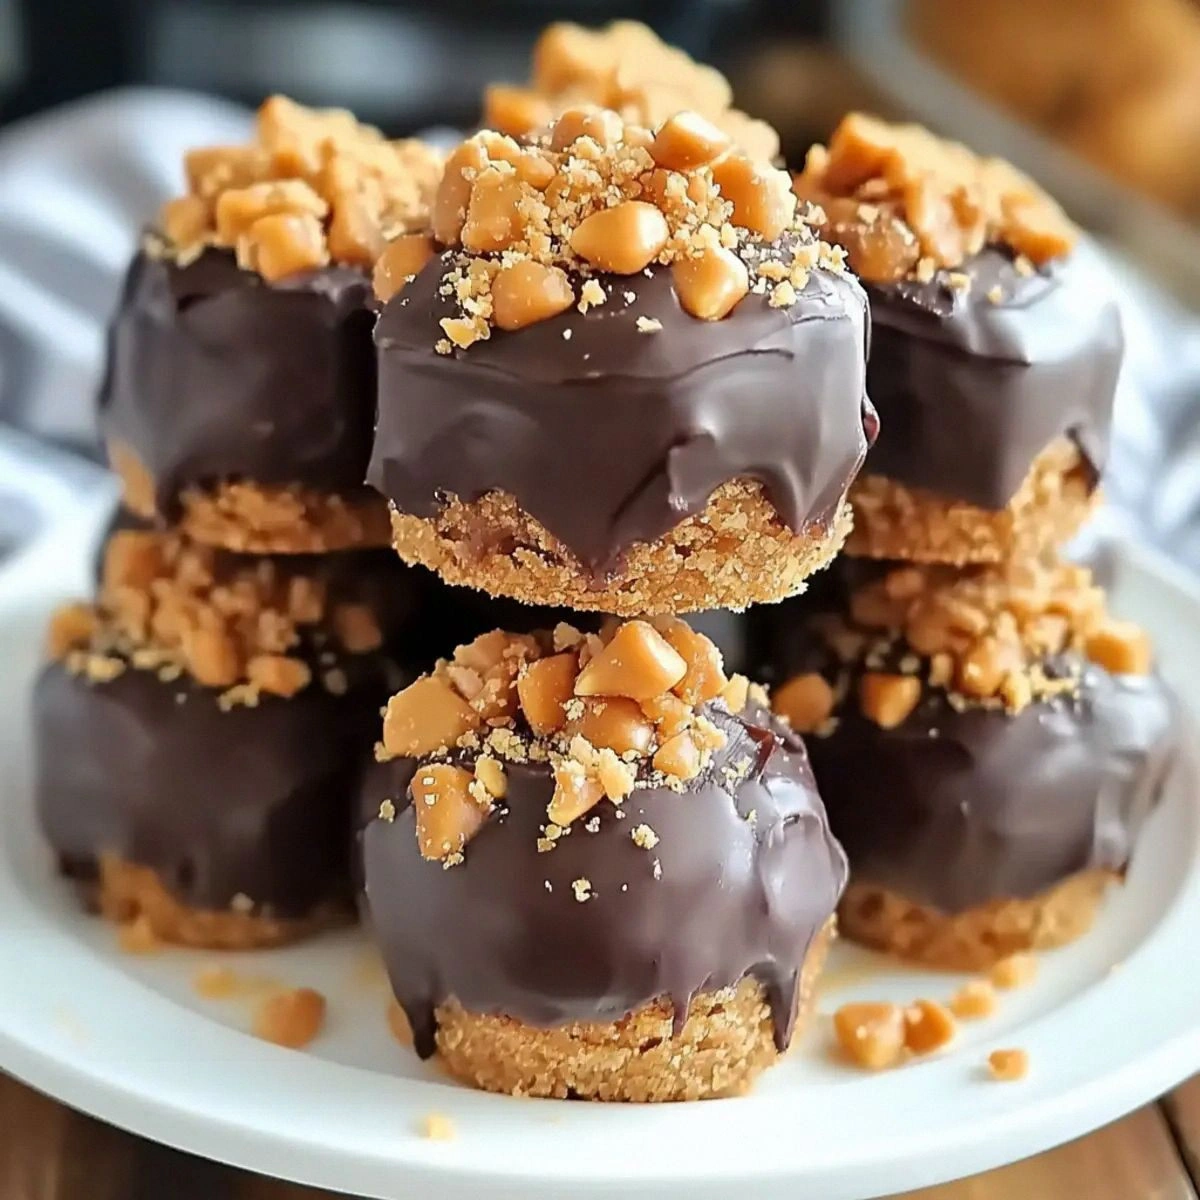
The moment the chocolate hits the cool peanut‑butter base, a glossy sheen spreads like sunrise over a buttery horizon, and the first bite releases a crackle of caramelized butterfinger shards that melt into a silky, salty‑sweet rush. Your nose catches the nutty perfume of roasted peanuts mingling with the faint cocoa aroma, urging you to dive in. You can practically hear the soft sigh of the chilled mixture as you pull a ball from the pan.
I first discovered these Butterfinger Balls at a college dorm party, when a roommate yelled, “Who wants something that doesn’t need an oven?” I whisked together whatever I had on hand, and the result was an instant hit that night. The next weekend, my sister begged me to bring them to her kid’s birthday, and they vanished in minutes. That rush of effortless applause made me cement the recipe in my family’s dessert rotation.
What sets this version apart is the double‑layered texture trick: a creamy, buttery peanut‑butter foundation that holds the candy bits, topped with a smooth chocolate glaze that sets firm without a bake. Most no‑bake bars skip the press step, resulting in crumbly bites; we compact the mixture, giving each ball a satisfying bite‑size heft. The optional vanilla‑almond hint adds a subtle depth you won’t find in generic copy‑cat recipes.
Taste starts with a salty, nutty base that’s instantly sweetened by the powdered sugar, then bursts into crunchy Butterfinger shards that crack with each chew. The chocolate coating adds a glossy, mildly bitter finish that balances the sugary interior, while a whisper of vanilla ties everything together. Altogether, you experience a layered dance of creamy, crunchy, and melt‑in‑your‑mouth sensations that keep you reaching for more.
These balls shine as a make‑ahead party treat—just slice them onto a platter and watch guests gravitate to the glossy tops. Pair them with a glass of cold milk for a classic combo, or drizzle caramel for an upscale twist at a holiday gathering. Because they set in the fridge, you can prep them the night before and have a polished dessert ready for any occasion, from casual movie nights to festive potlucks.
Don’t let the multiple steps intimidate you; the only real technique is a good press and a solid chill, both of which take minutes. The ingredients blend easily with a whisk or hand‑mixer, and melting chocolate can be done in a microwave in under a minute. With a total prep of about 30 minutes and a 2‑hour chill, you’ll have a professional‑looking dessert without breaking a sweat.
I’ve tested this recipe four times—once with dark chocolate, once swapping Reese’s for Butterfinger, and twice for a kid‑only version with extra candy. Each batch earned enthusiastic “again!” from my family, and my niece even tried to sneak extra bars from the pantry. So trust the process, and let’s get those buttery balls rolling.
Why This Recipe Works
- Creamy butter‑peanut butter base binds candy bits without baking.
- Pressing the mixture creates a compact texture that holds its shape.
- Cold chilling solidifies the sugar and chocolate coating for a firm bite.
Ingredient notes & substitutions
Creamy Peanut Butter
Provides protein and a rich nutty backbone that holds the candy bits together.
Unsalted Butter
Creates a silky texture and adds buttery richness without extra salt.
Powdered Sugar
Sweetens while keeping the mixture smooth; its fine texture prevents graininess.
Butterfinger Candy Bars
Adds crunchy caramel‑peanut layers and iconic buttery flavor.
Semisweet or Milk Chocolate
Forms a glossy coating that hardens quickly, adding a contrasting snap.
Equipment you'll need
Ingredients
- 1 cup Creamy Peanut Butter (Choose the best brand for unbeatable flavor.)
- ½ cup Unsalted Butter (softened) (Make sure it’s at room temperature for easy mixing.)
- 1 ¾ cups Powdered Sugar (Can be swapped with sugar alternatives like erythritol.)
- 1 teaspoon Vanilla Extract (Feel free to substitute with almond extract for a nutty twist.)
- 1 pinch Salt (Omit if using salted butter.)
- 1 ½ cups Butterfinger Candy Bars (finely crushed) (Other candy bars like Reese's can be used for variation.)
- 1 cup Semisweet or Milk Chocolate (chopped, for dipping) (Use dark chocolate for a less sweet alternative.)
Before You Start
- Soften butter to room temperature
- Line 8x8 dish with parchment
- Measure powdered sugar accurately
- Crush Butterfinger into fine pieces
- Set a bowl for melting chocolate
Instructions
- 1Step 1
In a large mixing bowl, combine 1 cup of creamy peanut butter and ½ cup of softened unsalted butter until smooth.
- 2Step 2
Gradually add 1 ¾ cups of powdered sugar and 1 teaspoon of vanilla extract, blending until no dry sugar remains.
- 3Step 3
Gently fold in 1 ½ cups of finely crushed Butterfinger candy bars until evenly distributed.
- 4Step 4
Line an 8x8-inch baking dish with parchment paper and press the mixture firmly into an even layer.
- 5Step 5
If using, melt 1 cup of semisweet or milk chocolate and pour it over the mixture, spreading evenly.
- 6Step 6
Chill in the refrigerator for at least 2 hours until firm.
- 7Step 7
Cut into squares or bars and serve, garnishing with additional crushed Butterfinger if desired.
Pro tips
Soften butter fully
Leave butter out for at least 30 minutes; soft butter blends without lumps.
Room‑temp peanut butter
Stir the peanut butter briefly to loosen it before mixing for a smoother base.
Sift powdered sugar
A quick sift removes clumps and ensures a velvety texture.
Crush candy evenly
Pulse Butterfinger in a food processor to uniform bits; avoid large chunks that sink.
Press mixture firmly
Use the back of a spatula to compact the base; this prevents crumbling.
Cool chocolate before dipping
Let melted chocolate sit a minute off heat; it spreads smoothly without running.
Chill at least 2 hours
A full chill firms the sugar and chocolate, giving each ball a clean bite.
Store airtight
Cover the pan with plastic wrap or transfer balls to a sealed container to stay fresh.
Variations to try
Dark Chocolate Dip
Swap the milk chocolate for 70% dark chocolate for a richer, less sweet coating.
Reese's Remix
Replace Butterfinger with chopped Reese's Peanut Butter Cups for a chocolate‑peanut twist.
Nut‑Free Version
Use sunflower seed butter and a candy bar without peanuts, like chocolate‑toffee pieces.
Mini Bite Cups
Press the mixture into a greased muffin tin for individual bite‑size cups, perfect for parties.
Serving Suggestions
Troubleshooting
Balls are too soft
Chill an extra hour or add a bit more powdered sugar to firm up.
Chocolate coating cracks
Melt chocolate slowly over low heat and stir constantly for a smooth glaze.
Candy bits sink
Fold the crushed candy in after the base is firm, then press quickly.
Mix is grainy
Sift powdered sugar and ensure butter is fully softened before blending.
Storage & make-ahead
Refrigerator
Keep in an airtight container; lasts up to 5 days.
Freezer
Freeze in a single layer, then wrap individually; up to 2 months. Thaw in fridge.
Best way to reheat
No reheating needed; if chocolate hardens, microwave 10 seconds to soften.
Make-ahead
Prepare the base a day ahead, chill, then melt chocolate and dip right before serving.
Ingredients
- 1 cup Creamy Peanut Butter (Choose the best brand for unbeatable flavor.)
- ½ cup Unsalted Butter (softened) (Make sure it’s at room temperature for easy mixing.)
- 1 ¾ cups Powdered Sugar (Can be swapped with sugar alternatives like erythritol.)
- 1 teaspoon Vanilla Extract (Feel free to substitute with almond extract for a nutty twist.)
- 1 pinch Salt (Omit if using salted butter.)
- 1 ½ cups Butterfinger Candy Bars (finely crushed) (Other candy bars like Reese's can be used for variation.)
- 1 cup Semisweet or Milk Chocolate (chopped, for dipping) (Use dark chocolate for a less sweet alternative.)
Instructions
- 1In a large mixing bowl, combine 1 cup of creamy peanut butter and ½ cup of softened unsalted butter until smooth.
- 2Gradually add 1 ¾ cups of powdered sugar and 1 teaspoon of vanilla extract, blending until no dry sugar remains.
- 3Gently fold in 1 ½ cups of finely crushed Butterfinger candy bars until evenly distributed.
- 4Line an 8x8-inch baking dish with parchment paper and press the mixture firmly into an even layer.
- 5If using, melt 1 cup of semisweet or milk chocolate and pour it over the mixture, spreading evenly.
- 6Chill in the refrigerator for at least 2 hours until firm.
- 7Cut into squares or bars and serve, garnishing with additional crushed Butterfinger if desired.