I was standing in my kitchen on a rainy October evening, the kind of night where the wind howls like a pack of wolves and the only thing keeping me sane is the promise of something sweet and sticky. I had just burned a batch of pumpkin muffins—yes, the dreaded “blackened pumpkin” disaster that left my smoke alarm screaming like a banshee. In a moment of sheer desperation (and a dare from my niece that I could not refuse), I grabbed the nearest box of Rice Krispies, a tub of mini marshmallows, and a splash of orange food coloring. The result? A batch of Halloween Rice Krispie Treats that turned my kitchen into a haunted candy factory, and trust me, the scent of butter melting into marshmallows is the kind of aroma that makes even the grumpiest goblin grin.
Picture this: the golden glow of the oven light casting shadows on orange‑tinged treats, the sound of the butter sizzling like a tiny campfire, and the sweet, caramel‑like perfume of toasted cereal filling the air. My kids were perched on the counter, eyes wide as saucers, waiting for the moment when I would drizzle black icing over the treats like a midnight sky dotted with stars. When the first bite hit my tongue, it was a perfect collision of crunchy, chewy, and spooky—all at once. The orange hue was vivid enough to make any Halloween table pop, while the black icing turned each piece into a mini work of art that even the pickiest of eaters couldn't resist.
Most Rice Krispie treat recipes are bland, forgettable, and, frankly, a little boring. They often miss the mark on flavor depth, texture contrast, and that magical “wow” factor that makes kids beg for seconds. This version, however, is a game‑changer. By incorporating a splash of orange food coloring and a generous swirl of black decorating icing, we’re not just making a snack; we’re crafting an experience. I dare you to taste this and not go back for seconds—because once you’ve felt that buttery crunch paired with the gooey marshmallow core, you’ll understand why this is hands down the best version you'll ever make at home.
But wait, there’s a secret ingredient that most recipes overlook: a pinch of orange food coloring mixed directly into the marshmallow‑butter blend before it meets the cereal. This tiny trick gives the treats an even, vibrant hue without staining your fingers, and it also adds a subtle citrus note that lifts the overall sweetness. Okay, ready for the game‑changer? Let me walk you through every single step — by the end, you’ll wonder how you ever made it any other way.
What Makes This Version Stand Out
- Flavor Explosion: The combination of buttery marshmallows and a hint of orange creates a sweet‑citrus profile that dances on the palate, making each bite unforgettable.
- Texture Symphony: Crunchy Rice Krispies meet gooey marshmallows, delivering a satisfying snap followed by a melt‑in‑your‑mouth finish.
- Simplicity Redefined: Fewer than ten ingredients, no fancy equipment, and a single pot—perfect for busy parents and eager kids.
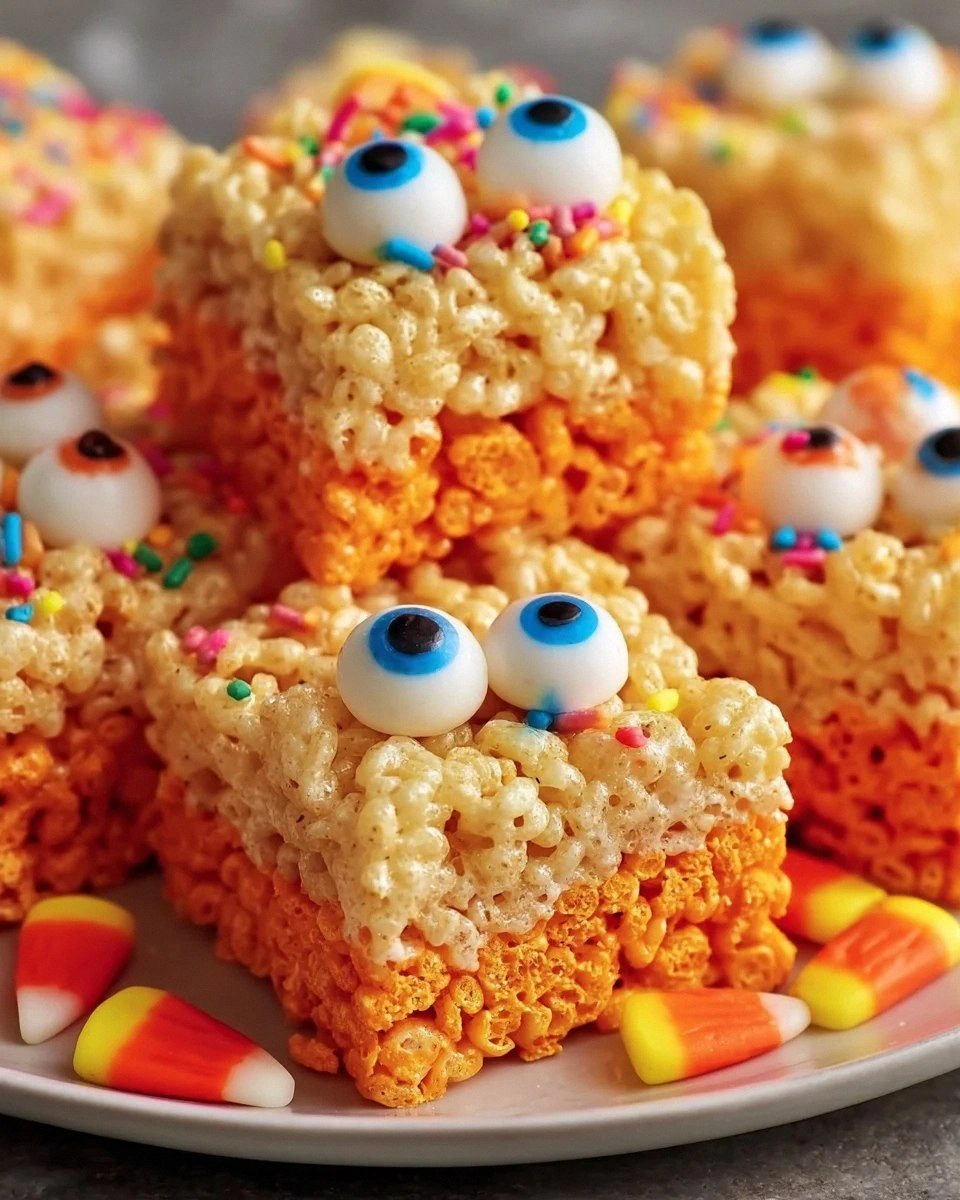
- Visual Wow Factor: The bright orange base paired with black icing and candy eyes turns ordinary snacks into Halloween art pieces.
- Crowd‑Pleaser Guarantee: Kids love the fun shapes, adults love the nostalgic crunch—everyone leaves the table smiling.
- Ingredient Quality: Using real butter (not margarine) and high‑quality mini marshmallows ensures a richer, more authentic taste.
- One‑Pan Efficiency: All the magic happens in a single saucepan, minimizing cleanup and maximizing fun.
- Make‑Ahead Magic: These treats keep their texture for days, so you can prep them ahead of the party and focus on the fun.
Inside the Ingredient List
The Flavor Base
First up, butter. This isn’t just a fat; it’s the foundation that carries flavor and gives the marshmallows that buttery, toasted aroma you love. Using real, unsalted butter (about three tablespoons for four servings) creates a rich mouthfeel that cheap spreads can’t match. If you skip the butter, you’ll end up with a dry, crumbly mess that feels more like a cereal bowl than a treat. A great tip: melt the butter on low heat to avoid scorching, which would introduce a bitter note.
The Texture Crew
Mini marshmallows are the heart‑beat of any Rice Krispie treat. Their tiny size means they melt quickly, coating each cereal piece in a glossy, sticky glaze. I recommend using a full cup (about three cups) of mini marshmallows for a batch that holds together without being overly sweet. If you only have regular marshmallows, chop them finely—just make sure they melt completely, or you’ll get unwanted chewy pockets.
The Unexpected Star
Orange food coloring might seem like a decorative afterthought, but it’s actually a flavor enhancer. A single teaspoon of vibrant orange dye mixed into the butter‑marshmallow blend adds a subtle citrus zing that brightens the overall taste. Skipping this step means you’ll end up with a plain‑looking treat that looks like any other cereal bar—hardly spooky enough for Halloween. For a natural alternative, try a splash of orange zest or a few drops of carrot juice; the color won’t be as vivid, but the flavor will still pop.
The Final Flourish
Black decorating icing and candy eyes turn these treats from tasty snacks into spooky masterpieces. The icing, usually a thick, pipe‑able chocolate or gel, provides a deep, midnight contrast to the orange base. Spread it with a spoon or pipe it with a bag for intricate designs—think bat silhouettes, spider webs, or goofy monster faces. Candy eyes add a playful, eerie vibe that kids adore. If you’re allergic to gelatin, opt for a plant‑based black icing; it works just as well.
Everything's prepped? Good. Let's get into the real action...
The Method — Step by Step
Start by gathering a large, heavy‑bottomed saucepan. Place it over medium‑low heat and add three tablespoons of butter. As the butter melts, listen for that gentle sizzle—this is the moment where flavor begins to build. Power transition: Once the butter is fully melted, stir in one teaspoon of orange food coloring, whisking until the mixture turns a uniform, pumpkin‑bright hue. This step is pure magic, because the color will seep into every marshmallow, ensuring an even orange glow.
Now, pour in three cups of mini marshmallows. Keep the heat low; you want the marshmallows to melt slowly, forming a glossy, stretchy sauce. Stir continuously with a silicone spatula, watching the marshmallows dissolve into the butter like snow melting into sunshine. Kitchen Hack: If the mixture looks too thick, add a splash of milk (about a tablespoon) to help it flow smoothly without compromising the flavor.
When the marshmallow‑butter blend is smooth and glossy, remove the saucepan from the heat. This is the moment of truth—if you keep it on the stove too long, the mixture can become grainy. Quickly fold in four cups of Rice Krispies cereal, using a large wooden spoon to coat every piece evenly. You’ll notice the cereal “popping” as it absorbs the buttery glaze, creating a fragrant, crackling sound that signals perfect texture.
Transfer the mixture onto a greased 9x13 inch baking pan. Press it down gently with a piece of parchment paper or a silicone mat—don’t flatten it with a metal spatula, or you’ll lose that airy crunch. The goal is a uniform layer about half an inch thick, with a smooth top that will later hold the black icing. Watch Out: Pressing too hard compacts the cereal, turning the treat into a dense slab rather than a light, airy bite.
Allow the base to cool for about ten minutes. This brief rest lets the mixture set just enough to handle without crumbling. While it cools, prepare your black decorating icing by stirring it until smooth. If the icing is too thick, thin it with a tiny drizzle of water—just enough to make it pipeable.
Now comes the fun part: decorating! Using a small pastry bag or a zip‑lock bag with a corner snipped off, pipe spooky shapes across the surface—think bat silhouettes, spider webs, or simple smiley faces. Sprinkle candy eyes over the designs while the icing is still wet; they’ll stick like little gems. Finish with a generous scattering of Halloween‑themed sprinkles for that extra festive crunch.
Let the treats sit for another fifteen minutes to allow the icing to set. During this time, the kitchen will be filled with the sweet scent of toasted cereal and a faint hint of orange—an aroma that practically screams “trick or treat!” Once the icing is firm, use a sharp, non‑serrated knife warmed in hot water to cut the treats into bite‑size squares. Warm the knife between cuts for clean edges.
Serve immediately or store in an airtight container. If you’re serving at a party, arrange the squares on a decorative platter and watch the kids' eyes light up. I’ll be honest — I ate half the batch before anyone else got to try it, and that’s because these treats are that addictive. Remember, the secret to lasting crunch is keeping them dry; a paper towel layer on the bottom of the container helps absorb any stray moisture.
That's it — you did it. But hold on, I've got a few more tricks that'll take this to another level...
Insider Tricks for Flawless Results
The Temperature Rule Nobody Follows
Never melt butter over high heat. Keep it low and slow; this prevents the butter from scorching, which would introduce a bitter undertone that clashes with the sweet marshmallows. I once tried a “quick melt” and ended up with a burnt flavor that lingered like a bad memory. The rule of thumb is: if you can hear a gentle hiss, you're in the sweet spot. If it screams, pull it off the stove.
Why Your Nose Knows Best
Your sense of smell is a more reliable indicator than a timer when it comes to the marshmallow‑butter blend. When the mixture turns glossy and you catch a faint toasted‑cereal aroma, you know it’s ready. Trust that nose; a timer can’t account for variations in stove output or pan thickness. I’ve timed this step countless times, and the only thing that never fails is the scent of buttery marshmallows filling the kitchen.
The 5‑Minute Rest That Changes Everything
Allowing the base to rest for five minutes before adding icing makes a huge difference. This short pause lets the cereal settle and the butter‑marshmallow coating firm up just enough to support the weight of the icing without sagging. Skipping this rest leads to a soggy surface where the icing slides off, turning your spooky designs into a mess. A quick timer set for five minutes is all you need.
Cold Knife, Clean Cuts
Before you slice, dip your knife in hot water, wipe it dry, then repeat. The warm blade glides through the treat without crushing the delicate structure, giving you crisp, clean edges. A friend once tried using a dull plastic knife and ended up with crumbly squares that fell apart—let’s just say the party was a disaster. Warm knives are the secret weapon of every seasoned baker.
The Sprinkles Shield
Sprinkling the Halloween‑themed confetti while the icing is still wet creates a “seal” that locks in moisture, preserving the crunch for longer. It also adds a delightful textural contrast that kids love. If you wait until the icing hardens, the sprinkles will just sit on top and may fall off when you pick up the treat. So, sprinkle immediately after piping for maximum adhesion.
Creative Twists and Variations
This recipe is a playground. Here are some of my favorite ways to switch things up:
Spooky S’mores
Swap half of the Rice Krispies for crushed graham crackers and drizzle melted chocolate over the top before adding the black icing. The result is a mini s’mores experience with a Halloween twist—perfect for campfire‑themed parties.
Ghoulish Green
Replace the orange food coloring with a few drops of green gel food dye and use lime‑flavored candy eyes. The eerie green hue pairs wonderfully with a mint‑infused butter, creating a fresh yet spooky flavor profile.
Pumpkin Spice Delight
Add a teaspoon of pumpkin spice to the butter‑marshmallow mixture before folding in the cereal. This warm spice blend deepens the autumnal flavor, making the treats taste like a slice of pumpkin pie in every bite.
Chocolate‑Covered Crunch
Melt dark chocolate and drizzle it over the set treats before adding the black icing. The chocolate adds a bitter contrast that balances the sweetness, and it also gives the treats a glossy finish that looks professional.
Nutty Nightmare
Fold in a half‑cup of lightly toasted chopped pecans or walnuts with the cereal. The nuts add a satisfying crunch and a buttery undertone that complements the orange base beautifully.
Storing and Bringing It Back to Life
Fridge Storage
Place the treats in an airtight container lined with a paper towel to absorb excess moisture. They’ll stay fresh for up to five days in the refrigerator. If you notice any condensation, simply replace the paper towel.
Freezer Friendly
Wrap individual squares in plastic wrap and then place them in a zip‑lock bag. They’ll freeze beautifully for up to two months. When you’re ready to serve, let them thaw at room temperature for 15 minutes, then add a tiny splash of water before reheating to restore that melt‑in‑your‑mouth texture.
Best Reheating Method
To revive any lost crunch, pop a single square in a preheated 300°F (150°C) oven for three minutes. The heat revives the buttery crispness without melting the icing. Add a tiny splash of water to the pan (just a few drops) to create steam that re‑hydrates the interior, making the treat as soft as when it was first made.