Picture this: I’m standing in my cramped kitchen, a half‑finished batch of store‑bought brownies staring back at me like a smug reminder that I’ve been living a culinary lie. The timer on the oven dings, and the scent of burnt sugar wafts through the air, instantly turning my confidence into a nervous puddle of chocolate‑laden regret. I swear I heard my neighbor’s cat meow in sympathy, and that was the exact moment I dared myself to create a dessert that would make even the most seasoned bakers weep with joy. I grabbed a box of chocolate cake mix, a jar of peanut butter, and a handful of mini peanut butter cups, and the rest is a glorious mess of gooey, fudgy, and utterly addictive goodness.
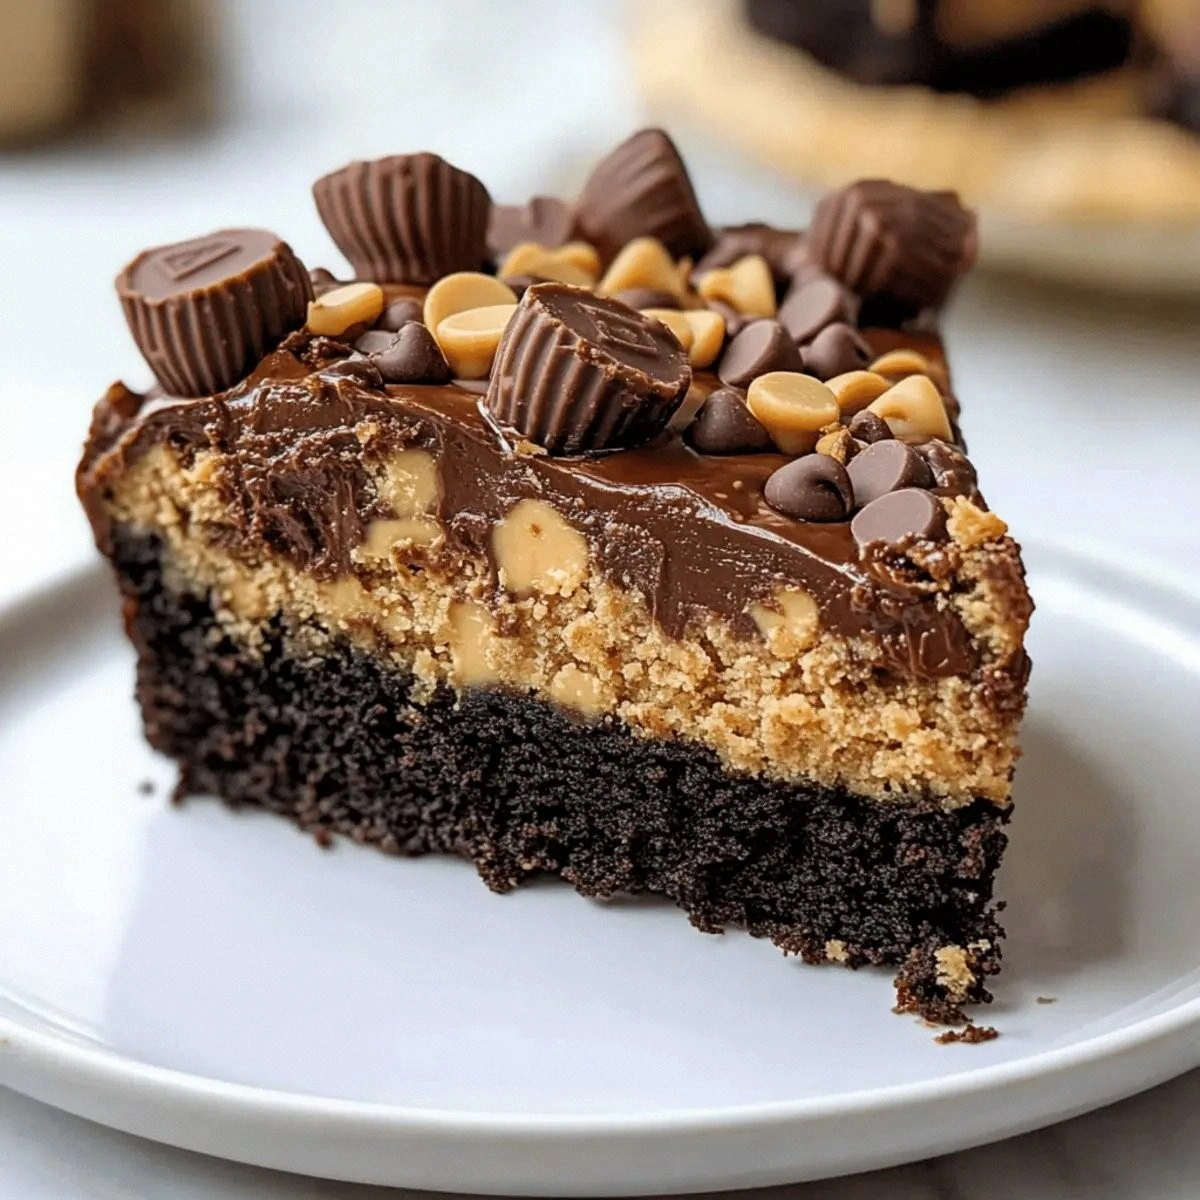
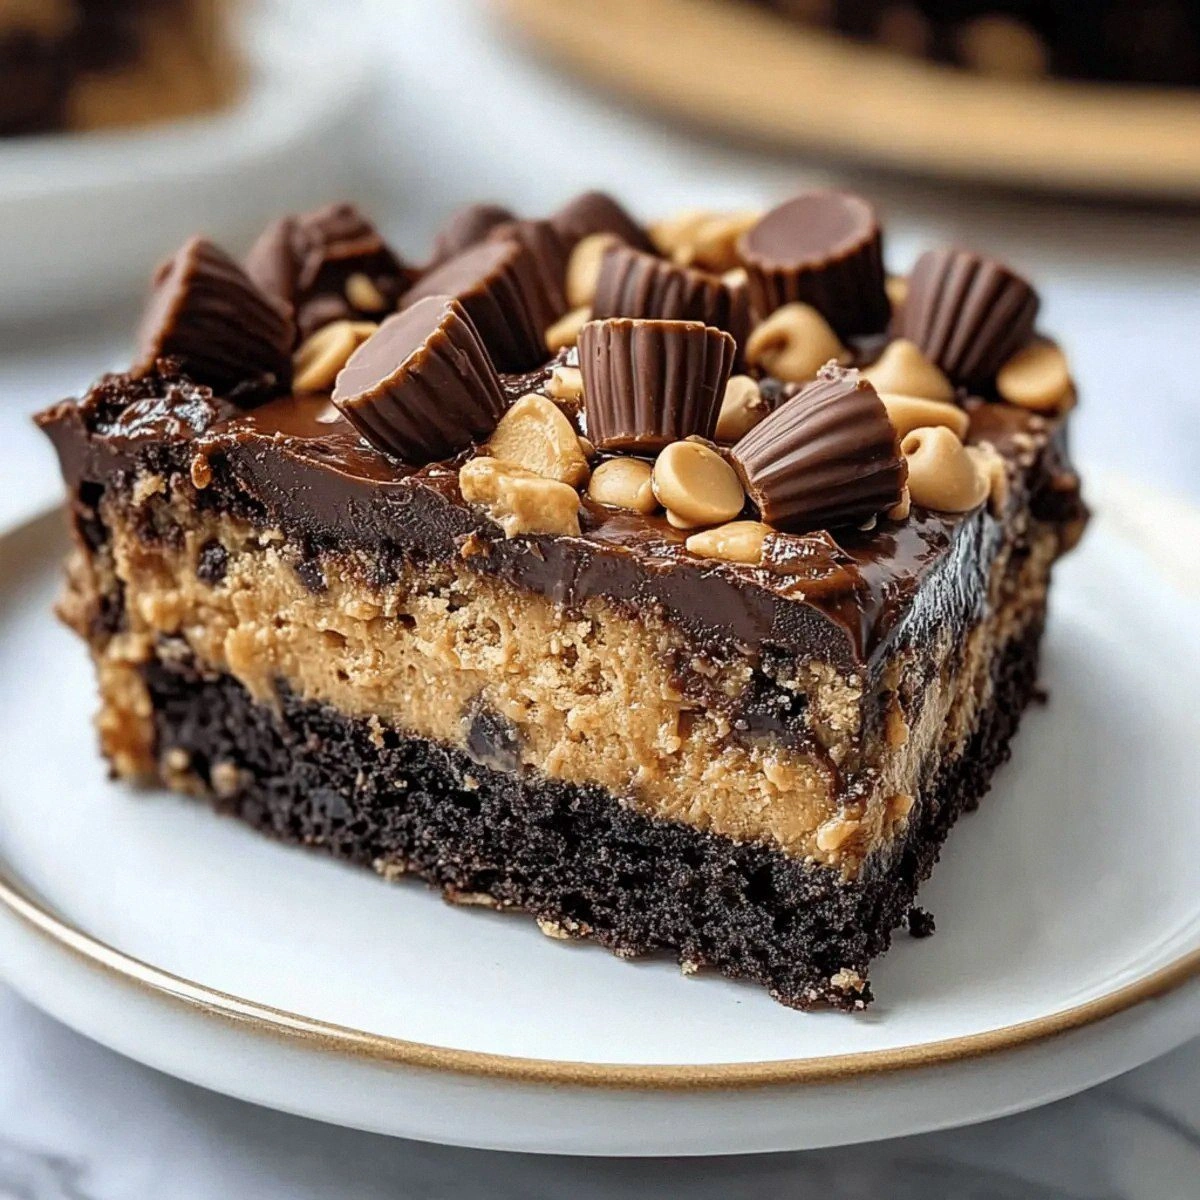
The first bite of this dump cake is like a love‑letter to your taste buds, a buttery, chocolatey embrace that’s punctuated by the salty‑sweet pop of peanut butter cups. Imagine the richness of a peanut butter cheesecake melting into the depth of a molten chocolate lava cake, all while the top crust crackles like a caramelized dream. You’ll hear that faint sizzle as the butter hits the pan, feel the warm, glossy sheen of the batter as it spreads, and see the edges of the cake rise like tiny golden cliffs ready to crumble at the slightest touch. This isn’t just a dessert; it’s a full‑on sensory overload that will have you shouting, “I dare you to taste this and not go back for seconds!”
Most dump‑cake recipes get the balance wrong—either the cake is dry, the peanut butter flavor is muted, or the mini cups melt into a soupy mess that never sets. I’ve cracked the code by tweaking the ratio of butter to milk, using a generous cup of creamy peanut butter, and folding in the mini cups at just the right moment so they stay whole, providing those glorious pockets of gooey surprise. The secret? A splash of milk that keeps the batter from becoming a dense brick, and a quick swirl of melted butter that creates a glossy, crackly top that’s as satisfying to look at as it is to eat.
And now, the kicker: I’ll be honest — I ate half the batch before anyone else got a chance to try it. That’s how addictive this thing is. But don’t worry, you’ll have plenty left to share (or not). Let me walk you through every single step — by the end, you’ll wonder how you ever made it any other way.
What Makes This Version Stand Out
Here’s the low‑down on why this dump cake is the undisputed champion of peanut butter desserts. Each point is a reason you’ll be bragging about this recipe at every gathering.
- Flavor Explosion: The combination of rich chocolate and creamy peanut butter creates a harmonious duet that sings on the palate, with each bite delivering a perfect balance of sweet, salty, and nutty notes.
- Texture Triumph: A crisp, caramelized top gives way to a soft, gooey interior that’s studded with mini peanut butter cups that stay intact, offering a delightful crunch amidst the melt.
- Simplicity Supreme: No mixing bowls, no fancy equipment—just dump, swirl, and bake. Even a kitchen novice can pull this off without breaking a sweat.
- Unique Twist: The addition of a full cup of peanut butter to the batter ensures a deep, lingering peanut flavor that most dump cakes completely miss.
- Crowd‑Pleaser: This cake disappears faster than a magician’s rabbit. Expect empty plates and endless requests for seconds.
- Ingredient Quality: Using a high‑quality chocolate cake mix and real mini peanut butter cups elevates the dish from “okay” to “obviously made with love.”
- One‑Pan Wonder: The entire dessert bakes in a single baking dish, making cleanup a breeze—perfect for busy weeknights or lazy weekends.
- Make‑Ahead Magic: It stores beautifully, so you can prep it in advance and still enjoy that fresh‑out‑the‑oven feeling later.
Alright, let's break down exactly what goes into this masterpiece...
Inside the Ingredient List
The Flavor Base
First up, the star of the show: 1 cup Peanut Butter. This isn’t just a flavoring; it’s the backbone that gives the cake its luscious, creamy texture. The natural oils in peanut butter keep the batter moist, while its inherent sweetness reduces the need for extra sugar. Skipping it would leave the cake flat, both in taste and mouthfeel, turning a potential masterpiece into a bland disappointment. If you’re allergic or prefer a different nut, try almond butter—it offers a similar richness with a subtle, sweet twist.
The Texture Crew
1 box Chocolate Cake Mix provides the structure and the chocolatey depth that makes this dump cake unmistakably decadent. The leavening agents in the mix ensure a light, airy crumb that contrasts beautifully with the dense peanut butter swirl. Using a generic brand can work, but a premium mix with real cocoa will give you a richer flavor profile and a more tender crumb. If you’re feeling adventurous, swap the box for a gluten‑free blend; just be sure it contains the same amount of leavening.
1/2 cup Melted Butter is the secret sauce that binds everything together. The butter creates a glossy, crackly top that’s the hallmark of a perfect dump cake. It also adds a buttery richness that elevates the overall flavor. If you’re watching your saturated fat intake, you can replace half the butter with a light olive oil, but expect a slightly different mouthfeel.
The Unexpected Star
1 cup Milk may seem mundane, but it’s the liquid that turns the dry mix into a smooth batter, preventing the cake from turning into a dense brick. The milk’s lactose also contributes to a subtle caramelization on the crust, giving it that golden‑brown edge that shatters like thin ice when you cut into it. For a dairy‑free version, use almond or oat milk; just keep the same volume to maintain the texture.
1 cup Mini Peanut Butter Cups are the surprise element that makes every bite an adventure. They stay mostly intact during baking, providing pockets of molten peanut butter and chocolate that burst open as you dig in. If you can’t find mini cups, crush regular ones and sprinkle them on top before baking, but you’ll lose some of that delightful “pop” effect.
Everything's prepped? Good. Let's get into the real action...
The Method — Step by Step
Preheat your oven to 350°F (175°C). While the oven warms up, grease a 9‑x‑13‑inch baking dish with a thin layer of butter or non‑stick spray. This step ensures the cake releases cleanly and the bottom stays moist. The moment you hear the oven fan whirr, you’ll know the magic is about to begin. Power transition: Okay, ready for the game‑changer?
Open the chocolate cake mix box and dump the entire contents into the prepared baking dish. No need to sift—just let the dry powder spread out evenly. The cake mix already contains sugar, flour, and leavening, so you’re essentially building a foundation for the peanut butter to sit on. That sizzle when it hits the pan? Absolute perfection. Give it a quick visual check; you should see a uniform layer of dry mix.
In a separate microwave‑safe bowl, melt the 1/2 cup butter until it’s a golden river of liquid. Add the 1 cup of peanut butter to the melted butter and whisk until fully combined, creating a silky, glossy mixture.
This combo is the heart‑beat of the cake, delivering that deep peanut flavor and a glossy top that will crackle during baking.Kitchen Hack: Warm the peanut butter slightly before mixing; it blends more smoothly and prevents clumps.Pour the melted butter‑peanut butter mixture over the dry cake mix, spreading it with a spatula so that it blankets the entire surface. Don’t worry if it looks uneven; the batter will settle as it bakes. At this point, the batter should look like a chocolate‑brown lake with a buttery swirl on top. This next part? Pure magic.
Slowly drizzle the 1 cup of milk over the batter, letting it seep into the dry mix. As the milk penetrates, you’ll see the batter start to soften and the edges pull away from the sides of the dish—this is the sign that the cake is forming the perfect crumb. Use a fork to gently swirl the milk in, creating marble‑like veins of peanut butter throughout.
Scatter the mini peanut butter cups evenly across the top. They should sit on the surface, not submerged; this ensures they retain their shape and give you those delightful pockets of gooey goodness when you bite in. If you’re feeling extra indulgent, add a few extra cups on top for a crunchy crown.
Slide the dish into the pre‑heated oven and bake for 30‑35 minutes. Around the 20‑minute mark, peek through the oven window: the edges should be pulling away slightly, and the top will be a deep, caramel‑gold hue.
Resist the urge to open the door frequently; each opening drops the oven temperature and can affect the rise.Watch Out: If the top darkens too quickly, tent the cake with foil to prevent burning while the interior finishes cooking.When the timer dings, test for doneness by inserting a toothpick into the center; it should come out with a few moist crumbs but no wet batter. The cake will continue to set as it cools, so don’t over‑bake. Let it rest for 10 minutes in the pan; this allows the flavors to meld and the top to firm up just enough for clean slices.
Finally, serve warm, optionally drizzling a little extra melted peanut butter or a dusting of powdered sugar for extra flair. The cake is best enjoyed fresh out of the oven, when the edges are still crisp and the center is ooey‑gooey. Picture yourself pulling this out of the oven, the whole kitchen smelling incredible—your guests will be lining up for a second serving before you even have a chance to cut the first slice.
That's it — you did it. But hold on, I've got a few more tricks that'll take this to another level...
Insider Tricks for Flawless Results
The Temperature Rule Nobody Follows
Never bake a dump cake straight from the fridge. Let the batter sit at room temperature for at least 15 minutes before sliding it into the oven. This simple step ensures the butter and peanut butter are evenly distributed, preventing cold pockets that can cause uneven baking. A friend tried skipping this once and ended up with a soggy center that never set—let's just say it didn't end well.
Why Your Nose Knows Best
Trust the aroma. Around the 20‑minute mark, the kitchen should be filled with a sweet, buttery perfume that hints at caramelization. If you smell a faint burnt sugar note early, lower the temperature by 25°F and tent with foil. Your nose is a more reliable timer than any digital gadget when it comes to achieving that golden top without scorching.
The 5‑Minute Rest That Changes Everything
Letting the cake rest for exactly five minutes after removing it from the oven allows the internal steam to redistribute, creating a tender crumb and preventing the center from collapsing. This short pause also makes the cake easier to cut, giving you clean slices instead of a mushy mess. I once cut straight away and the top collapsed like a deflated balloon—lesson learned.
Switch Up the Sweetness
If you prefer a less sweet dessert, swap half the milk for unsweetened almond milk and add a pinch of sea salt to the batter. The salt will amplify the chocolate and peanut butter flavors, creating a more balanced taste profile. This tweak is perfect for those who love a sophisticated, less cloying dessert.
Serve It Like a Pro
For an Instagram‑worthy presentation, serve each slice on a white plate, drizzle a thin ribbon of melted chocolate, and sprinkle a few crushed mini cups on top. The contrast of the glossy drizzle against the matte cake surface makes the dish pop visually, while the extra crunch adds texture. Your guests will think you spent hours plating—little do they know it’s all dump‑cake simplicity.
Creative Twists and Variations
This recipe is a playground. Here are some of my favorite ways to switch things up:
Salted Caramel Swirl
Replace half the milk with caramel sauce and sprinkle flaky sea salt over the top before baking. The caramel adds a buttery sweetness, while the salt heightens the peanut butter flavor, creating a sophisticated sweet‑and‑salty combo.
Double Chocolate Delight
Swap the chocolate cake mix for a double‑chocolate version and fold in ½ cup of dark chocolate chips into the batter. The extra cocoa depth makes the cake richer, perfect for true chocolate addicts.
Nutty Crunch
Add a half cup of chopped toasted peanuts to the batter before baking. The toasted nuts give a crunchy contrast to the gooey interior, adding a layer of texture that’s incredibly satisfying.
Berry Burst
Gently fold in a cup of fresh raspberries or frozen mixed berries after adding the milk. The berries add a bright, tart note that cuts through the richness, making the dessert feel lighter.
Vegan Version
Use a plant‑based butter substitute, dairy‑free milk (like oat or soy), and a vegan chocolate cake mix. Ensure the mini peanut butter cups are also dairy‑free. The result is a cruelty‑free indulgence that still delivers on flavor.
Storing and Bringing It Back to Life
Fridge Storage
Allow the cake to cool completely, then cover it tightly with plastic wrap or store it in an airtight container. It will keep fresh in the refrigerator for up to four days. The texture may firm up a bit, but a quick microwave reheating will restore its gooey goodness.
Freezer Friendly
Slice the cake into serving‑size portions, wrap each piece in parchment paper, and place them in a freezer‑safe bag. The cake freezes beautifully for up to three months. When you’re ready to indulge, let a slice thaw at room temperature for 15 minutes, then microwave for 20‑30 seconds.
Best Reheating Method
To revive that fresh‑out‑the‑oven feel, place a slice on a microwave‑safe plate, sprinkle a tiny splash of milk (about a teaspoon) around the edges, and heat for 20 seconds. The added moisture steams the cake back to its original softness without turning it rubbery.