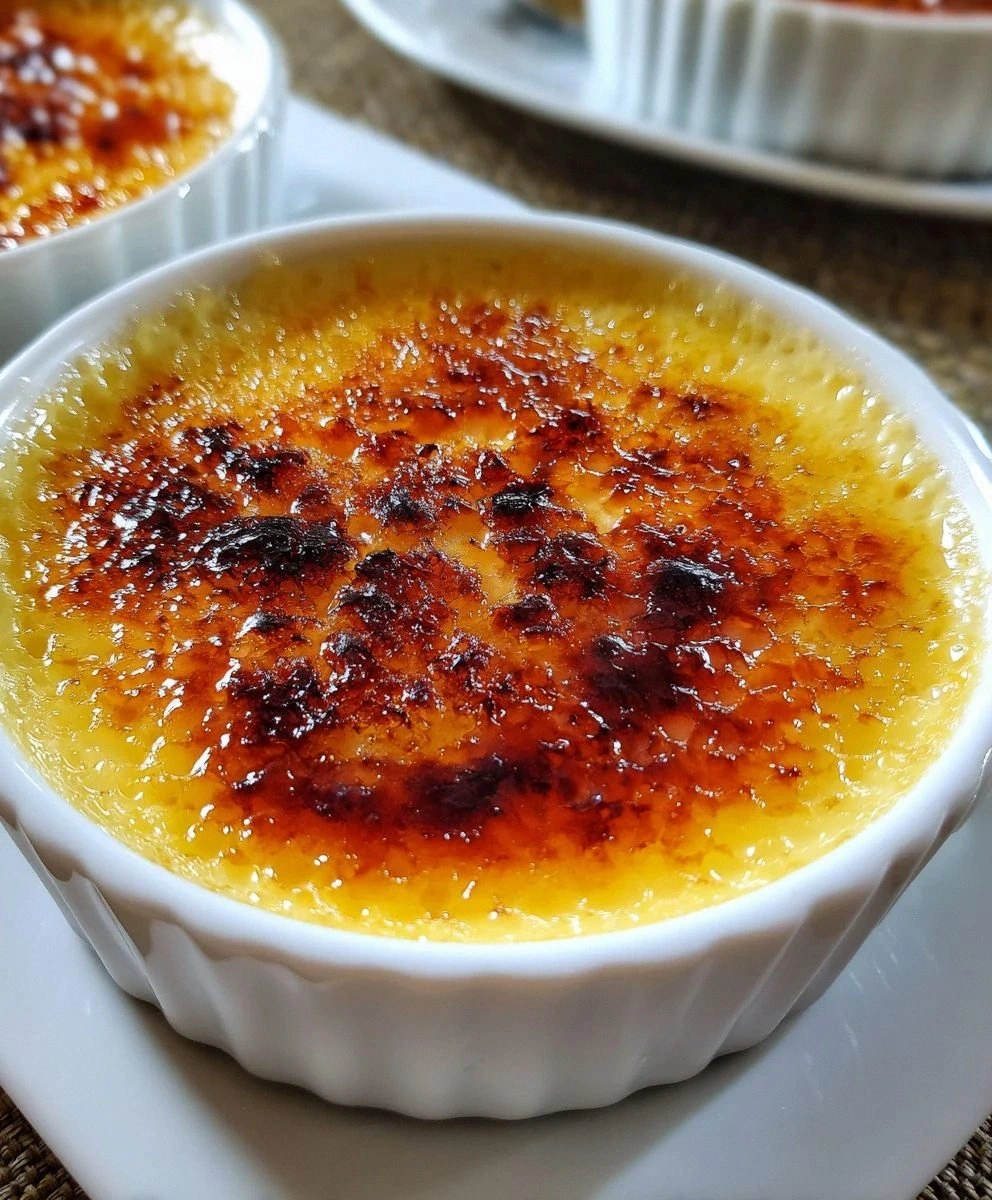
I still remember the first time I tried to make crème brûlée. I was twenty-three, armed with a borrowed kitchen torch and more confidence than skill. What emerged from my oven looked like scrambled eggs wearing a sugar helmet. Fast forward a decade, and I've turned that disaster into an obsession—one that recently led me to create the silkiest, most aromatic lemon crème brûlée that has ever graced my dessert spoon. The twist? I almost didn't share the recipe because, honestly, I wanted to keep the glory all to myself. But then I thought about all of you out there, tapping your forks against sad, grainy custards or biting into lemon desserts that taste like furniture polish, and my heart softened.
Picture this: It's a rainy Sunday afternoon, the kind that begs for a project. Your kitchen smells like a French patisserie collided with a Sicilian lemon grove—warm cream, sweet vanilla, and bright citrus swirling together like a culinary ballet. You slide the ramekins out of their water bath, the custard trembling just slightly, like it's shy about being so perfect. Later, when you crack that amber sugar glass with your spoon, the sound alone makes your shoulders drop in relief. The first bite is a cloud that somehow also explodes with sunshine. That, my friends, is what we're building today.
Most lemon crème brûlée recipes play it safe—just a whisper of zest, maybe a squeeze of juice if the author is feeling wild. This version? It punches you with lemon in three separate waves, yet still keeps that custard so smooth it could run for office and win. The secret weapon is a technique I borrowed from a perfume chemist (long story, involves a bar in Lyon), plus a temperature curve that would make a NASA engineer proud. Stay with me here—this is worth it.
Let me walk you through every single step—by the end, you'll wonder how you ever made it any other way.
What Makes This Version Stand Out
Triple Lemon Hit: We're using zest, juice, and an optional whisper of lemon oil. Most recipes chicken out after the zest, leaving you with a custard that tastes like it once saw a lemon on Instagram. This one delivers a bright, layered citrus experience that blooms on your tongue.
Silk-Sheet Texture: The custard sets like velvet thanks to a low, gentle bake and a water bath that hugs the ramekins tighter than your grandma at Christmas. No bubbles, no curdles, no weeping. Just smooth perfection that slides across your spoon.
Torch-Free Brûlée Option: If the idea of wielding fire in your kitchen after two glasses of wine sounds dicey, I've got a broiler method that yields a gorgeous, even crust. You'll still get that satisfying crack, minus the anxiety attack.
Make-Ahead Magic: The custards can lounge in the fridge for up to three days, waiting for their sugar moment. That means you can prep dessert for a dinner party without breaking a sweat while your guests arrive. Just keep the sugar layer separate until you're ready to serve.
Balanced Sweetness: By dropping the sugar slightly and adding a pinch of salt, the lemon shines instead of being muffled by sweetness. It's like turning up the brightness on a photo—you still recognize the subject, but suddenly every detail pops.
Restaurant-Level Flavor at Home: This recipe uses supermarket staples but tastes like it came from a Michelin-starred pastry lab. The trick is in the technique, not exotic ingredients. If you've ever struggled with custard, you're not alone—and I've got the fix.
Inside the Ingredient List
The Flavor Base
Heavy cream is the canvas here—pick one with at least 36 percent fat. Anything lighter and the custard will weep like it's watching a tearjerker. I splurge on cream from a local dairy; the difference in richness is like comparing a thrift-store sweater to cashmere. If you absolutely must, you can swap in half-and-half, but expect a slightly thinner texture and a shorter shelf life. Warm it gently; scorched cream tastes like disappointment and smells like a burnt marshmallow took a wrong turn.
Granulated sugar does double duty: it sweetens the custard and later becomes that shattering glass lid. I use organic cane sugar because it melts more evenly and has fewer impurities that can burn. Resist the urge to cut the sugar too much—yes, it's dessert, but the brûlée layer needs enough fuel to caramelize properly. Think of sugar as the structural engineer of this dessert; skimp and everything collapses.
The Texture Crew
Egg yolks are the silent magicians. They thicken the custard without making it taste like scrambled eggs, provided you treat them gently. Use the freshest yolks you can find—older ones have a sulfur note that competes with the lemon. Separate the eggs while they're cold; the yolks stay intact and don't break into pathetic little tails. Save the whites for cocktails or a pavlova later in the week.
A single teaspoon of vanilla extract rounds the edges of the lemon, like a diplomatic translator between bright citrus and rich cream. Skip the imitation stuff; it leaves a metallic aftertaste that clashes with the zest. If you're feeling fancy, scrape half a vanilla bean instead. The tiny black flecks are gorgeous and announce that you care about details.
The Unexpected Star
Lemon zest is where the perfume lives. Use a microplane and stop at the yellow—any white pith and your dessert tastes like earwax. One packed tablespoon is the sweet spot for a noticeable but not aggressive lemon presence. Rotate the lemon as you zest; think of it as shaving a tiny, yellow tree. If you only have a box grater, use the smallest holes and pray.
Fresh lemon juice adds snap and balance. Bottled juice tastes like the ghost of a lemon that died in a factory. Strain out the seeds but keep the pulp; those little vesicles burst on your tongue like citrus caviar. Two tablespoons is enough to brighten without turning the custard into lemon curd.
The Final Flourish
A pinch of salt is the difference between a flat, sweet custard and one that sings. It sharpens the lemon and keeps the dessert from feeling cloying. Use kosher or sea salt; iodized salt can give a faintly medicinal edge. Add it to the cream early so it dissolves completely.
Everything's prepped? Good. Let's get into the real action...
The Method — Step by Step
- Warm the cream, sugar, salt, and lemon zest in a heavy saucepan over medium-low heat. You want tiny bubbles forming around the edge—no rolling boil, or the cream will climb out like an angry cat. Stir just until the sugar dissolves; think of it as giving the ingredients a gentle group hug. The kitchen should start to smell like a lemon orchard at sunset. This takes about five minutes, but don't walk away; cream loves to surprise you with a volcanic overflow.
- While the cream warms, whisk egg yolks and vanilla in a medium bowl until the mixture looks like sunshine in liquid form. The goal is to break up the yolks without whipping in too much air; bubbles are the enemy of silk. Pro tip: place a damp kitchen towel under the bowl so it doesn't skate across the counter like a mischievous toddler. If you spot any stubborn white streaks, fish them out with the edge of your whisk—nobody wants rubbery surprises.
- Now the dance begins: slowly ladle about a cup of the hot cream into the yolks while whisking constantly. This is called tempering, and it's your insurance against scrambled eggs. Think of it as introducing two friends who need to like each other—go slow, keep talking, and nobody gets hurt. The mixture should thicken slightly and coat the back of a spoon like liquid velvet.
- Pour the warmed yolk mixture back into the saucepan and stir over low heat until it reaches 170°F on an instant-read thermometer. The custard will be thick enough to leave a trail when you drag your finger across the spoon, but still pourable. If you don't have a thermometer, watch for the first lazy bubble—then pull it off immediately. Overcooking here is the difference between silk and cottage cheese.
- Strain the custard through a fine-mesh sieve into a large measuring cup or pitcher. This step removes any curdled bits and the larger pieces of zest, ensuring a texture smoother than a pick-up line. Use a rubber spatula to press every last drop through; this liquid gold took effort. Compost the zest left behind—it's done its duty.
- Stir in the fresh lemon juice. The custard will brighten in color and thin slightly; that's normal. Taste it now and revel in the fact that you're basically drinking liquid sunshine. If you want an extra layer of lemon perfume, add one drop of food-grade lemon oil—no more, or it tastes like Pledge.
- Divide the custard among four six-ounce ramekins. Tap each one gently on the counter to dislodge air bubbles; they rise like tiny submarines surfacing for air. Place the ramekins in a roasting pan and create a water bath by pouring hot tap water halfway up the sides. The water insulates the custards so they cook gently, like a warm hug from a mermaid.
- Bake at 300°F for 25 to 30 minutes. The custards are done when the edges are set but the centers jiggle like Jell-O doing yoga. They'll firm as they cool, so err on the side of wobbly. Remove the ramekins from the water bath immediately; otherwise they'll keep cooking like tiny hard-boiled eggs wearing porcelain hats.
- Cool to room temperature, then chill at least four hours—overnight is better. The lemon flavor melds and deepens, turning from shouty to sophisticated. Cover each ramekin with plastic wrap pressed directly onto the surface to prevent a skin. When you're ready to serve, top with sugar and torch away for that glassy, shattering crust.
That's it—you did it. But hold on, I've got a few more tricks that'll take this to another level...
Insider Tricks for Flawless Results
The Temperature Rule Nobody Follows
Most home bakers obsess over oven temperature but ignore the custard's internal goal: 170°F. Beyond that, egg proteins tighten like overworked muscle, squeezing out moisture and leaving you with weepy craters. I pull mine the second a fingertip pressed lightly in the center meets gentle resistance, not liquid. If you're nervous, pull one ramekin at 25 minutes and jiggle it; if it ripples like a pond after a skipped stone, give it three more minutes. Remember, carryover heat is real, and custards are the divas of the dessert world—slightly underdone beats overdone every single time.
Why Your Nose Knows Best
Before the custard even reaches your lips, aroma does the heavy lifting. Rub a speck of zest between your fingers and sniff; if the lemon smells floral and bright, you're golden. If it's faint or bitter, swap lemons. During baking, the scent should shift from sharp citrus to creamy lemon-meringue. If your kitchen still smells like a cleaning product after ten minutes, lower the oven 25 degrees—high heat volatilizes lemon oils into something closer to furniture polish than dessert.
The 5-Minute Rest That Changes Everything
After torching the sugar, wait five full minutes before serving. I know, the crackling is calling your name, but patience here is the difference between a rock-hard sugar shard and a thin sheet that shatters like autumn ice. The sugar draws just enough moisture from the custard underneath, creating a micro-layer of syrup that acts like delicious glue. A friend tried skipping this once—let's just say we chipped a tooth and renamed the dessert "dental disaster brûlée."
Smooth-Talking Strain
Even pros get tiny curdles. Straining twice—once after cooking and again right before pouring into ramekins—removes micro-lumps and stray zest fibers. Use a conical chinois if you have one; the pointed bottom forces custard through efficiently. No fancy gear? A regular sieve works, but give it a gentle tap rather than scraping, which can force bits through. The texture difference is like comparing silk stockings to burlap socks.
Chill Like a Pastry Chef
Rapid chilling sets the custard's structure and prevents bacteria parties. After the water-bath exit, slide ramekins onto a room-temp baking sheet to avoid thermal shock, then park them in the coldest part of your fridge (usually the back bottom shelf). If you're in a hurry, nestle them in an ice-water bath for 20 minutes first. Whatever you do, don't stack hot ramekins—condensation drips and turns your perfect tops into sad puddles.
Creative Twists and Variations
This recipe is a playground. Here are some of my favorite ways to switch things up:
Basil-Kissed Sunshine
Add four fresh basil leaves to the cream while it warms, then discard them before tempering. The herbal note marries magically with lemon, giving you a custard that tastes like summer in Provence. Garnish with a single tiny basil blossom if you're trying to impress someone who uses words like "mouthfeel" unironically.
Meyer Lemon Luxury
Swap regular lemons for Meyer lemons and drop the sugar by a tablespoon. Meyers are sweeter and more floral, so the custard tastes like lemon-drop candy wearing a silk gown. The color will be a softer yellow, like early morning sunshine rather than high noon.
Ginger Spark
Whisk a quarter teaspoon of ground ginger into the yolks. It doesn't scream ginger; it just adds a warm sparkle that makes people ask, "What's that cozy note?" Think of it as the dessert equivalent of a cashmere scarf in October.
Lavender Honey Dream
Replace two tablespoons of sugar with lavender honey and steep a pinch of culinary lavender buds in the warm cream. Strain them out before tempering. The result is a custard that tastes like you napped in a sun-drenched field. Warning: may cause spontaneous humming.
Boozy Brûlée
Stir a teaspoon of limoncello or vodka into the custard after cooking. The alcohol sharpens the lemon and helps the sugar caramelize faster under the torch. Plus, it gives you a slight grown-up edge—like wearing fancy underwear nobody knows about.
Coconut Cloud
Replace half the cream with full-fat coconut milk and add a strip of lime zest alongside the lemon. The custard sets slightly softer and tastes like a tropical vacation. Top with brûléed sugar and a sprinkle of toasted coconut flakes for full cabana vibes.
Storing and Bringing It Back to Life
Fridge Storage
Once cooled, wrap each ramekin tightly with plastic wrap pressed directly onto the surface to prevent a skin and block fridge odors that think they're welcome. They'll keep for three days, though the lemon flavor intensifies daily—day two is the sweet spot. If condensation forms, gently blot with a paper towel before torching.
Freezer Friendly
You can freeze the custards (without the sugar top) for up to a month. Wrap each in a double layer of plastic plus foil to guard against freezer burn. Thaw overnight in the fridge, then let them sit at room temp 15 minutes before adding sugar and torching. Texture suffers slightly—think silk that's been through the wringer—but flavor stays bright. Only freeze if you have more custards than friends to eat them, which sounds like a personal problem.
Best Reheating Method
Crème brûlée is served chilled, but if you accidentally over-chill and the custard feels tight, let ramekins sit on the counter for ten minutes. No microwave, no warm oven—just gentle room-temp relaxation. Add the sugar and torch just before serving so the contrast between cold custard and warm crackly top is at its dramatic peak.