Picture this: it’s a rainy Saturday morning, the kitchen smells like burnt toast, and your friend has just challenged you to turn a simple bowl of tortilla chips into something that would make the whole neighborhood line up for a bite. I stared at the pile of soggy, half‑fried tortillas on the counter and thought, “I can do better.” The moment I tossed the first chip into hot oil, the sizzle sang a promise of crispness, the air filled with the aroma of garlic and onion, and the world seemed a little brighter. That first bite was a revelation—crisp edges that cracked like thin ice, a velvety salsa that coated the chips, and a creamy, salty cheese that made the whole experience feel like a hug from a Mexican grandmother. If you’re ready to hear how I turned a kitchen mishap into a breakfast legend, let’s dive in.
I’ll be honest—this isn’t just another chilaquiles recipe. It’s the result of countless experiments, a dash of daring, and a sprinkle of that “what if” mindset that turns ordinary meals into unforgettable moments. I’ve tasted chilaquiles from street carts to high‑end restaurants, and I’ve always felt something was missing: that perfect balance of crunch and melt, a salsa that sings, and a finish that lingers. The version I’m about to share is hands down the best you’ll ever make at home, and I dare you to taste it and not go back for seconds. If you’ve ever struggled with soggy chips or bland salsa, you’re not alone—and I’ve got the fix.
What makes this version stand out isn’t just a single tweak; it’s a whole philosophy that treats every ingredient as a starring character. We’re talking about using corn tortillas that are sliced into triangles for that classic bite, a salsa that’s either fresh or store‑bought but never watered down, and an oil that’s neutral so the tortillas get that golden crunch without overpowering the flavor. Then there’s the salsa, simmered gently with onions and garlic to deepen its profile, and the finishing touches: crumbled queso fresco, fresh cilantro, a drizzle of crema, and optionally, fried or scrambled eggs that add protein and richness. The result? A dish that feels like a hug, a party, and a breakfast all at once. Picture yourself pulling this out of the oven, the whole kitchen smelling incredible, and friends gathering around the table, eyes wide, ready to dive in. That’s the experience I’m about to guide you through.
Let me walk you through every single step—by the end, you’ll wonder how you ever made it any other way. From selecting the right tortillas to mastering the salsa’s consistency, we’ll cover every trick and tip that turns a simple breakfast into a showstopper. So grab your apron, set the timer, and let’s get cooking.
What Makes This Version Stand Out
- Taste: The salsa is simmered with onions and garlic until it’s a rich, velvety sauce that coats each tortilla chip like a fine mist. The subtle heat from the salsa balances the creaminess of the queso fresco, creating a flavor profile that’s both comforting and exciting.
- Texture: Crispy tortilla triangles that hold their crunch even after soaking in salsa are achieved by a quick double‑fry. The result is a satisfying snap followed by a melt‑in‑your‑mouth softness.
- Simplicity: You only need eight ingredients, all of which you probably already have on hand. No special equipment or exotic spices—just love and a little patience.
- Uniqueness: The use of fresh cilantro and a splash of crema after the chilaquiles are plated adds a bright, cooling contrast that elevates the dish beyond ordinary.
- Crowd Reaction: Friends who try this version often say it’s the most “homey” chilaquiles they’ve tasted. They come back for seconds and even ask for the recipe.
- Ingredient Quality: By choosing fresh, high‑quality tortillas and a good salsa, you’re investing in the flavor foundation. The cheese should be crumbled, not shredded, to keep the texture light.
- Cooking Method: The double‑fry technique ensures the chips don’t become soggy, while the quick simmer of the salsa locks in the flavors.
- Make‑Ahead Potential: Once you’ve plated the chilaquiles, they keep great for a day when stored properly, making it a perfect make‑ahead breakfast or brunch.
Alright, let’s break down exactly what goes into this masterpiece…
Inside the Ingredient List
The Flavor Base
The salsa is the heart of this dish. Whether you choose a bright, red salsa or a smoky green one, the key is to let it simmer gently with diced onions and minced garlic. This slow cooking step allows the flavors to meld, creating a sauce that’s robust yet balanced. If you’re using a store‑bought salsa, look for one that’s low in added sugars to keep the taste authentic. Skipping the onions or garlic will result in a flat sauce that doesn’t do justice to the crispy chips.
The Texture Crew
Corn tortillas are your main structural element. Slice them into triangles before frying so each chip can absorb the salsa without falling apart. The double‑fry method—first at a lower temperature to cook through, then at a higher temperature to crisp—ensures each chip has a crunch that lasts. If you skip the double fry, the tortillas will become soggy once they soak in the sauce, ruining the experience.
The Unexpected Star
Cilantro isn’t just a garnish; it’s the bright, herbal counterpoint that lifts the dish. Freshly chopped cilantro adds a burst of freshness that cuts through the richness of the cheese and crema. If cilantro is not your favorite, you can substitute with parsley, but the flavor profile will change noticeably. A pinch of salt is essential to bring out the cilantro’s brightness, so don’t skip it.
The Final Flourish
Crema (or sour cream) drizzled on top adds a cooling, velvety finish that balances the heat of the salsa. It also provides a creamy texture that contrasts nicely with the crunchy chips. If you’re looking for a lighter option, a dollop of Greek yogurt works well. Finally, optional eggs—fried or scrambled—add protein and a comforting, soft texture that makes the dish feel more substantial. Without the eggs, the dish is still delicious, but the added protein makes it a complete meal.
Everything’s prepped? Good. Let’s get into the real action…
The Method — Step by Step
- Prepare the Tortillas: Begin by cutting the corn tortillas into triangles. A standard tortilla yields about six triangles, so eight tortillas will give you roughly 48 pieces. Pat them dry with a paper towel to remove excess moisture, which helps them crisp up faster. This step might seem trivial, but it’s crucial for that perfect crunch.
- First Fry: Heat about 2 tablespoons of neutral oil in a large skillet over medium heat. Add a handful of tortilla triangles and cook for 3–4 minutes, turning occasionally, until they’re evenly browned. This first fry cooks the tortillas through without over‑browning. Once done, remove them to a paper towel-lined plate to drain. Repeat with the remaining tortillas.
- Make the Salsa: In the same skillet, add a splash of oil and sauté diced onions until translucent, about 3 minutes. Add minced garlic and cook for an additional 30 seconds until fragrant. Pour in the salsa—about 2 cups—and stir to combine. Let it simmer gently for 5–7 minutes, allowing the flavors to meld. The salsa should thicken slightly and emit a savory aroma.
- Second Fry: Increase the heat to medium‑high and add the first batch of fried tortilla triangles back into the skillet with the simmering salsa. Stir gently to coat each chip evenly, then let them cook for 2–3 minutes so they absorb the sauce without becoming soggy. Remove them to a plate and repeat with the remaining tortillas. The goal is a coating that’s thick enough to cling but not so heavy that it clogs the chips.
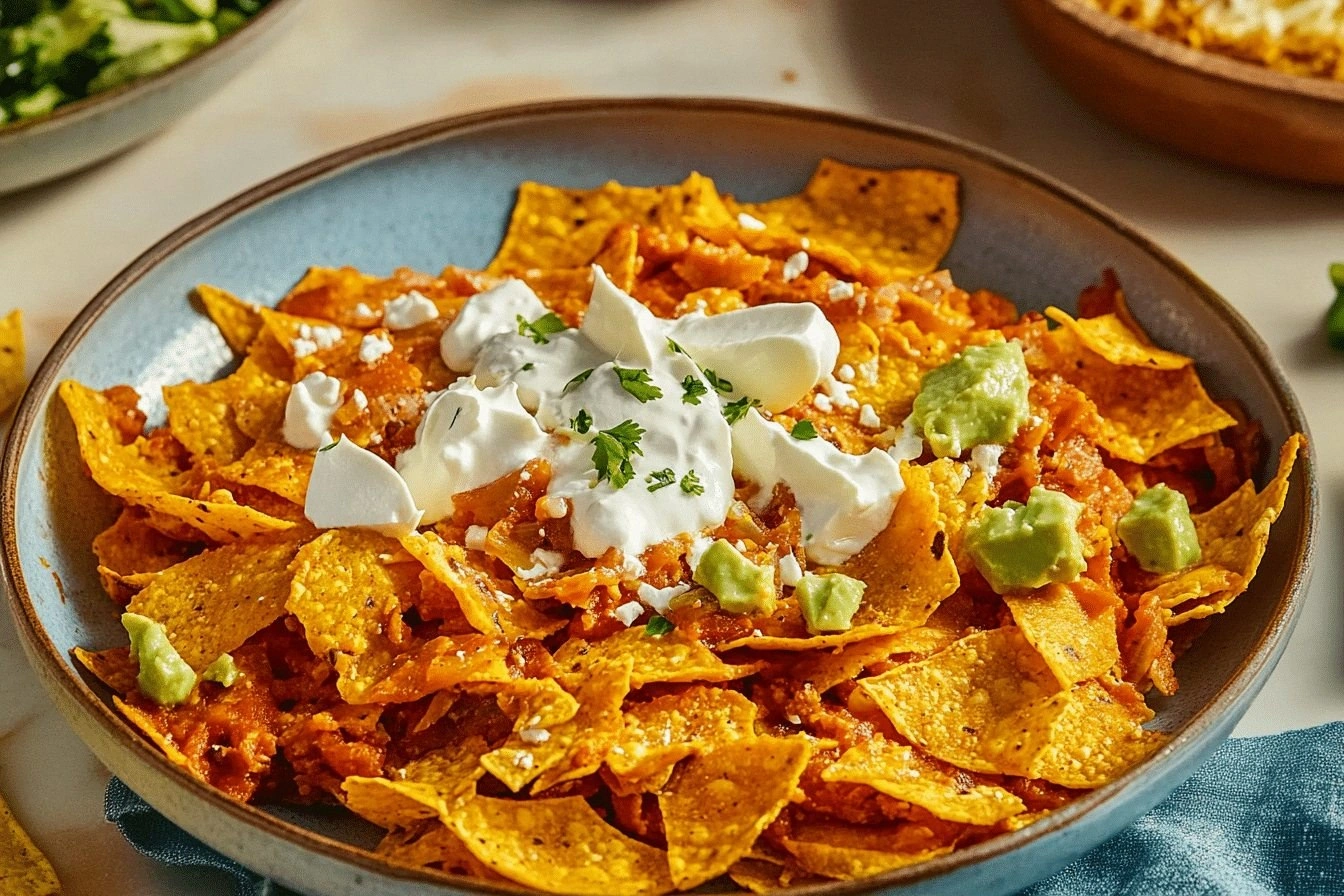
- Plate the Chilaquiles: Transfer the coated tortilla triangles to a large serving bowl or individual plates. The arrangement should look like a vibrant, slightly chaotic pile of crispy, saucy chips—an invitation to dig in.
- Add the Cheese: Sprinkle about 1 cup of crumbled queso fresco over the hot chips. The heat from the tortilla and salsa will slightly melt the cheese, creating pockets of creamy texture. If you prefer a sharper flavor, you can also add a pinch of smoked paprika.
- Finish with Freshness: Drizzle a generous amount of crema (or sour cream) across the top, then scatter chopped cilantro and a few slices of optional fried eggs. The crema cools the heat, while the cilantro adds a bright herbal note. The eggs, if included, provide a satisfying protein boost.
- Serve Immediately: The chilaquiles are best enjoyed hot, with the tortilla chips still crisp and the salsa shimmering. Serve with lime wedges on the side for an extra zing. The dish feels like a warm hug, and it’s ready to be devoured within minutes.
That’s it—you did it. But hold on, I’ve got a few more tricks that will take this to another level. Keep reading for insider tips that will elevate your chilaquiles from good to unforgettable.
Insider Tricks for Flawless Results
The Temperature Rule Nobody Follows
Many people fry tortillas at the same high heat for the entire process, which can lead to uneven cooking. Instead, start at medium heat for the first fry to ensure the tortilla cooks through, then raise the heat to medium‑high for the second fry. This method guarantees a crisp exterior while keeping the interior tender. I once tried frying everything at high heat and ended up with a hard, burnt chip that didn’t absorb the salsa at all. The temperature rule saved the day.
Why Your Nose Knows Best
Before you add the salsa, give it a quick sniff. A bright, slightly sweet aroma indicates fresh ingredients, while a flat, sour smell might mean the salsa is past its prime. Your nose is a reliable indicator of freshness—trust it. I once used a salsa that had gone bad; the dish turned out bland, and I learned to always trust that first scent.
The 5‑Minute Rest That Changes Everything
After plating, let the chilaquiles sit for about five minutes before serving. This rest allows the tortilla chips to settle, letting the salsa thicken slightly and the cheese melt evenly. The result is a more harmonious bite where every component is in sync. Skipping this step can leave you with a dish that feels disjointed.
Use Fresh Corn for Extra Crunch
If you can find fresh corn tortillas, they’ll give you an unbeatable crunch compared to store‑bought varieties. Fresh tortillas have a natural moisture content that, when fried, turns into a crisp, golden shell. If fresh tortillas are unavailable, choose a brand known for its quality and avoid ones that are too thin.
Keep It Simple, Keep It Fresh
The beauty of this recipe lies in its simplicity. Avoid overcomplicating the salsa with too many spices; let the onions, garlic, and cilantro shine. A single pinch of cumin or a splash of lime can add depth, but the core flavors should remain clear. This restraint allows each ingredient to speak for itself.
Creative Twists and Variations
This recipe is a playground. Here are some of my favorite ways to switch things up:
Smoky Chipotle Version
Swap the regular salsa for a chipotle‑infused salsa. The smoky heat adds depth, and the chipotle’s peppery bite pairs beautifully with the queso fresco. Serve with a side of guacamole for a complete Mexican brunch.
Veggie‑Loaded Delight
Add diced roasted bell peppers and corn kernels to the salsa before simmering. This boosts the vegetable content and adds sweet, caramelized flavors that contrast the creamy cheese. It’s a great way to sneak in extra veggies.
Protein‑Packed Powerhouse
Include diced chicken or beef that’s been pre‑cooked and seasoned. The meat adds a hearty element, making the dish suitable for a post‑workout breakfast. Top with a sprinkle of cheddar for an extra melty layer.
Vegan Version
Replace queso fresco with a plant‑based cheese alternative and use coconut‑milk crema. Keep the eggs optional or omit them entirely. The result is a creamy, satisfying dish that’s fully plant‑based.
Breakfast Burrito Style
Fold the chilaquiles into a large flour tortilla, add a fried egg, and roll into a burrito. This transforms the dish into a portable breakfast that’s easy to eat on the go.
Sweet & Spicy Surprise
Incorporate a splash of honey into the salsa for a subtle sweetness that balances the heat. Finish with a sprinkle of crushed red pepper flakes for an extra kick. This version is perfect for those who love a sweet‑spicy combo.
Storing and Bringing It Back to Life
Fridge Storage
Store chilaquiles in an airtight container in the refrigerator for up to 48 hours. Keep the salsa and tortilla chips separate until you’re ready to serve, as the chips can absorb moisture over time. When you’re ready to eat, reheat the salsa and chips together for a few minutes on the stovetop until hot and crisp.
Freezer Friendly
For longer storage, freeze the salsa and tortilla chips separately in freezer bags. The chips can be frozen for up to 3 months. When ready to use, thaw in the refrigerator overnight and reheat as described above. The texture will remain crisp, and the flavors will stay vibrant.
Best Reheating Method
The secret to bringing chilaquiles back to life is a quick sauté in a hot skillet. Add a splash of oil and heat the dish over medium heat until the tortilla chips are crisp again. A tiny splash of water before reheating can help steam the salsa back to its original consistency, preventing it from drying out.