Ever found yourself staring at a pantry full of ingredients, feeling like a culinary magician, only to end up with a batch of flat, lifeless cookies that taste like cardboard? That was me last Tuesday, mid‑week, after a disastrous attempt at chocolate meringues that turned out as chewy as a rubber band and as bland as a beige wall. I was about to throw the batter into the trash when a friend dared me to make a version that would make even the most skeptical taste buds swoon. I grabbed a notebook, scribbled down the ingredients, and decided that this would be the culinary revelation that would change my dessert game forever.
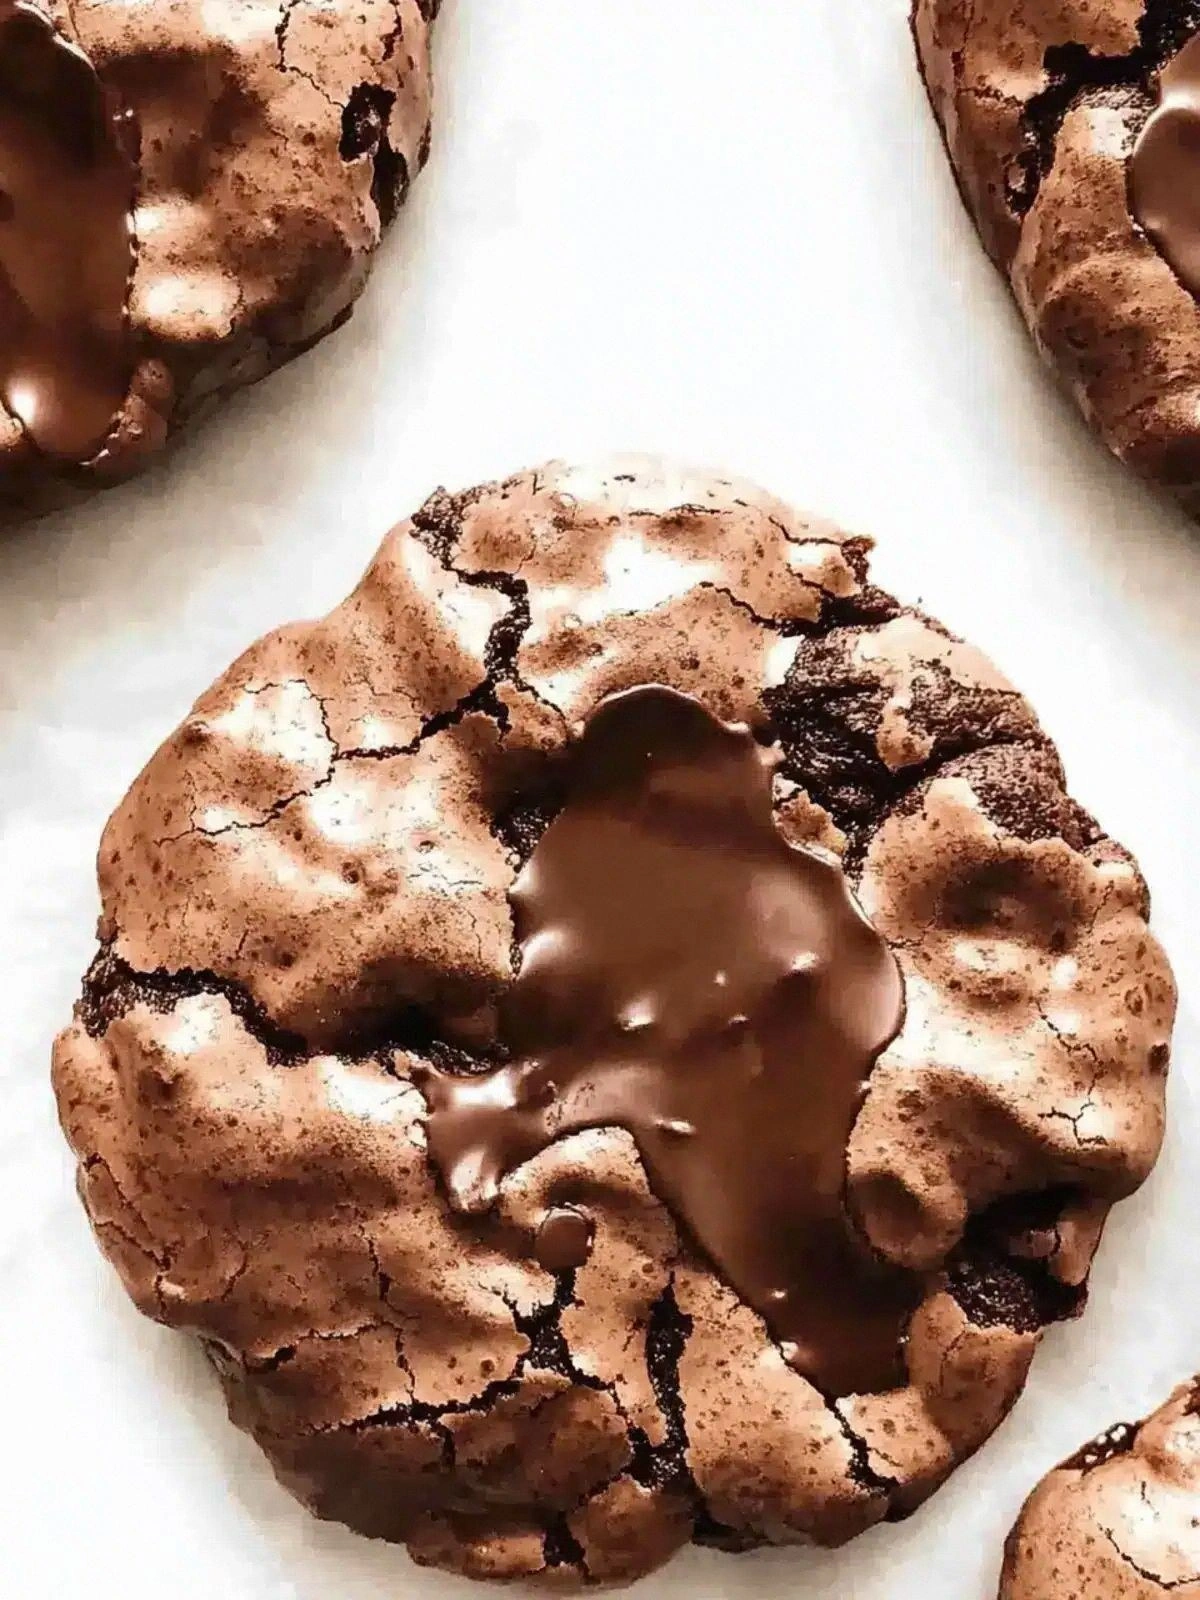
Picture this: the kitchen lights dim, the air is thick with the sweet, nutty scent of toasted walnuts, and a glossy chocolate meringue sits on a parchment sheet like a miniature moon ready to land on your tongue. The first bite is a delicate crackle, the surface crisp and the inside a cloud of silky chocolate that melts slowly, leaving a lingering, almost whisper‑like aftertaste. It’s not just dessert; it’s an edible sunrise that wakes up your senses. I’ve spent hours tweaking ratios, testing ovens, and even experimenting with different brands of cocoa, and the result is a chewy chocolate meringue that’s hands down the best version you'll ever make at home.
I dare you to taste this and not go back for seconds. The secret? A surprising twist of cornstarch that keeps the meringues chewy without compromising the airy structure, and a pinch of salt that amplifies the chocolate’s depth. Most recipes get this completely wrong by over‑whipping the egg whites or using too much sugar, which creates a brittle texture that snaps like thin ice. Here, I’ve found the sweet spot where the meringue is soft enough to bite into but still holds its shape like a miniature, edible cloud. The result is a dessert that feels indulgent yet light, like a whisper of chocolate on a summer breeze.
If you’ve ever struggled with meringues that fall apart or taste like a sugar crash, you’re not alone — and I’ve got the fix. Picture yourself pulling this out of the oven, the whole kitchen smelling incredible, and guests reaching for the next bite before you even have a chance to plate. The anticipation is half the fun, and the payoff is a chewy, chocolatey treat that feels like a secret kept just for you. Let me walk you through every single step — by the end, you'll wonder how you ever made it any other way.
What Makes This Version Stand Out
- Texture: The meringues have a unique chew that feels like a soft, chocolate‑infused cloud, thanks to a precise balance of sugar and cornstarch.
- Flavor: A robust cocoa profile is amplified by a pinch of salt, creating a depth that feels both sweet and savory.
- Ease: No fancy equipment required—just a whisk, a stand mixer, and a standard oven.
- Make‑ahead: These can be baked, cooled, and stored for up to a week, making them perfect for parties or last‑minute dessert needs.
- Nutty Boost: Toasted walnuts add a crunchy contrast, delivering a nutty aroma that lingers long after the bite.
- Visual Appeal: The glossy finish and crisp edges look like tiny chocolate moons, making them Instagram‑ready.
- Ingredient Quality: Using high‑grade cocoa and fresh egg whites elevates the final taste profile.
- Versatility: Works beautifully as a dessert, a snack, or an elegant component of a chocolate tasting menu.
Alright, let's break down exactly what goes into this masterpiece…
Inside the Ingredient List
The Flavor Base
Icing sugar is the backbone of any meringue, providing the sweetness that balances the bitterness of cocoa. It dissolves cleanly, preventing a gritty finish. If you’re on a low‑sugar diet, you can replace it with a sugar alternative like erythritol, but be prepared to tweak the mixing time, as sugar substitutes can behave differently during aeration.
The Texture Crew
Cornstarch is the unsung hero that keeps the meringues chewy. Without it, the structure becomes fragile and brittle. If you don’t have cornstarch on hand, you can use a small amount of potato starch—just keep the quantity to a quarter of a tablespoon to avoid altering the flavor profile.
The Unexpected Star
Walnuts add more than crunch—they bring a subtle earthy undertone that complements the deep chocolate notes. Toast them lightly in a dry skillet until fragrant; this step unlocks their natural oils and enhances the overall aroma. If walnuts are out of season, pecans or hazelnuts work well as alternatives, each adding a distinct flavor twist.
The Final Flourish
Vanilla is the final touch that rounds out the taste, providing a warm, aromatic backdrop to the chocolate. A quarter teaspoon is enough to elevate the flavor without overpowering the cocoa. For a more pronounced vanilla note, you can use vanilla extract instead of vanilla powder, but adjust the quantity to avoid a bitter aftertaste.
Everything's prepped? Good. Let's get into the real action…
The Method — Step by Step
- Preheat the oven to 300°F (150°C) and line two baking sheets with parchment paper. This low temperature allows the meringues to dry slowly, creating that coveted chewy interior. The parchment prevents sticking, making cleanup a breeze. Let the sheets sit in the oven to warm up; this ensures a consistent baking environment.
- Whisk the egg whites in a clean bowl until they form soft peaks. Use a stand mixer on medium speed for about 2 minutes, then increase to high for another 3 minutes. The goal is silky, glossy whites that hold their shape. Watch the peaks—they should stand tall but gently fall back into the bowl when lifted.
- Add the pinch of salt and vanilla to the whites. Fold in gently with a spatula, ensuring the mixture stays light. The salt will enhance the chocolate’s depth, while vanilla adds warmth. This step is crucial for flavor balance.
- Gradually sift in the icing sugar, a tablespoon at a time. Sifting removes lumps, creating a smooth batter. After each addition, whisk until the mixture becomes glossy and thick. This gradual incorporation prevents over‑whipping and ensures the meringue remains airy.
- Fold in the cocoa and cornstarch. Use a gentle folding motion to keep the mixture airy. The cocoa brings the chocolate flavor, while the cornstarch provides chew. Make sure both are fully integrated; any clumps will affect the final texture.
- Fold in the toasted walnuts. This is the moment you can add a dash of excitement. Use a rubber spatula to gently fold, ensuring the nuts are evenly distributed without crushing them. The walnuts add a delightful crunch and an earthy undertone.
- Pipe or spoon the batter onto the prepared sheets. Create 12–15 meringue shapes, each about 1.5 inches in diameter. Keep them spaced apart; this prevents them from merging as they bake. Use a small offset spatula to smooth the tops for an even finish.
- Bake for 30–35 minutes, then turn off the oven and leave the meringues inside. The residual heat will finish the drying process without browning. You’ll notice a subtle crackling as the surface dries, a sign that the interior is still moist and chewy. Let them cool on the sheet for 10 minutes before transferring to a wire rack.
- Cool completely on the rack. The meringues will continue to set as they cool, achieving that perfect chewy texture. Do not rush the cooling process—patience is key to a flawless finish. Once cooled, they’re ready to serve or store.
- Enjoy immediately or store in an airtight container. If you’re planning ahead, these meringues stay fresh for up to a week in the fridge. For longer storage, freeze them and reheat briefly in a low‑temperature oven to restore their chew.
That's it — you did it. But hold on, I've got a few more tricks that'll take this to another level. The next section is all about insider tips that will elevate your meringue game from good to legendary.
Insider Tricks for Flawless Results
The Temperature Rule Nobody Follows
Many bakers bake meringues at 350°F, but that high heat can cause the outer layer to brown before the interior dries. I always bake at 300°F, which gives the meringues enough time to dry slowly and maintain a chewy center. The trick is to let the residual heat finish the job—just turn off the oven and leave the meringues inside for the last 5 minutes.
Why Your Nose Knows Best
Before you even taste the first bite, inhale the aroma of the toasted walnuts and cocoa. Your nose will give you a preview of the flavor profile. If the scent feels flat, you’re probably missing a pinch of salt or under‑toasting the nuts. A good aroma is a sign that the ingredients are working together harmoniously.
The 5-Minute Rest That Changes Everything
After baking, allow the meringues to rest on the sheet for exactly 10 minutes before moving them to a rack. This short rest period lets the surface set firmly, preventing them from breaking when you handle them. Think of it as giving the meringues a brief, well‑deserved nap before they’re showcased.
The Secret to Even Size
Use a small cookie scoop or a tablespoon to portion the batter. Consistent size ensures even baking and a professional look. If you notice some meringues are slightly larger, they’ll take a minute longer to bake—just keep an eye on the edges.
The Final Crunch
If you prefer a slightly crisp exterior, bake for an additional 2–3 minutes, but watch the edges closely. The moment they start to pull away from the parchment is a sign that the meringues are ready. A quick glance at the surface will tell you if it’s time to pull them out.
Creative Twists and Variations
This recipe is a playground. Here are some of my favorite ways to switch things up:
Nutty Nirvana
Swap walnuts for a mix of pistachios and almonds. The green pistachios add a subtle sweetness, while almonds provide a hearty crunch. This combo is perfect for those who love a more complex nut profile.
Spiced Surprise
Add a pinch of cinnamon or a dash of cayenne pepper to the batter. The warmth of cinnamon pairs beautifully with chocolate, while cayenne adds a surprising heat that lingers. Ideal for a cozy, spiced dessert.
Minty Marvel
Incorporate a teaspoon of peppermint extract into the vanilla. The mint undertone gives the meringues a refreshing twist, especially during summer gatherings. It’s a delightful contrast that keeps the chocolate from feeling too heavy.
Sea Salt Sensation
Finish the meringues with a sprinkle of flaky sea salt before serving. The salty crystals add a burst of flavor that makes each bite feel indulgent and balanced. This is a simple tweak that elevates the entire dessert.
Chocolate Swirl
Create a chocolate swirl by adding a tablespoon of melted dark chocolate to the batter before folding in the walnuts. The swirl adds visual drama and an extra layer of chocolate intensity. It’s a showstopper for special occasions.
Vegan Variation
Replace egg whites with aquafaba—chicken‑leg soup liquid from a can of chickpeas. Whip it until stiff peaks form, then proceed as usual. This vegan version retains the chewy texture and chocolate flavor while being plant‑based.
Storing and Bringing It Back to Life
Fridge Storage
Place the cooled meringues in an airtight container, ideally with a paper towel to absorb any moisture. Store them in the refrigerator for up to 5 days. The cool temperature helps preserve the chewy texture without drying them out.
Freezer Friendly
Freeze the meringues in a single layer on a parchment sheet until solid, then transfer to a freezer bag. They can stay fresh for up to 3 months. When ready to serve, let them thaw at room temperature for 30 minutes to regain their softness.
Best Reheating Method
To revive frozen or stale meringues, preheat your oven to 250°F (120°C). Place them on a baking sheet and heat for 5–7 minutes, or until warmed through. For an extra touch, add a tiny splash of water on top before reheating; this steams the meringues back to perfection and restores the chewy interior.