Picture this: a crowded kitchen, a sizzling skillet, and a friend who swore she could never master the perfect crispy bite. The night before, I tried a store‑bought version of the classic bloomin’ onion, and it was a sad, soggy disappointment that made me question my culinary destiny. That night, my craving for a crunchy, savory, finger‑friendly appetizer grew louder than the music blasting from the speakers. I was determined to turn that disappointment into a triumph, and I swore I would share every secret, every tweak, and every micro‑challenge that would make you taste it and not go back for seconds.
When I first opened the bag of onions, the sharp scent of raw onions hit me like a fresh breeze on a hot summer day. I could feel the rough, papery skin under my fingertips, and the sound of my knife slicing through the layers echoed in the quiet kitchen. The anticipation was electric—there was something about the way the onion’s white layers unfurled like a delicate flower that made my heart race. I knew this wasn’t just another recipe; it was an experience that would awaken all five senses: the crisp snap of the first bite, the smoky warmth that lingers on the tongue, the sweet aroma of caramelized onion, the subtle heat of cayenne, and the comforting crunch that makes your fingers sticky with joy.
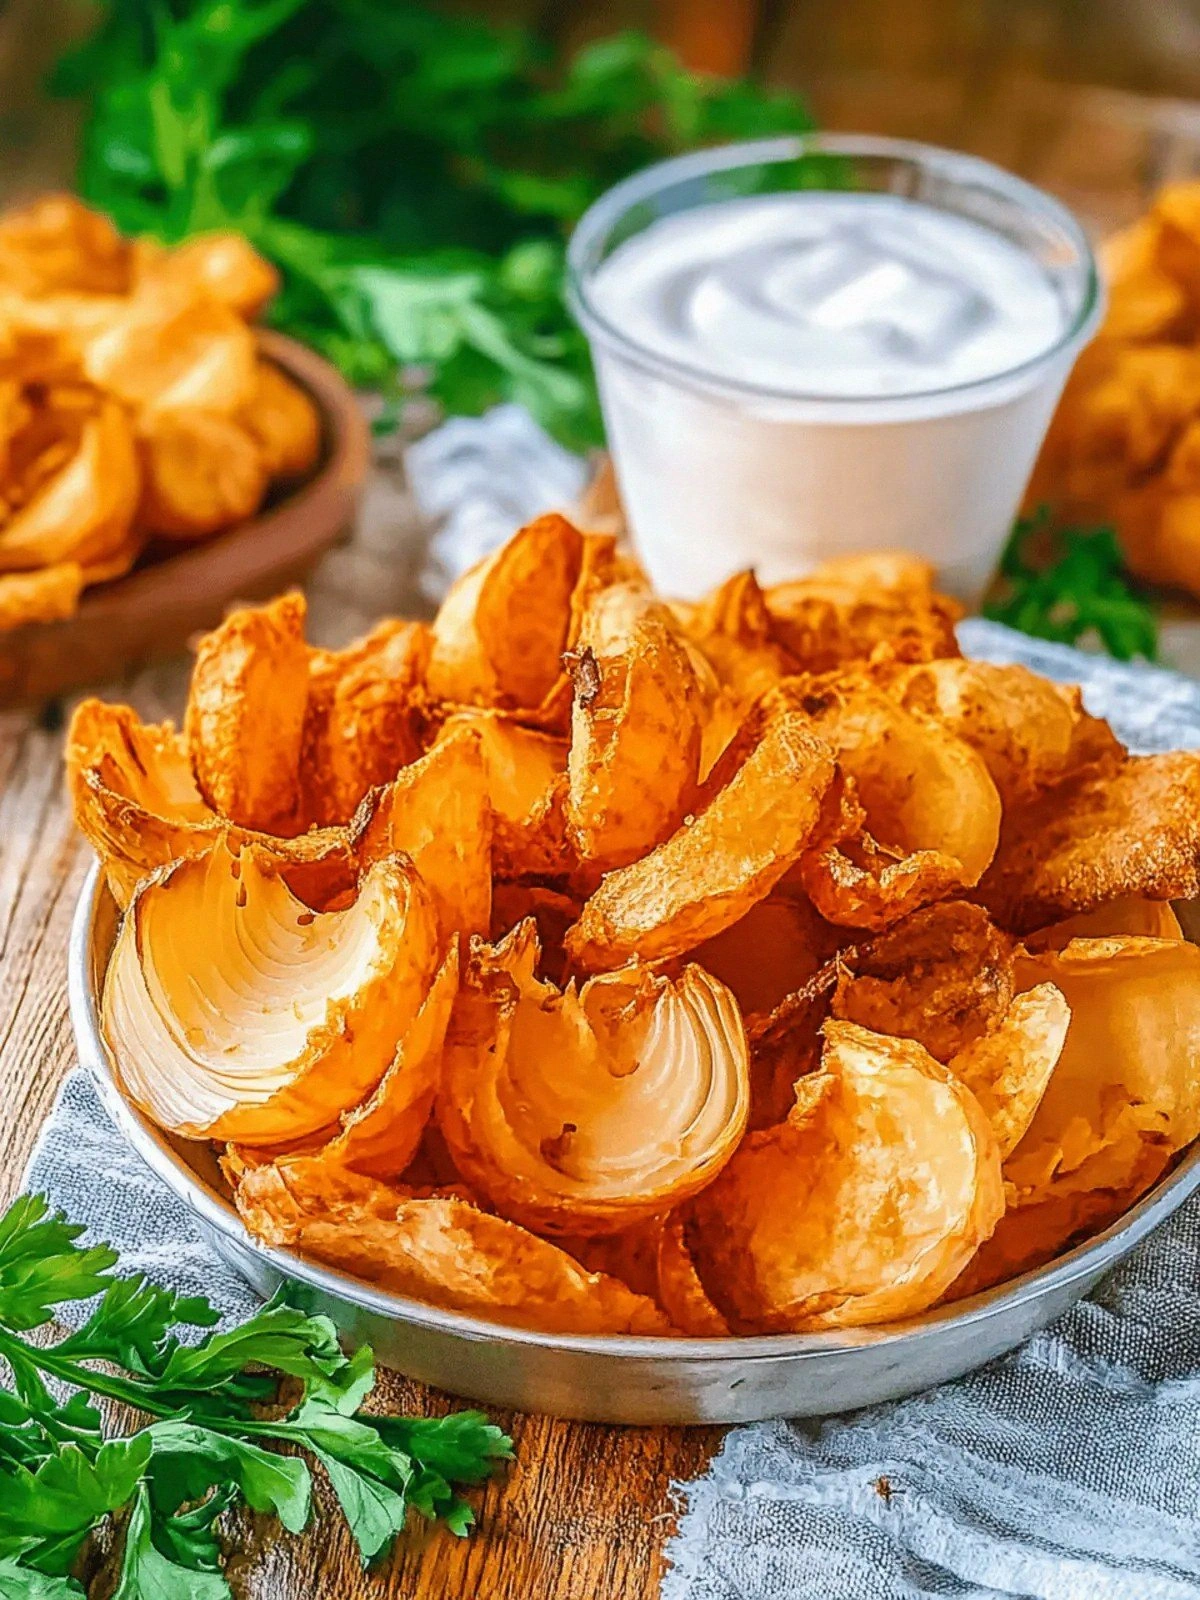
What sets this version apart from the countless renditions you’ll find online is the marriage of a velvety, horseradish‑infused sauce with a double‑dredged batter that delivers a crunch so intense it shatters like thin ice. The sauce, a silky blend of mayo, sour cream, ketchup, and a touch of smoked paprika, coats each petal like velvet, creating a flavor halo that lingers long after the last bite. Meanwhile, the batter—flour, buttermilk, and a secret blend of spices—creates a golden, airy crust that is both airy and satisfyingly crisp. Together, they form a symphony of textures and flavors that will have your guests begging for the recipe. I dare you to taste this and not go back for seconds.
Now, I’m about to walk you through every single step of this culinary adventure. From the moment you slice the onion to the final drizzle of sauce, you’ll see why this is hands down the best version you’ll ever make at home. The techniques are simple, the ingredients are pantry staples, and the results are spectacular. Picture yourself pulling this out of the skillet, the whole kitchen smelling incredible, and the plates already lined up with eager diners. Let’s dive in, and by the end, you’ll wonder how you ever made it any other way.
What Makes This Version Stand Out
- Taste: The sauce is a creamy, tangy, and slightly spicy masterpiece that elevates the natural sweetness of the onion. The horseradish gives it a kick that wakes up the palate without overpowering the delicate flavor of the petal. Each bite is a harmonious balance of sweet, savory, and heat, leaving you craving more.
- Texture: The double‑dredge technique creates a two‑layered crust—an airy, fluffy interior that cracks to reveal a golden, crunchy exterior. The result is a contrast that feels like biting into a cloud that’s been kissed by a flame. It’s the kind of texture that makes your fingers sticky with delight.
- Simplicity: Every step is straightforward, and you can do this with ingredients you already have. No exotic spices or fancy equipment are required—just a skillet, a bowl, and a splash of patience. It’s the perfect recipe for busy evenings or last‑minute dinner parties.
- Uniqueness: Unlike the typical bloomin’ onion, which is often deep‑fried in a batter, this version uses a double coating that yields a lighter, crispier result. The sauce’s subtle smokiness and horseradish infusion give it a distinctive flavor profile that sets it apart from the crowd.
- Crowd Reaction: Friends who have tried this rave about how the crunch and flavor are on a whole new level. They say it’s the kind of dish that turns a casual gathering into a memorable feast. The instant feedback is proof that this recipe delivers.
- Ingredient Quality: Using fresh, high‑quality ingredients—especially a sweet onion and real smoked paprika—makes a noticeable difference. The natural sweetness of a fresh onion shines through, while the smoked paprika adds depth without overpowering.
- Cooking Method: The two‑step batter process ensures even coating and a consistent crunch. It’s a technique borrowed from classic French onion rings but refined to bring out the best in each petal.
- Make‑Ahead Potential: The onions can be prepped and coated in advance, then fried just before serving. This makes the dish ideal for entertaining, as you can keep the prep separate from the final cooking.
Alright, let's break down exactly what goes into this masterpiece. Every ingredient, every technique, and every sensory checkpoint is designed to elevate your kitchen experience. Stay tuned, because I’m about to reveal the secrets that make this dish unforgettable.
Inside the Ingredient List
The Flavor Base
The sauce is the heart of this dish, and it starts with a creamy foundation of mayonnaise and sour cream. The mayonnaise adds richness, while the sour cream cuts through the heaviness with a bright tang. Adding ketchup provides a subtle sweetness and a hint of tomato that balances the onion’s sharpness. Horseradish, a tablespoon of prepared kind, introduces a piquant bite that wakes up the palate. Smoked paprika and cayenne pepper bring smoky depth and a gentle heat that lingers without overwhelming.
Each component of the sauce serves a purpose beyond flavor. The mayonnaise coats the petals, preventing the batter from sticking to the onion. The sour cream adds moisture, keeping the coating from drying out too quickly. Ketchup’s acidity helps the batter set, creating a crisp barrier. Horseradish’s sharpness cuts through the richness of the mayo, providing a clean finish. Smoky paprika and cayenne pepper add layers of complexity, turning each bite into a flavor explosion.
Skipping any of these ingredients will alter the balance. Without horseradish, the sauce becomes bland. Omitting smoked paprika will remove that subtle smoky undertone that makes the dish memorable. If you’re allergic to mayo, you can replace it with Greek yogurt, but the texture will shift slightly. The key is to maintain the harmony of sweet, savory, and heat.
When choosing ingredients, look for high‑quality, fresh products. Freshly grated garlic adds a bright aroma, while a good quality smoked paprika gives the sauce depth. Use real, not powdered, horseradish for an authentic kick. The onion itself should be sweet, with a firm texture that holds up during frying. These details make a noticeable difference in the final taste.
Everything's prepped? Good. Let's get into the real action and start assembling the batter.
The Texture Crew
The batter is where the magic happens, turning a simple onion into a crispy masterpiece. It starts with one cup of all‑purpose flour, which provides structure and a golden crust. Seasoned salt adds a savory depth that complements the onion’s natural sweetness. Black pepper, garlic powder, and onion powder give the batter a subtle kick and aroma, ensuring every bite is flavorful.
But the batter’s real secret lies in the buttermilk and egg. The buttermilk’s acidity reacts with the flour, creating a tender, airy interior that cracks when you bite. The egg acts as a binder, keeping the batter clinging to the onion petals while allowing it to puff up in the oil. This combination results in a light, fluffy interior that’s crunchy on the outside—a texture you’ll love.
When you add cayenne pepper and smoked paprika to the batter, you introduce a mild heat and smoky flavor that enhances the onion’s sweetness. The spices are measured carefully to avoid overpowering the delicate flavors of the onion and the sauce. If you prefer a milder version, simply reduce the cayenne pepper to 1/8 teaspoon.
For the best results, use cold buttermilk and keep the batter chilled until you’re ready to fry. This prevents the batter from absorbing too much oil and ensures a crispier texture. A chilled batter also helps the coating set faster, reducing the chances of the petals becoming soggy.
Now that the batter is ready, let’s move on to the onion itself.
The Unexpected Star
The onion is the star of this dish, and choosing the right one is essential. A large sweet onion, like a Vidalia or Walla Walla, provides the perfect balance of sweetness and mildness. Its layers are thick enough to hold their shape when sliced into petals, yet tender enough to soften during frying.
To prepare the onion, start by cutting off the top and root ends, then slice it into quarters. Remove the outer skin, and place the quarters flat side down on a cutting board. Slice each quarter into thin, even petals, about 1/4 inch thick. This thickness is crucial for a crisp exterior and a tender interior.
Some people like to soak the sliced onions in cold water for 10 minutes to reduce their pungency. This step is optional, but if you find the raw onion too sharp, a quick soak can mellow it. After soaking, pat the petals dry with a clean towel to ensure the batter adheres properly.
When you’re slicing, keep the knife steady and use a rocking motion to create uniform petals. Uneven slices can result in uneven cooking times and inconsistent textures. The goal is to have each petal cook at the same rate, giving you a uniform, golden crunch.
With the onion ready, we can now assemble the batter and coat each petal.
The Final Flourish
Before you start coating, let the batter rest for at least 10 minutes. This allows the flour to hydrate fully and the spices to meld together. A rested batter will produce a more cohesive coating that sticks to the onion petals without clumping.
When you’re ready to coat, dip each petal into the batter, ensuring it’s fully submerged. Shake off any excess batter, and then roll it in the flour mixture. This double coating creates a two‑layered crust that is both airy and crunchy. The first layer of batter forms a barrier that keeps the onion moist, while the second flour layer provides the final crunch.
For a cleaner process, use a large bowl for the batter and a separate shallow dish for the flour mixture. This setup allows you to dip and roll quickly, preventing the batter from drying out. If you’re working with many petals, consider using a paper towel to keep the coated petals from sticking to each other.
Now that every petal is coated, it’s time to heat the oil and fry the onions to golden perfection.
The Method — Step by Step
-
Begin by whisking together the mayonnaise, sour cream, ketchup, horseradish, smoked paprika, and cayenne pepper in a medium bowl. The mixture should be smooth and slightly thick, like a creamy dip. Add the minced garlic and a pinch of kosher salt, then stir until fully combined. Taste the sauce and adjust the seasoning if necessary—more salt for depth, more horseradish for heat. This sauce will coat each petal, locking in moisture and flavor.
-
While the sauce sits, prepare the batter. In a separate bowl, whisk the all‑purpose flour, seasoned salt, black pepper, garlic powder, cayenne pepper, onion powder, and smoked paprika. Then add the cold buttermilk and whisk until a thick, smooth batter forms. Fold in the beaten egg, which helps the batter bind to the onion petals. Let the batter rest for 10 minutes to hydrate the flour fully.
-
Now, take the sliced onion petals and pat them dry with a paper towel. This step is crucial—any moisture will prevent the batter from adhering properly. Dip each petal into the batter, making sure it’s fully coated. Shake off the excess batter, then roll the petal in the flour mixture. Repeat until all petals are coated twice.
-
Heat a deep skillet or Dutch oven with about 2 inches of oil to 350°F (175°C). Use a thermometer to ensure the temperature stays steady. A too‑hot oil will burn the coating, while a too‑cold oil will leave the petals greasy. The ideal temperature gives a golden, crisp crust in just a few minutes.
-
Carefully lower the coated petals into the hot oil, working in batches to avoid overcrowding. Fry each batch for 3–4 minutes, or until the coating turns a deep golden brown. Use a slotted spoon to turn the petals, ensuring even cooking on all sides. The aroma will be intoxicating, and you’ll know the timing is right when the petals crackle.
-
Once the petals are golden, remove them with a slotted spoon and place them on a paper towel rack or a plate lined with paper towels. This step drains excess oil, keeping the crust crisp. Let them rest for a minute to allow the steam to escape, preventing sogginess.
-
While the onions are still hot, drizzle the prepared sauce over them or serve it on the side as a dipping sauce. The sauce should be thick enough to coat the petals without soaking them. The contrast between the hot, crispy onion and the cool, creamy sauce creates an unforgettable flavor combination.
-
Serve immediately with a sprinkle of fresh parsley for a pop of color. The fresh herbs add a bright, herbal note that balances the richness of the sauce. If you’re hosting a party, arrange the petals on a platter with a small dish of sauce in the center. The presentation will wow your guests.
That’s it— you did it. But hold on, I've got a few more tricks that'll take this to another level. Stick around for insider tips that will elevate your crispy bloomin’ onion petals to legendary status.
Insider Tricks for Flawless Results
The Temperature Rule Nobody Follows
Many cooks think any oil temperature works, but the secret to a crisp coating is a precise 350°F (175°C). If the oil is too hot, the batter will burn before the onion cooks through; too cool, and the coating becomes greasy. Use a candy or deep‑fry thermometer to keep the temperature steady. If you don’t have a thermometer, test the oil by dropping a small piece of batter in—if it sizzles immediately, you’re good.
Why Your Nose Knows Best
Before you start frying, inhale deeply. The aroma of hot oil and onions is a clear indicator that the oil is at the right temperature. A faint, pleasant scent means the oil is ready; a sharp, acrid smell signals overheating. Trust your nose—if it feels off, wait a minute before adding more petals.
The 5-Minute Rest That Changes Everything
After frying, let the petals rest on a rack for five minutes. This pause allows the steam to escape, preventing the crust from becoming soggy. It also gives the coating a chance to set, making the crunch even more pronounced. A quick 5‑minute rest is a small investment for a big payoff.
Use Cold Buttermilk for a Light Batter
Cold buttermilk reacts with the flour to create a batter that puffs up in the oil. If you use warm or room‑temperature buttermilk, the batter may become too runny and cling to the onions rather than crisp. Keep the buttermilk refrigerated until you’re ready to mix.
Shake the Oil with Onion Pieces
Adding a small piece of onion to the oil before frying stabilizes the temperature and infuses the oil with subtle flavor. The onion releases steam, cooling the oil slightly and preventing sudden spikes. This trick also adds a hint of onion aroma to the oil, enhancing the overall flavor profile.
Use a Slotted Spoon for Even Cooking
When flipping the petals, a slotted spoon allows excess oil to drain quickly, preventing sogginess. It also provides better control, ensuring each petal is turned evenly. A regular spoon can trap oil, making the coating greasy.
Creative Twists and Variations
This recipe is a playground. Here are some of my favorite ways to switch things up:
Spicy Cajun Bloom
Swap the smoked paprika and cayenne pepper in the batter for a Cajun spice blend. Add a pinch of thyme and oregano for depth. This version delivers a bold, Southern‑style kick that pairs well with a cool ranch dip.
Herb‑Infused Petals
Incorporate fresh herbs like thyme, rosemary, or basil into the batter. The herbs infuse the coating with aromatic flavors that complement the onion’s sweetness. Serve with a lemon‑yogurt sauce for a bright finish.
Cheesy Onion Rings
After coating, roll the petals in grated Parmesan or cheddar cheese before frying. The cheese melts into a golden, crispy shell that adds a savory, umami layer. Serve with a garlic aioli for extra richness.
Vegan Version
Replace mayo with a plant‑based mayo and use a vegan buttermilk alternative. Swap the egg for a flaxseed “egg” made with flaxseed meal and water. The result is a delicious vegan option that still delivers that coveted crunch.
Sweet & Smoky Twist
Add a tablespoon of maple syrup to the sauce for a subtle sweetness. Increase the smoked paprika in the batter to intensify the smoky flavor. This combination creates a sweet‑savory balance that’s perfect for fall gatherings.
Crunchy Topping Variation
After frying, sprinkle the petals with crushed cornflakes or panko for an extra crunch. This adds a textural contrast that keeps the dish interesting. Pair with a spicy dipping sauce to keep the flavor profile balanced.
Storing and Bringing It Back to Life
Fridge Storage
Store leftover petals in an airtight container in the refrigerator for up to 2 days. Keep them on a paper towel to absorb excess moisture. Reheat in a preheated oven at 350°F (175°C) for 5 minutes to restore crispness.
Freezer Friendly
Freeze coated petals in a single layer on a baking sheet before transferring to a freezer bag. This prevents clumping. When ready to eat, bake directly from the freezer at 400°F (200°C) for 10 minutes, or until crispy.
Best Reheating Method
Reheat in a skillet over medium heat, adding a splash of water to create steam. This technique steams the petals, keeping the interior tender while the exterior regains its crunch. Avoid microwaving, as it will make the coating soggy.