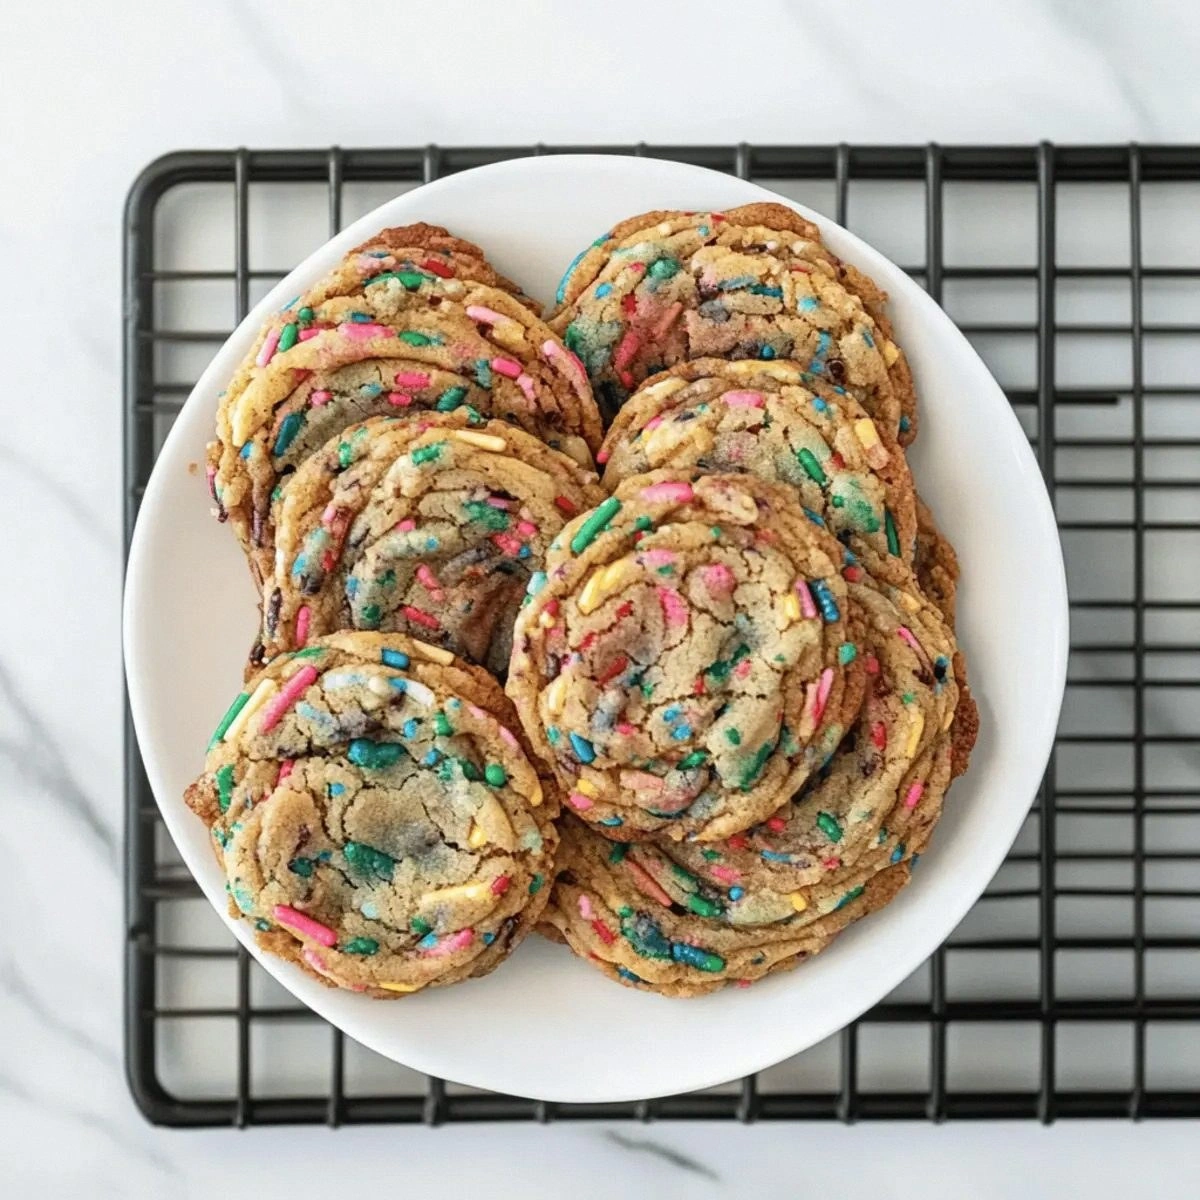
I was standing in my kitchen on a rainy Saturday night, staring at a half‑baked batch of plain sugar cookies that looked like they’d been rescued from a thrift‑store bakery. The dough was soft, the aroma was decent, but the texture? About as exciting as a wet sock. Then my best friend dared me, “Bet you can’t make a cookie that’s both crisp on the edges and chewy in the middle, and still looks like a confetti cannon exploded on a pan!” I laughed, I accepted, and I went down the rabbit hole of butter‑softening, sprinkle‑sprinkling, and pan‑banging alchemy. I’ll be honest — I ate half the batch before anyone else got a chance to try it, but the rest survived long enough for me to document the exact process.
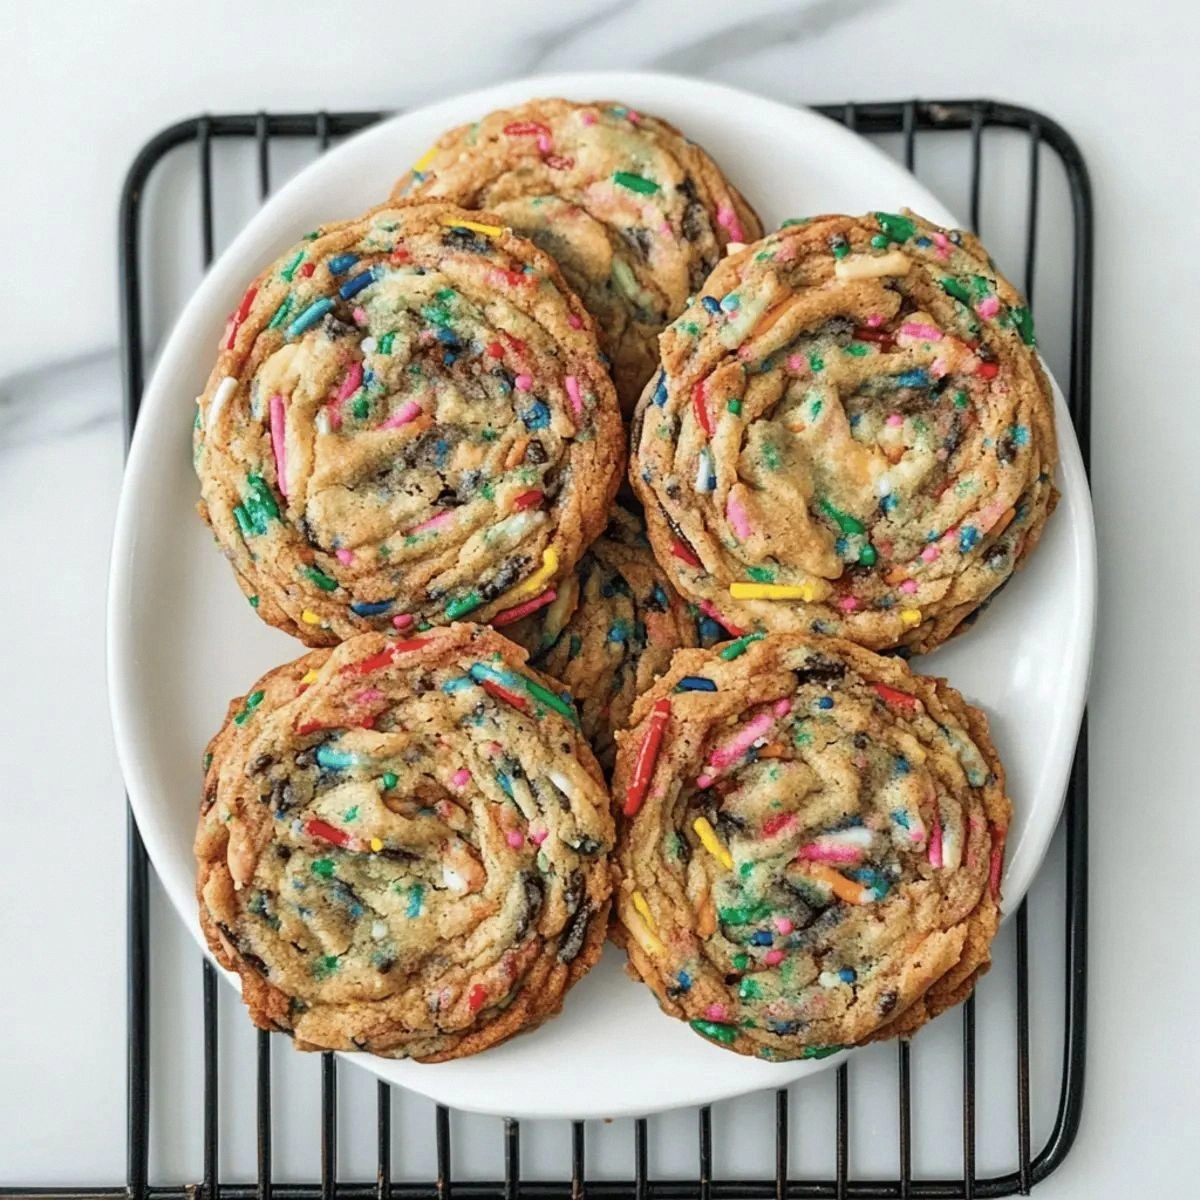
Picture this: a golden‑brown edge that shatters like thin ice under your bite, while the center stays tender enough to melt on your tongue like a warm hug. The scent of vanilla and almond swirling with caramelized sugar fills the kitchen, and every time you crack open the tin, a cascade of rainbow jimmies bursts out, daring you to dive in. The sound of the cookie hitting the hot pan is a satisfying sizzle that says, “We’re about to create something unforgettable.” I’ve tried dozens of funfetti recipes, most of which ended up flat, cakey, or just plain soggy. Most recipes get this completely wrong. Here’s what actually works: a quick “pan‑banging” technique that creates a crisp crust while preserving that coveted chew.
What makes this version stand out is a secret weapon — a splash of water added at just the right moment, and a brief, high‑heat “bang” on the skillet that locks in moisture. The result? A cookie that’s crisp on the outside, chewy inside, and speckled with bright, crunchy sprinkles that stay in place instead of melting into a sugary puddle. I dare you to taste this and not go back for seconds; the texture contrast is so addictive it practically whispers, “Take another.” And now, ready for the game‑changer? Let me walk you through every single step — by the end, you’ll wonder how you ever made it any other way.
What Makes This Version Standout
- Texture: The pan‑banging method creates a crisp edge that shatters like thin ice while the center stays soft and chewy, delivering a dual‑sensory experience in each bite.
- Flavor: A duet of vanilla and almond extracts adds depth, while the buttery base carries the sweet, caramelized notes of the sugars.
- Simplicity: Only ten ingredients, no fancy equipment, and a 30‑minute bake time make this recipe approachable for beginners and pros alike.
- Visual Impact: The jimmies sprinkles stay vibrant, creating a confetti‑like explosion that’s perfect for celebrations, birthdays, or any moment that calls for a little sparkle.
- Crowd Reaction: Guests often ask for the “secret” after the first bite, and the answer is always “just a splash of water and a quick pan‑bang.”
- Ingredient Quality: Using real butter, not margarine, and high‑quality sprinkles ensures each component shines without any off‑flavors.
- Cooking Method: The high‑heat pan‑bang locks in moisture, preventing the dreaded flat, cakey texture that plagues most funfetti recipes.
- Make‑Ahead Potential: These cookies store beautifully, staying crisp for days if kept in an airtight container, so you can bake ahead for any celebration.
The Texture Crew
Baking soda is the leavening hero that creates a tiny lift, ensuring the cookie isn’t dense. Too much, and you’ll get a metallic aftertaste; too little, and the cookie stays flat. The 0.5 teaspoon amount is calibrated for a subtle rise that contributes to the chewy interior without making the cookie puffy. Salt, at 0.75 teaspoons, amplifies the sweetness and balances the butter, preventing the flavor from becoming one‑dimensional. It also strengthens the gluten network, giving the cookie that satisfying snap.
Butter, in the form of two sticks at room temperature, is the flavor engine. It should be soft enough to cream easily but not melted, otherwise the cookie spreads too quickly and loses its crisp edge. If you’re using European‑style butter (higher butterfat), you’ll get an even richer taste and a slightly crisper crust.
The Sweet Symphony
Granulated sugar (1.5 cups) caramelizes during the pan‑bang, forming that golden‑brown crust we all crave. Brown sugar (0.25 cups) adds moisture and a hint of molasses, contributing to the chewy middle. Together, they create a complex sweetness that’s deeper than plain white sugar alone. If you prefer a less sweet cookie, reduce the granulated sugar by ¼ cup, but keep the brown sugar for texture.
The single large egg acts as a binder, adding structure while also providing a subtle richness. For those with egg allergies, a flax‑egg (1 tablespoon ground flaxseed mixed with 3 tablespoons water) works as a substitute, though the texture will be slightly less tender.
The Unexpected Star
Vanilla and almond extracts each bring their own aromatic profile. Vanilla rounds out the flavors, while almond adds a nutty brightness that cuts through the butter richness. If you’re allergic to nuts, you can omit the almond extract; the cookie will still be delicious, just a touch less complex. Finally, the 2 tablespoons of water might seem odd, but it creates steam during the pan‑bang, ensuring the interior stays moist while the exterior crisps.
Jimmies sprinkles (0.5 cups) are the visual fireworks. Their sugar coating resists melting thanks to the high‑heat sear, so they remain crunchy and colorful. If you want a more sophisticated look, swap for pastel non‑nutri‑color sprinkles or even finely chopped candied citrus peel.
Everything's prepped? Good. Let’s get into the real action…
The Method — Step by Step
Preheat your oven to 375°F (190°C) and place a heavy‑bottomed cast‑iron skillet on the middle rack to heat up. You want the pan scorching hot, about 400°F, so that when the dough hits it, the sizzle is immediate and the crust forms instantly. This is the moment of truth: if the pan isn’t hot enough, the cookie will spread and lose its crisp edge.
In a large mixing bowl, whisk together the flour, baking soda, and salt. This aerates the dry ingredients and ensures an even distribution of leavening. Set aside; you’ll notice the mixture looks slightly fluffy, which is a good sign.
In a separate bowl, cream the softened butter with the granulated and brown sugars until the mixture is light, fluffy, and pale yellow — about 3 minutes with a handheld mixer on medium speed. The texture should resemble a smooth frosting, and you’ll hear a faint “whoosh” as air is incorporated.
Add the egg, vanilla extract, and almond extract to the butter‑sugar blend. Beat until just combined; over‑mixing can develop too much gluten, leading to a tougher cookie. The batter will look glossy and slightly thick.
Gradually add the dry flour mixture to the wet ingredients, mixing on low speed. Stop as soon as the dough comes together; you’ll notice it becomes a cohesive ball that pulls away from the sides of the bowl. At this stage, fold in the water and then the jimmies sprinkles, distributing them evenly without crushing them.
Cover the dough with plastic wrap and chill in the refrigerator for exactly 30 minutes. Kitchen Hack: Set a timer; this precise chilling time is crucial for the butter to firm up just enough to give you that snap when the dough hits the pan.
While the dough chills, lightly oil the preheated skillet with a neutral oil (like grapeseed) and wipe away excess with a paper towel. The pan should be shimmering but not smoking.
Watch Out: Too much oil will cause the cookies to fry rather than bake, resulting in a greasy texture.Scoop a heaping tablespoon of dough (about 30 g) and gently flatten it in your hand. Place it onto the hot skillet, then immediately press down with the back of a spatula to “bang” it flat, creating a thin, even layer that will crisp quickly. You’ll hear a satisfying sizzle that tells you the pan is doing its job.
Bake for 8‑10 minutes, rotating the pan halfway through to ensure even browning. The edges should turn a deep golden‑brown, and the center will still look slightly soft — that’s perfect because the residual heat will finish the cooking without over‑drying.
Remove the skillet from the oven and let the cookies rest on the pan for 2 minutes before transferring them to a wire rack. This short rest allows the steam to finish the interior while the crust stays crisp. And now the fun part: repeat the process with the remaining dough, letting the pan re‑heat between batches.
That’s it — you did it. But hold on, I’ve got a few more tricks that’ll take this to another level, ensuring every bite is as unforgettable as the first.
Insider Tricks for Flawless Results
The Temperature Rule Nobody Follows
Never bake funfetti cookies at a low temperature. The high heat of 375°F creates the rapid steam burst that locks in moisture while the exterior crisps. If you lower the oven to 350°F, you’ll lose that contrast, ending up with a uniformly soft cookie. I once tried a “gentle bake” after reading a vague blog post, and the result was a soggy mess that barely held together. Trust the heat; it’s the secret behind that satisfying snap.
Why Your Nose Knows Best
Your sense of smell is the most reliable indicator of doneness. When the edges start to smell nutty and caramelized, that’s your cue to pull the pan out. If you rely solely on timer, you risk over‑baking and losing chewiness. I always stand a foot away, inhaling deeply; that aromatic cue tells me the cookie is ready for the next step.
The 5‑Minute Rest That Changes Everything
After the cookies finish baking, let them rest on the skillet for exactly two minutes, then transfer to a wire rack for a full five‑minute cool‑down. This rest allows the interior steam to finish cooking gently, preventing a gummy center. Skipping this step leads to a cookie that’s too soft and can crumble when you try to lift it. It’s a tiny patience exercise that pays massive dividends.
Butter Temperature Tactics
Room‑temperature butter should be soft enough to leave an imprint when pressed with a finger, but not so warm that it oozes. If you’re in a hot kitchen, chill the butter for 10 minutes before creaming; if it’s cold, let it sit a few minutes longer. The right butter texture ensures the dough spreads just enough to create that thin, crisp edge.
Sprinkle Shield Strategy
To keep sprinkles from melting into the dough, fold them in gently after the water is added. The water creates a thin barrier that protects the sugar coating on the sprinkles. I once mixed sprinkles too early, and they turned into a sugary puddle that stained the cookie surface. This little timing tweak preserves both color and crunch.
Creative Twists and Variations
This recipe is a playground. Here are some of my favorite ways to switch things up:
Chocolate‑Covered Funfetti
After the cookies have cooled, drizzle them with melted dark chocolate and sprinkle a pinch of sea salt. The bitterness of the chocolate balances the sweet sprinkles, creating a sophisticated flavor that’s perfect for adult parties.
Citrus Zest Burst
Add one tablespoon of finely grated lemon or orange zest to the butter‑sugar mixture. The citrus brightens the buttery base and pairs beautifully with the almond extract, giving the cookie a fresh, summery twist.
Nutty Crunch
Stir in ¼ cup of toasted, finely chopped almonds or pistachios just before folding in the sprinkles. The nuts add an extra layer of texture and a subtle earthiness that complements the sweet confetti.
Brown Butter Funfetti
Swap the regular butter for browned butter (cook butter until it turns amber and smells nutty). This adds a deep, caramelized flavor that makes the cookies taste like a bakery’s premium offering.
Holiday Spice Edition
Mix ½ teaspoon each of ground cinnamon, nutmeg, and a pinch of clove into the dry ingredients. Pair with red and green sprinkles for a festive twist that’s perfect for Christmas gatherings.
Storing and Bringing It Back to Life
Fridge Storage
Place the cooled cookies in an airtight container with a paper towel layer at the bottom to absorb any residual moisture. They’ll stay crisp for up to five days in the refrigerator, and the chill helps preserve the vibrant color of the sprinkles.
Freezer Friendly
Separate a single layer of cookies on a parchment‑lined tray and freeze for two hours. Transfer the frozen cookies to a zip‑top freezer bag. They’ll keep for up to three months. When you’re ready to serve, let them thaw at room temperature for 15 minutes, then re‑heat briefly.
Best Reheating Method
To revive that crisp edge, preheat your oven to 300°F (150°C) and bake the cookies for 5‑7 minutes. For an extra moisture boost, add a tiny splash (about 1 teaspoon) of water to the bottom of the oven tray; the steam will revive the chewy center without sogging the edges.