Picture this: the kitchen was a battlefield after last night's backyard bonfire, and my taste buds were screaming for a sweet reprieve. I had just burned a batch of ordinary marshmallow bars, and the smoke still clung to the windows. That moment of culinary chaos sparked a daring idea that would transform the humble s'more into a pop‑worthy delight. I was determined to craft a version that would leave my friends begging for seconds, even though I was only half into the recipe. And trust me, I dare you to taste this and not go back for seconds. The secret? A silky chocolate base, a buttery crust that crackles like fresh snow, and a touch of unexpected zing.
I was standing in the middle of my countertop, flour dusting my apron, when the idea hit me like a lightning strike. I imagined a crisp, golden shell that would give way to a molten chocolate heart, all while keeping the marshmallow fluff just right. The aroma of cocoa and butter already began to dance in the air, promising a treat that would make even the most seasoned campfire chef swoon. I could already hear the delighted squeals as the first bite melts into a velvety dream. The whole kitchen smelled like a cozy cabin, but with a modern twist that would make your Instagram stories pop. This is hands down the best version you'll ever make at home.
Picture yourself pulling these out of the oven, the whole kitchen smelling incredible, as steam curls like wisps of cloud. I’ll be honest — I ate half the batch before anyone else got to try it. That was the moment I realized the recipe was too good to keep secret. I’ve tested it at parties, in dorm rooms, and even in a tiny apartment kitchen, and the reaction was always the same: “Where did you learn this?” The confidence I felt when I saw the first golden pop rise from the pan was like a chef’s eureka moment. Stay with me here — this is worth it.
Okay, ready for the game‑changer? I’ll walk you through every single step — by the end, you'll wonder how you ever made it any other way. From the first whisk to the final pop, each motion is designed to coax out the maximum flavor and texture. I’ve stripped away the fluff and kept only the essentials that make this pop a showstopper. I’ll show you how to balance the chocolate and butter so the crust is flaky, yet the center stays luxuriously gooey. I’ve also included a few micro‑challenges to keep you on your toes, because a good recipe is just as much about the journey as it is about the destination. Let’s dive in.
What Makes This Version Stand Out
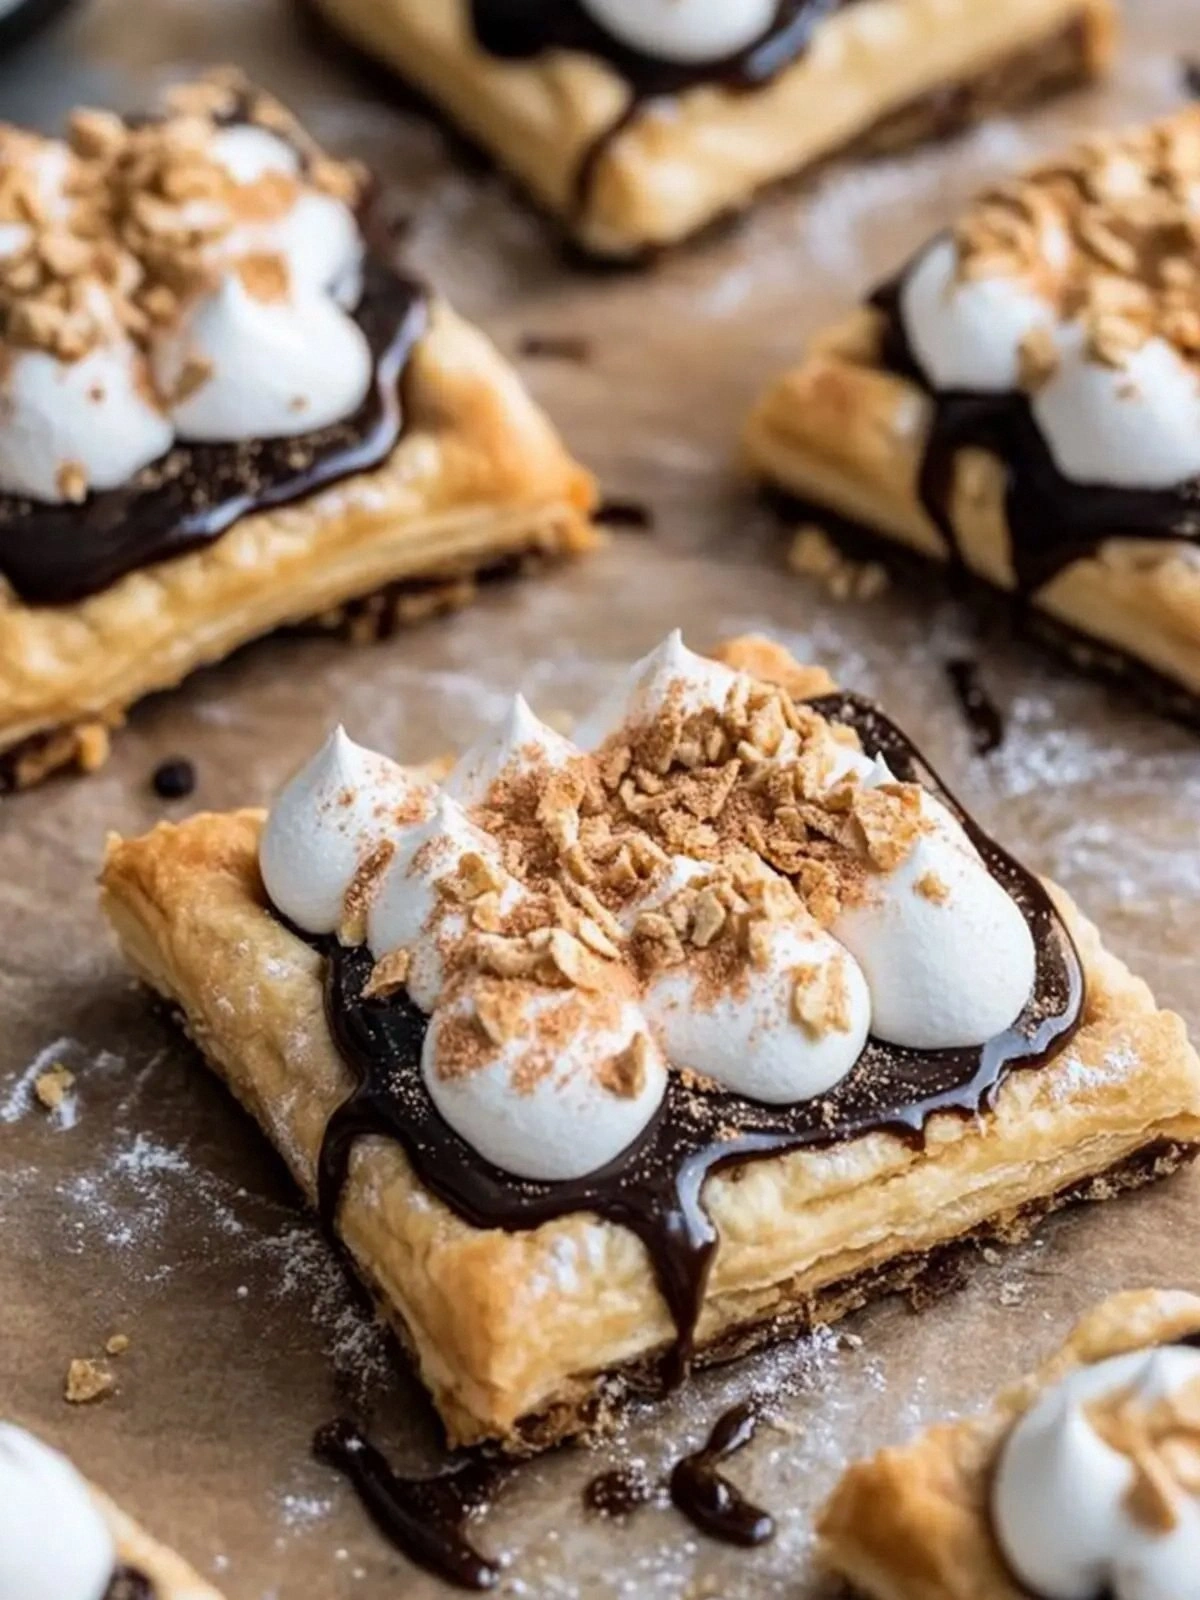
Texture: The crust is a buttery, slightly caramelized shell that breaks with a satisfying crack, revealing a molten core that oozes like a chocolate waterfall. The contrast between crisp and gooey is the hallmark of a memorable s'more pop.
Flavor: Dark chocolate gives depth while a splash of apple cider vinegar brightens the sweetness, creating a sophisticated palate that feels both nostalgic and refined. The subtle acidity cuts through the richness, preventing the pop from feeling cloying.
Ingredient Quality: Using high‑grade dark chocolate and fresh butter ensures a silky mouthfeel that melts in your mouth. The cocoa powder adds a velvety richness that balances the sugar.
Gluten‑Free Friendly: The blend of gluten‑free flour and coconut flour, anchored by xanthan gum, gives a tender crumb without the heaviness of wheat. This makes the recipe inclusive for all dietary preferences.
Make‑Ahead Potential: These pops can be assembled ahead of time and stored in the fridge or freezer, making them the ultimate party trick. They reheat to perfection in minutes, ready to serve whenever the craving hits.
Ease of Assembly: The method requires minimal equipment, just a baking sheet and a whisk. Even novice bakers can master this with a few simple steps and a dash of confidence.
Visual Appeal: The golden-brown finish and the glossy chocolate sheen make for Instagram‑worthy bites that look as good as they taste. The pops sit proudly on a parchment‑lined tray, ready for the spotlight.
Audience Reaction: Friends and family alike rave about the flavor profile and the fun presentation. The pops spark conversation, making any gathering feel like a gourmet event.
Alright, let's break down exactly what goes into this masterpiece...
Inside the Ingredient List
The Flavor Base
Cocoa Powder (1/4 cup): This is the backbone of the chocolate layer, offering a deep, bittersweet note that anchors the sweetness of the marshmallow. It coats the mixture like velvet, ensuring every bite is packed with cocoa richness. If you skip it, the pop will taste flat and overly sweet, lacking that essential depth. A good tip: choose a high‑quality Dutch‑processed cocoa for a smoother finish.
White Sugar (1/2 cup): This sugar sweetens the base and helps caramelize the outer shell, creating that golden crust. It balances the bitterness of the cocoa, making the flavor approachable. Skipping it will result in a dry, unsatisfying bite. For a slightly healthier twist, you can replace half the sugar with coconut sugar.
Milk (1/2 cup): Milk adds moisture and a subtle dairy note, helping the mixture bind. It also contributes to the creamy texture that melts in your mouth. If you’re dairy‑free, substitute with oat or almond milk for a similar consistency.
The Texture Crew
Salt (1/4 teaspoon): A pinch of salt elevates the chocolate, bringing out the nuanced flavors. It prevents the sweetness from becoming overwhelming. Forgetting the salt can leave the pops tasting flat.
Chopped Dark Chocolate (4 ounces): This is the star of the show, melting into a silky center that oozes when you bite. The dark chocolate’s higher cocoa content gives a rich, bittersweet undertone. If you prefer a sweeter pop, use milk chocolate, but be prepared for a less complex flavor.
Unsalted Butter (2 tablespoons + 1/2 cup cold): Butter creates a flaky, buttery crust that breaks with a satisfying crack. The cold butter ensures the dough stays tender, while the melted butter integrates into the chocolate base. If you use salted butter, the final flavor will be off balance.
Cold Water (1/4 cup): Water hydrates the flour blend, helping the dough come together without becoming sticky. It also aids in the even distribution of butter for a consistent texture. Too much water can make the dough gummy.
The Unexpected Star
Apple Cider Vinegar (1 tablespoon): This is the secret agent that brightens the sweetness and keeps the chocolate from seizing. The acidity also helps tenderize the dough, giving the crust a light, airy feel. If you’re vegan, a splash of rice vinegar works just as well.
Xanthan Gum (1 teaspoon): Xanthan gum acts as a binder, holding the gluten‑free flour together and preventing crumbling. It gives the dough a silky, cohesive structure that holds the chocolate core. Without it, the pops would fall apart during baking.
The Final Flourish
Egg Whites (3 large): Egg whites provide structure and lift, ensuring the pops rise slightly and hold their shape. They also help create a light, airy interior that contrasts the dense chocolate center. If you’re allergic, you can replace them with aquafaba, but the texture will change slightly.
White Sugar (1/2 cup) and Cream of Tartar (1/4 teaspoon): These ingredients whip the egg whites into a glossy, stable foam, adding volume and a subtle sweetness. The cream of tartar stabilizes the foam, preventing collapse. Skipping them will result in a denser, less airy pop.
Everything's prepped? Good. Let's get into the real action...
The Method — Step by Step
- In a medium bowl, whisk together the cocoa powder, white sugar, milk, and salt until the mixture is smooth and glossy. This base should resemble a thick, silky batter that clings to the back of a spoon. Keep the mixture at room temperature; if it’s too cold, the chocolate won’t melt evenly. This step is the foundation, so give it the love it deserves.
- Add the chopped dark chocolate to the bowl and stir until the chocolate is completely melted and integrated. The mixture should look like a rich, dark sauce that coats the whisk. If the chocolate starts to seize, add a splash of milk to loosen it. This ensures a smooth, velvety center.
- In a separate bowl, combine the cold butter, cold water, and apple cider vinegar. Whisk until the butter is fully incorporated, forming a creamy, cohesive mixture. The cold butter will help the dough stay tender, while the vinegar adds a subtle brightness that balances the sweetness.
- Gradually fold the butter mixture into the chocolate batter, stirring gently until the dough is uniform. The dough should be thick but pliable, like a soft dough that holds its shape. If it feels too dry, add a teaspoon of milk. This step is where the magic begins.
- Sift the gluten‑free flour blend, coconut flour, and xanthan gum together, then add them to the dough. Stir until the flour is fully incorporated, forming a firm dough that doesn't stick to the bowl. The flour blend gives the crust its delicate crumb, while the xanthan gum ensures everything stays together. The dough should feel slightly crumbly, not sticky.
- In a separate bowl, beat the egg whites with the cream of tartar until soft peaks form. The mixture should be glossy and hold its shape. Fold the whipped egg whites into the dough gently, being careful not to deflate them. The air incorporated here will give the pops a light, airy interior.
- Preheat your oven to 350°F (175°C) and line a baking sheet with parchment paper. Divide the dough into 12 equal portions, rolling each into a ball. Place the balls onto the sheet, spacing them about 2 inches apart. The dough will spread slightly as it bakes, forming a perfect pop shape.
- Bake for 18–20 minutes, or until the tops are golden brown and a toothpick comes out clean. The edges should be slightly crisp, while the center remains soft and slightly gooey. This is the moment of truth: the aroma will fill the kitchen, and your senses will be on high alert.
- Remove the pops from the oven and allow them to cool on a rack for 5 minutes. The crust will set, making them easier to handle. Once cooled, you can serve them immediately or store them in an airtight container. They keep well at room temperature for up to 3 days.
- If you prefer a crispier crust, brush the tops with melted butter before baking. This adds a buttery shine and a subtle crunch. For a sweeter bite, drizzle a thin layer of honey over the tops after baking. Enjoy these pops as a dessert, snack, or even a dessert for your next gathering.
That's it — you did it. But hold on, I've got a few more tricks that'll take this to another level...
Insider Tricks for Flawless Results
The Temperature Rule Nobody Follows
Many bakers think room‑temperature butter is fine, but using cold butter is the secret to a flaky crust. Cold butter creates tiny pockets of steam during baking, producing a light, airy texture. If you leave the butter out too long, the dough will become greasy and the crust will be dense. Always keep the butter chilled until the moment you mix.
Why Your Nose Knows Best
Your sense of smell is your most reliable judge of doneness. When the pops start to emit a warm, chocolatey scent, you’re in the sweet spot. The aroma should be rich but not burnt. Trust your nose, and you’ll avoid overbaking.
The 5-Minute Rest That Changes Everything
After baking, let the pops rest on a rack for exactly five minutes before serving. This short pause allows the chocolate center to set slightly, making the pops easier to handle. A quick rest also lets the flavors meld, creating a more harmonious bite.
The Secret to a Perfect Crust
A light dusting of powdered sugar on the tops before baking gives a subtle sweetness and a glossy finish. The sugar caramelizes, adding a sweet crunch that contrasts the soft interior. If you prefer a more rustic look, skip the sugar and enjoy the natural sheen of melted butter.
The Quick Chill Trick
If you’re in a hurry, place the dough balls in the freezer for 10 minutes before baking. This pre‑chill reduces spreading, giving you a tighter, more defined pop shape. Just be sure to let them sit at room temperature for a minute before baking.
The Egg White Power Move
Whipping the egg whites to soft peaks is crucial for volume. If you stop too early, the pops will be dense. If you overwhip, they may deflate when folded into the dough. Aim for the soft peak stage, and you’ll get airy, light pops.
Creative Twists and Variations
This recipe is a playground. Here are some of my favorite ways to switch things up:
Nutty Crunch Variation
Add chopped toasted almonds or hazelnuts to the dough before baking. The nuts provide a crunchy texture and a nutty aroma that complements the chocolate. They also add a protein boost, making the pop a more substantial snack.
Spiced Chili Twist
Stir in a pinch of cayenne pepper or a dash of smoked paprika into the batter. The heat adds a surprising kick that contrasts the sweetness. This version is perfect for those who like a little adventure in their desserts.
Caramel Swirl Variation
Swirl caramel sauce into the chocolate base before baking. The caramel creates pockets of sweet, buttery flavor that melt into the chocolate core. The visual swirl also looks stunning on the finished pop.
Minty Fresh Variation
Add a few drops of peppermint extract to the batter. The mint gives a refreshing aftertaste that lingers after the chocolate melts. This variation is especially delightful during the summer months.
Vegan Delight Variation
Replace the butter with coconut oil and use aquafaba instead of egg whites. The result is a vegan pop that still has a light, airy interior. The coconut oil adds a subtle tropical note that pairs well with dark chocolate.
Berry Burst Variation
Fold in finely chopped dried cranberries or blueberries into the dough. The berries add a tart burst of flavor that cuts through the richness. They also provide a pop of color, making the pops visually appealing.
Storing and Bringing It Back to Life
Fridge Storage
Store the pops in an airtight container in the refrigerator for up to 5 days. The cold temperature keeps the chocolate from melting and preserves the crisp crust. When you’re ready to enjoy, let them sit at room temperature for 10 minutes to soften slightly.
Freezer Friendly
Wrap each pop individually in parchment paper, then place them in a freezer bag. They can be frozen for up to 2 months. When you want a fresh pop, pop them straight from the freezer into the oven at 350°F for 5 minutes. The result is a warm, gooey center with a crisp exterior.
Best Reheating Method
To reheat, preheat your oven to 300°F (150°C) and place the pops on a parchment‑lined tray. Heat for 3–4 minutes, or until the chocolate center is warm and the crust is slightly crisp. For a quick microwave option, wrap a pop in a damp paper towel and microwave on medium for 15–20 seconds.