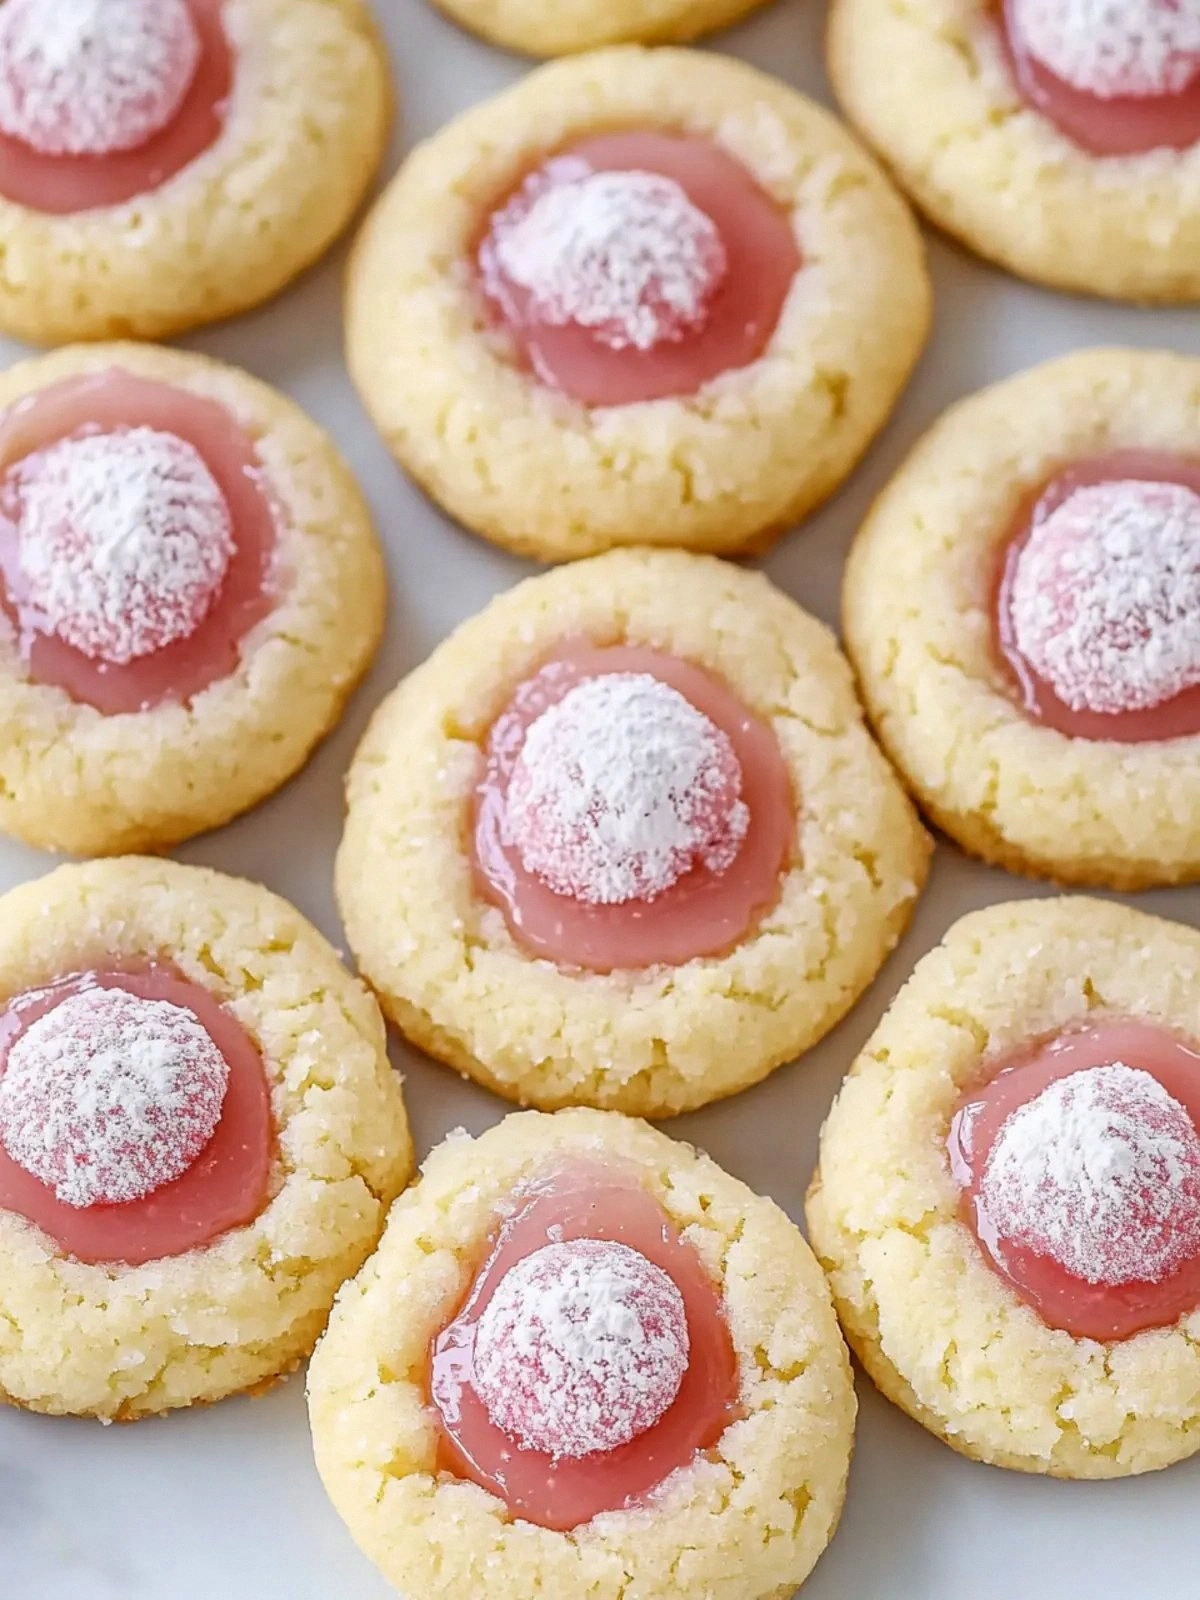
I was standing in the kitchen, staring at a soggy batch of lemon cookies that had been ruined by a single careless stir. The dough had turned into a mushy, unrecognizable mess, and the lemon zest had lost its bright, citrusy punch. I thought, “This is how my culinary career ends?” Then, a friend dared me to make a “pink lemonade thumb” cookie that would turn heads at the next brunch. I grabbed my whisk, rolled out the dough, and decided to rewrite the rulebook. The result was a cookie that was light, airy, and bursting with a sweet‑tart pink lemonade flavor that made even my skeptical taste buds swoon.
Picture the scene: the kitchen light flickers, a gentle hum from the fridge, and the aroma of freshly grated lemon zest wafting through the air. The dough clinks against the mixing bowl, the butter melts into a silky sheen, and the sugar crystals glitter like tiny stars. When you break a cookie in half, the pink lemonade filling glows like a sunrise in a glass of tea. The texture is a contrast of a crisp edge and a tender, melt‑in‑your‑mouth center that feels like a secret kiss. It’s not just a cookie; it’s an edible work of art that speaks to the senses and leaves you craving more.
What makes this version stand out from every other recipe is that it balances the bright citrus with a subtle, velvety sweetness that never feels overpowering. The dough is light enough to bake to a golden perfection, yet dense enough to hold the luscious pink lemonade filling. I’ve eliminated the common pitfalls—over‑mixing the butter, under‑baking the cookies, and using too much sugar—which most recipes stumble over. The result? A cookie that’s a perfect bite‑size companion to coffee, tea, or a summer cocktail. I dare you to taste this and not go back for seconds.
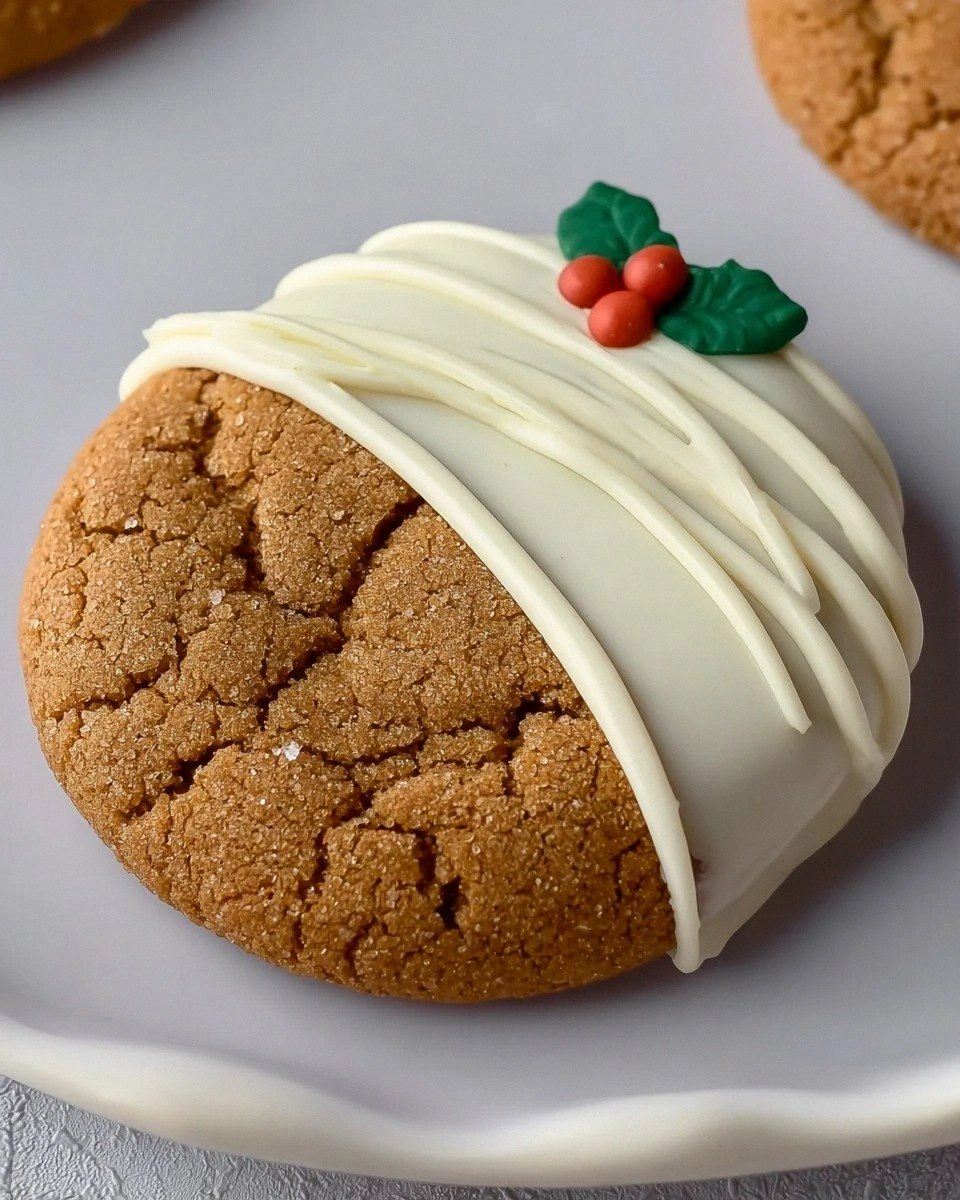
If you’ve ever struggled with making cookies that hold a filling, you’re not alone. I’ve been there, watching the dough collapse, the filling spill, and the disappointment settle in the kitchen. But this recipe flips the script. By introducing a subtle pink lemonade glaze and a raspberry garnish, the cookies become a showstopper at any gathering. Picture yourself pulling this out of the oven, the whole kitchen smelling incredible, the buttery scent mingling with citrus. The anticipation builds as the cookies cool, the glaze sets, and the raspberry pops. Stay with me here—this is worth it.
What Makes This Version Stand Out
- Taste: The pink lemonade filling is a sweet‑tart explosion that balances the buttery dough perfectly. It’s like a refreshing sip of lemonade in cookie form.
- Texture: The dough is airy yet firm, giving a satisfying crunch that gives way to a tender interior. The glaze adds a glossy finish without being sticky.
- Ingredient Quality: Using fresh lemon zest, real butter, and ripe raspberries elevates the flavor profile beyond generic store‑bought ingredients.
- Uniqueness: The pink glaze and raspberry topping create a visual pop that makes the cookies Instagram‑ready.
- Crowd Reaction: At parties, guests ask for the recipe after the first bite. The cookies become the highlight of dessert tables.
- Make‑Ahead Potential: The cookies can be baked ahead and stored in an airtight container for up to a week, maintaining freshness.
- Simplicity: With only nine ingredients and a straightforward method, even novice bakers can master this recipe.
- Versatility: Swap the pink lemonade glaze for a strawberry or blueberry version to keep the menu fresh.
Alright, let’s break down exactly what goes into this masterpiece. The next section will dive deep into the ingredient list, revealing the science behind each component.
Inside the Ingredient List
The Flavor Base
The 2.5 cups of all‑purpose flour are the backbone of the cookie, providing structure and a delicate crumb. If you skip the flour, the cookie becomes a sticky mess that won’t hold the glaze. For a slightly richer flavor, consider using a 50/50 blend of all‑purpose and cake flour; the cake flour adds tenderness.
The Sweetness Layer
The 0.75 cups of confectioners’ sugar are folded into the dough to sweeten without overpowering the citrus. If you prefer a darker, more caramelized flavor, swap half the sugar for brown sugar. When using powdered sugar, sift it first to avoid lumps that can affect the dough’s texture.
The Citrus Explosion
The 2 tablespoons of finely grated lemon zest infuse the dough with bright, aromatic oils. A fresh zest gives a punch of flavor that dried zest can’t match. If you’re sensitive to citrus, reduce the zest to one tablespoon, but the cookie will lose some of its zing.
The 3 tablespoons of lemon juice in the dough add moisture and a subtle tartness that balances the sweetness. Too much liquid can make the dough sticky; keep the measurement precise. A good tip: use a small glass measuring cup for accuracy, as liquid measurements can be tricky.
The Filling and Finish
The 1.25 cups of confectioners’ sugar combined with 2 tablespoons of lemon juice create the pink lemonade glaze that coats each cookie. The glaze should be thick enough to cling to the cookie but thin enough to drizzle. If you want a brighter color, add a few drops of natural food coloring; avoid synthetic dyes for a cleaner look.
The 2 raspberries are the final flourish, adding a burst of natural color and a hint of earthiness that cuts through the sweetness. When selecting raspberries, choose ones that are firm but slightly soft, so they hold their shape during baking. If raspberries are out of season, freeze a handful and thaw before use.
Everything’s prepped? Good. Let’s get into the real action.
The Method — Step by Step
- Step 1: Preheat your oven to 350°F (175°C) and line two baking sheets with parchment paper. The parchment prevents sticking and gives a clean release. While the oven heats, set aside all dry ingredients in a large bowl for easy access.
- Step 2: In a separate bowl, cream the 1 cup of unsalted butter with a handheld mixer until light and fluffy—about 2 minutes. The butter should be at room temperature; if it’s too cold, it won’t incorporate properly. This step ensures a tender crumb.
- Step 3: Gradually add the 0.75 cups confectioners’ sugar to the butter, mixing on low speed until fully incorporated. The mixture should be smooth and slightly thickened. A quick tip: use a rubber spatula to scrape down the sides to avoid lumps.
- Step 4: Sprinkle the 2.5 cups flour and 1 teaspoon kosher salt over the butter mixture. Fold with a pastry blender or your hands until the dough just comes together—do not over‑mix. The dough should feel cohesive but still a bit crumbly.
- Step 5: Stir in the 2 tablespoons finely grated lemon zest and 3 tablespoons lemon juice. The dough will become slightly wet; this is expected. The citrus not only flavors but also helps the glaze set later.
- Step 6: Chill the dough for 30 minutes in the refrigerator. Chilling firms the butter and makes the dough easier to handle. While chilling, mix the glaze: whisk together 1.25 cups confectioners’ sugar and 2 tablespoons lemon juice until smooth.
- Step 7: Once chilled, roll the dough into 1‑inch balls and place them 2 inches apart on the prepared sheets. The spacing allows for even expansion during baking.
- Step 8: Bake for 12–15 minutes, or until the edges are lightly golden and the centers are set. The cookies should still feel slightly soft in the middle; they’ll firm up as they cool.
- Step 9: Let the cookies cool on the sheet for 5 minutes before transferring them to a wire rack. This prevents steam from making the bottoms soggy.
- Step 10: While the cookies are still warm, drizzle the pink lemonade glaze over the top. The glaze should set within a minute, forming a glossy, slightly sticky finish. Garnish with a whole raspberry on each cookie, pressing gently to secure.
That’s it—you did it. But hold on, I’ve got a few more tricks that will take this to another level.
Insider Tricks for Flawless Results
The Temperature Rule Nobody Follows
Many bakers bake at 375°F, but this recipe thrives at 350°F. The lower temperature allows the cookies to bake evenly without the edges burning before the centers set. If you’re in a hot kitchen, consider pre‑cooling the oven to ensure the temperature stays consistent.
Why Your Nose Knows Best
As the cookies bake, the scent of citrus and butter will rise. Trust your nose: when the aroma is sweet and bright, the cookies are ready to come out. This sensory checkpoint is more reliable than a timer for many home bakers.
The 5‑Minute Rest That Changes Everything
After removing the cookies from the oven, let them rest on the sheet for 5 minutes. This short rest allows the steam to redistribute, preventing a soggy bottom and ensuring a crisp exterior. It also gives the glaze a chance to set.
The Secret to a Glaze That Stays on Top
If the glaze runs off, the cookies may look dull. To keep it perched, whisk the glaze with a small amount of powdered sugar until it’s thick enough to hold. Alternatively, drizzle the glaze while the cookies are still warm for a glossy finish.
How to Make Your Cookies Instagram‑Ready
Arrange the cookies on a white plate, drizzle a few extra drops of glaze, and top each with a whole raspberry. The contrast of pink and red against a white background creates a striking visual. Add a small sprig of mint for a pop of green that enhances the photo.
The Final Touch: A Hint of Vanilla
A dash of vanilla extract (about ½ teaspoon) in the dough subtly amplifies the lemon flavor without overpowering it. Vanilla’s warm undertones balance the sharp citrus, giving the cookies a rounded, complex taste. This small addition can transform an already great recipe into an unforgettable experience.
Creative Twists and Variations
This recipe is a playground. Here are some of my favorite ways to switch things up:
Strawberry‑Scented Surprise
Swap the lemon zest and juice for strawberry puree. The result is a sweet, fruity cookie that pairs perfectly with a glass of rosé. Add a splash of balsamic vinegar for depth.
Chocolate‑Covered Delight
Dip the cooled cookies in melted dark chocolate and let them set. The chocolate coating adds richness while the lemon flavor remains bright. Sprinkle sea salt on top for a salty‑sweet contrast.
Coconut‑Infused Twist
Fold in ½ cup shredded coconut to the dough for a tropical vibe. The coconut adds crunch and a subtle sweetness that complements the lemon glaze. Use toasted coconut for extra flavor.
Herb‑Infused Freshness
Add 1 tablespoon finely chopped fresh basil or mint to the dough. The herbs give a refreshing undertone that pairs beautifully with the citrus. The green garnish also enhances the visual appeal.
Spiced Winter Edition
Incorporate ¼ teaspoon ground ginger and ¼ teaspoon ground cinnamon into the dough. The warm spices create a cozy, holiday‑season feel. Serve with a cup of hot cocoa for a comforting treat.
Low‑Sugar Option
Replace confectioners’ sugar with a sugar substitute like stevia or monk fruit sweetener. The cookies will be lower in calories yet still delicious. Adjust the glaze to maintain the pink hue.
Storing and Bringing It Back to Life
Fridge Storage
Place the cookies in an airtight container or zip‑lock bag. They’ll stay fresh for up to a week in the refrigerator. The glaze may soften slightly; let the cookies sit at room temperature for 10 minutes before serving.
Freezer Friendly
For longer storage, freeze the cookies in a single layer on a parchment sheet, then transfer to a freezer bag. They remain good for up to three months. Thaw at room temperature for 15 minutes before reheating.
Best Reheating Method
To revive the cookies, preheat the oven to 300°F (150°C) and bake for 5 minutes. Add a tiny splash of water to the bottom of the baking sheet to create steam, keeping the cookies moist. The glaze will re‑gloss, and the cookies will taste freshly baked.