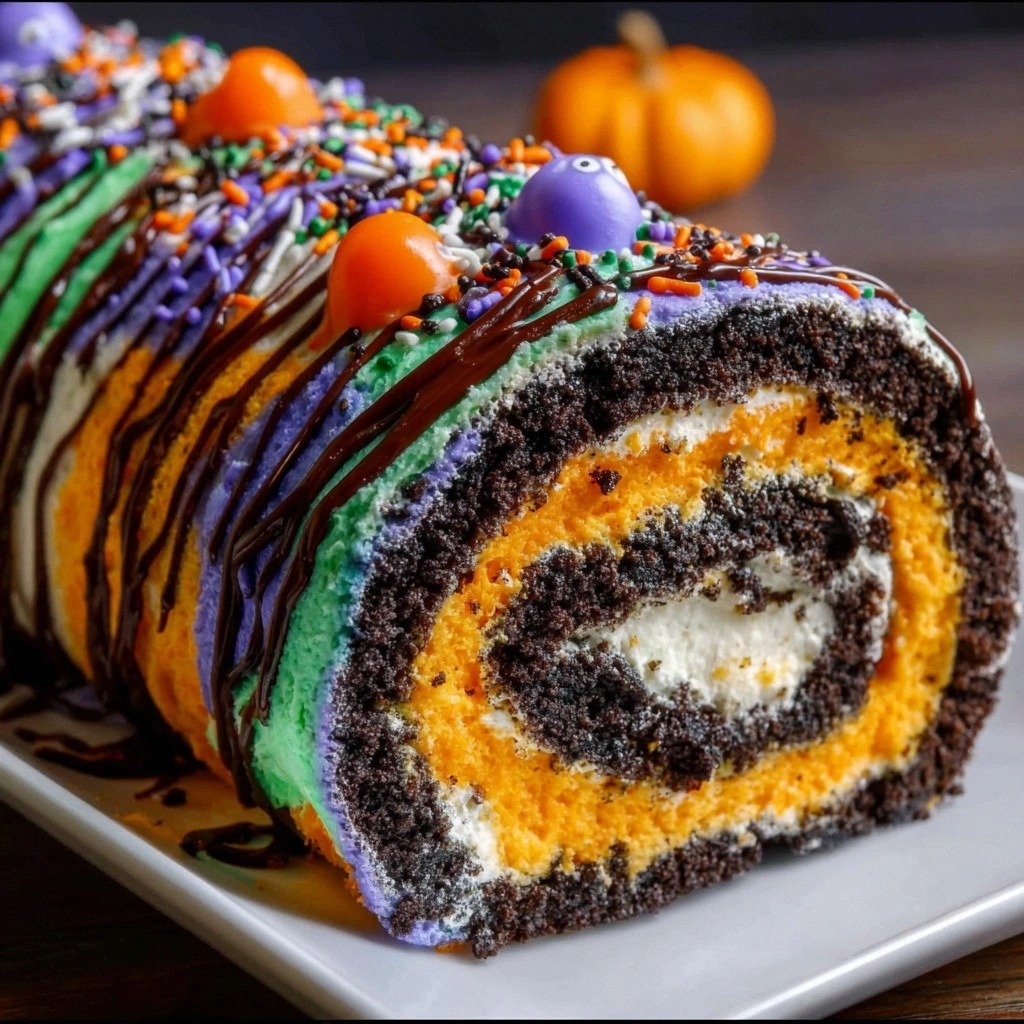
I still remember the Halloween potluck where my haunted gingerbread house collapsed into a pile of frosting and regret. The kids wailed, the adults politely nibbled store-bought cookies, and I swore I’d never attempt another spooky centerpiece again. Then my niece dared me—double-dog-dared me, actually—to make something that looked impressive but didn’t require architectural engineering or a PhD in fondant. Challenge accepted. Fast-forward three test batches, a kitchen dusted in Oreo crumbs, and one very happy family: the Halloween Oreo Roll was born. It’s the Frankenstein’s monster of desserts, cobbled together from pantry staples yet somehow elegant enough to make guests gasp. Picture a jet-black cookie carpet rolled around a neon-orange filling, studded with candy eyes that follow you around the room like a possessed painting. The first bite tastes like the best part of trick-or-treating without the sidewalk chills or the plastic pumpkin pail. Creamy, crunchy, sweet, and just a little mischievous—exactly what October ordered. If you’ve ever struggled with finicky layer cakes or temperamental pie crusts, you’re not alone—and I’ve got the fix. This no-bake beauty forgives every heavy-handed stir and shortcut, yet it slices like a dream under dim party lights. Ready for the game-changer? Let me walk you through every single step—by the end, you’ll wonder how you ever made it any other way.
What Makes This Version Stand Out
Orange Crème Shock: Those limited-edition Halloween Oreos aren’t just cute; they bleed psychedelic orange into the filling, turning the swirl into a neon cauldron that glows under black-light bulbs.
No-Bake Victory: Your oven gets the night off, which means no sweating over risen centers or sunken middles—just whirl, roll, chill, done.
Cream-Cheese Cloud: Full-fat bricks whip into a mousse so stable you can slice microscopic slivers or doorstop wedges and the roll never weeps.
Make-Ahead Hero: Wrap it tight, park it in the fridge for three days, or freeze for a month; the flavor actually intensifies while the texture stays cloud-soft.
Kid-Proof Assembly: Little monsters can crush cookies, sprinkle eyeballs, and lick spatulas without derailing the final masterpiece.
Instagram Gold: Cross-sections reveal a hypnotic spiral that photographs itself—no fancy lighting rigs or edible glitter necessary.
Flavor Echo Chamber: Vanilla deepens the chocolate, salt amplifies the sweet, and a whisper of espresso powder makes the Oreo taste more Oreo-y than the cookie itself.
Inside the Ingredient List
The Flavor Base
Halloween Oreos are the spine of this roll; their orange crème melts into the cream cheese and tints everything the color of a jack-o’-lantern’s grin. Without them you lose both the iconic cookies-and-cream speckles and that eerie neon swirl. Swap in regular Oreos only if you’re desperate—the taste still rocks, but you’ll need gel coloring to fake the fun. Buy two extra sleeves because “quality control” nibbling is real and you’ll thank me later.
The Texture Crew
Full-fat cream cheese is non-negotiable; low-fat versions whip up watery and can crack the roll like a dry riverbed. Let it soften on the counter for a full hour—microwaving creates hot pockets that seize when they meet cold cookies. Vanilla extract whispers warmth, but if you want to walk on the wild side, almond extract adds a cherry-ghost haunting that pairs eerily well with chocolate. A pinch of kosher salt is the invisible hand that makes every other flavor feel three-dimensional.
The Unexpected Star
Powdered sugar does double duty: it sweetens and stabilizes, absorbing moisture so the roll firms up sliceable. Add it gradually while the mixer runs on low or you’ll recreate a Halloween snowstorm across your countertops. If you’re out, blitz granulated sugar in a blender with a teaspoon of cornstarch—DIY confectioners’ in a pinch.
The Final Flourish
Halloween-colored frosting from a can saves sanity; choose purple, slime-green, or pumpkin-orange to paint abstract swirls across the top. Sprinkles need to be added within five minutes of frosting or the surface skins over and they bounce off like hail on a windshield. Candy eyes are optional but highly recommended—they’re the edible equivalent of a jump scare in a funhouse.
The Method — Step by Step
- Pulverize the entire package of Halloween Oreos—filling and all—in a food processor until they resemble midnight sand. You want fine crumbs with no sneaky pebbles; those become crunchy speed bumps later. If you lack a processor, shove the cookies into a gallon zip bag and whale on them with a rolling pin while pretending it’s your least favorite politician. The noise alone will wake the neighbors, but the therapy is free.
- Tip the crumbs into a bowl and beat in softened cream cheese with a sturdy spatula. Feel free to switch to a hand mixer once the mixture turns glossy and pulls away from the sides like bread dough doing yoga. Scrape the bottom obsessively; hidden white streaks are dead giveaways when you slice. This step smells like childhood dunked in cold milk—resist eating half the batch before anyone else gets to try it.
- Stir in vanilla and a pinch of salt. The mixture will tighten and roll into a playful ball that looks like black-and-orange marble. If it feels sticky, refrigerate ten minutes; you want Play-Doh pliability, not gum-on-hot-sidewalk chaos.
- Lay a sheet of plastic wrap roughly the size of a doormat on your counter. Plop the dough in the center, pat it into a rectangle, then lay another sheet of plastic on top. Roll from the center outward, rotating the plastic so you wind up with a tidy 10-by-12-inch slab about a quarter-inch thick. Peel off the top plastic and gasp at the tiger-striped canvas you just created.
- Spread a whisper-thin layer of Halloween frosting over the slab, leaving a one-inch border at the far edge so the roll can seal without oozing like a zombie gut. Too much frosting causes tidal waves when you roll; restraint here equals Instagram glory later.
- Scatter sprinkles and candy eyes across the frosting, pressing gently so they anchor but don’t disappear. Kids love this part—hand over the candy eyes and watch them narrate a tiny monster army. Future pacing: picture yourself pulling this out of the fridge, the whole kitchen smelling like a cream-cheese cloud, and those eyes blinking under the pendant lights.
- Use the bottom plastic wrap to lift the near edge and coax the slab into a tight spiral, peeling the plastic back as you go. Aim for a sushi-bar swirl, not a cinnamon bun—think compact and confident. If cracks appear, pinch them closed like scar tissue; the darkness hides imperfections better than any Photoshop filter.
- Twist the plastic wrap like a giant candy, compressing the log gently to banish air pockets. Chill at least four hours or up to two days; the roll needs to firm up like refrigerated fudge before you can slice clean coins without them pancaking under the knife.
- Just before serving, drizzle melted chocolate in erratic zigzags across the top. The contrast of inky drizzle against neon filling is pure Gothic elegance, and the snap of thin chocolate gives way to creamy interiors—textural drama at its finest. Slice with a warm, sharp knife, wiping between cuts for parade-ready presentation.
Insider Tricks for Flawless Results
The Temperature Rule Nobody Follows
Cream cheese must feel like chilled butter left on the counter for twenty minutes—pliable but not greasy. Anything warmer and the Oreo oils separate, creating dark streaks that look like lightning scars. Test by poking; your finger should leave a gentle valley that slowly fills in, not a melted crater.
Why Your Nose Knows Best
When the roll is properly chilled, it smells like cold cheesecake kissed by cocoa. If you detect sharp sourness, it needs more sugar or another pinch of salt to balance the tang. Trust the sniff test over the clock—fridges vary, noses don’t.
The 5-Minute Rest That Changes Everything
After drizzling chocolate, walk away for five minutes. The shell sets just enough to snap, yet the interior stays mousse-soft, creating that coveted contrast. Slice too early and the chocolate drags like wet paint, ruining your swirl art.
Creative Twists and Variations
Mint Monster Swirl
Swap vanilla for half a teaspoon peppermint extract and dye the frosting toxic green. Crushed mint Oreos amp up the candy-cane vibe, making this the December cousin of our October star.
Peanut-Butter Poltergeist
Beat two tablespoons creamy peanut butter into the cream cheese before adding cookies. The nutty richness plays hide-and-seek with the cocoa, and Reese’s Pieces eyes staring out the top are next-level creepy.
Triple-Chocolate Terror
Use chocolate cream cheese, chocolate frosting, and dust the final plate with black cocoa powder for a dessert that absorbs light like a black hole. Serve with red berry coulis “blood” for dramatic drizzle.
Keto Crypt-Keeper
Replace Oreos with crushed almond-flour chocolate cookies and swap powdered sugar for erythritol. The carb count plummets while the indulgence stays sky-high—perfect for haunted house hosts watching their macros.
Coconut-Cream Cauldron
Substitute half the cream cheese with coconut cream and stir in toasted coconut flakes. The finished roll tastes like a Mounds bar in tuxedo form—elegant yet eerily tropical.
Spicy-Specter Surprise
Add a quarter teaspoon cayenne and a pinch of cinnamon to the filling; the heat sneaks up after the cool cream fades, leaving guests pleasantly spooked and reaching for milk.
Storing and Bringing It Back to Life
Fridge Storage
Wrap the roll tightly in plastic, then slip into a zip bag with the air sucked out. It keeps four days without drying, though the colors stay brightest within the first forty-eight hours. Park it on the top shelf where temperatures are coldest and most stable.
Freezer Friendly
Flash-freeze individual slices on a parchment-lined tray, then load into a rigid container with parchment between layers. They’ll survive up to one month without freezer burn; thaw fifteen minutes on the counter for fudgy coins that still snap.
Best Reheating Method
There is none—serve chilled. If you must soften an over-frozen slice, microwave three seconds only; any longer and the cream cheese melts into sticky puddles. Add a tiny splash of water to the plate before covering with plastic wrap; the gentle steam brings back that just-rolled suppleness.