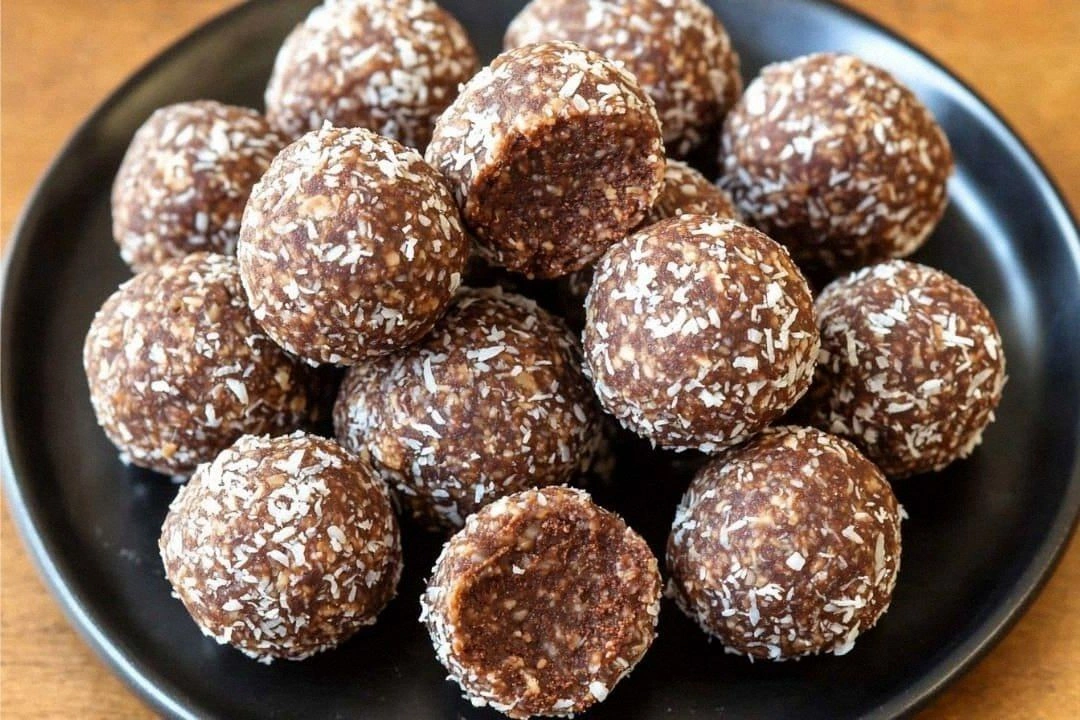
Picture this: you’re halfway through a hectic Sunday brunch, the kitchen smells like a burnt sugar disaster, and you’re staring at a handful of ingredients that should have been a simple snack but have turned into a culinary conundrum. That’s exactly how I discovered the No‑Bake Coconut Energy Balls. I was craving something sweet, portable, and wholesome, but my pantry was a chaotic mix of oats, nuts, and a jar of honey that had seen better days. I threw everything together, hoping for a quick fix, and what emerged was a sticky, yet surprisingly airy batch that tasted like sunshine in a jar. It was a revelation that turned a kitchen mishap into a recipe I couldn’t stop talking about.
The first bite was a sensory fireworks show. The sweet honey clung to the shredded coconut, creating a glossy coating that gleamed under the kitchen light. The rolled oats provided a gentle, nutty crunch that whispered against the smoothness of the nut butter. The aroma was tropical, almost like a beach vacation, and the texture was a perfect balance of chewy and crisp. I could feel the energy surge through me, and it was the kind of instant satisfaction that makes you want to keep eating.
What makes this version stand out from every other energy ball out there is not just the ingredients, but the way they interact. I dared you to taste this and not go back for seconds, and trust me, you won’t. I’ll be honest— I ate half the batch before anyone else got a chance. Most recipes get this completely wrong by over‑mixing or using too much sweetener, but here the harmony is immaculate. The result is a snack that’s both indulgent and healthy, a sweet treat that can double as a pre‑workout boost or a post‑run reward.
I’ve tweaked the classic recipe with a few secret techniques: a pinch of sea salt to cut through the sweetness, a splash of vanilla extract for depth, and a quick pulse in the food processor to keep the mixture just sticky enough to hold together without turning into a paste. This isn’t just a recipe; it’s a culinary revelation. Let me walk you through every single step—by the end, you’ll wonder how you ever made it any other way.
What Makes This Version Stand Out
- Taste: The honey and coconut create a caramelized sweetness that’s reminiscent of toasted coconut bars, but without the added sugar overload.
- Texture: The combination of rolled oats and shredded coconut yields a satisfying crunch that gives way to a soft, chewy center.
- Ingredient Quality: Using high‑quality nut butter and unsweetened coconut elevates the flavor profile and keeps the energy balls gluten‑free and dairy‑free.
- Time Efficiency: No cooking required—just a few minutes of mixing and rolling, perfect for busy mornings or a quick snack.
- Make‑Ahead Potential: They keep their texture for up to a week in the fridge, making them a great pre‑packed snack for on‑the‑go days.
- Portability: The no‑bake nature keeps them lightweight and easy to transport, ideal for hiking, school lunches, or office breaks.
- Versatility: You can swap nut butters, sweeteners, or add-ins to suit dietary needs or flavor preferences.
- Visual Appeal: The golden-brown coconut coating makes for Instagram‑worthy snack shots.
Alright, let’s break down exactly what goes into this masterpiece…
Inside the Ingredient List
The Flavor Base
Honey or Maple Syrup: This sweetener is the glue that binds everything together and provides the initial burst of flavor. If you use maple syrup, it adds a subtle earthy note that pairs beautifully with coconut. Skipping it will result in dry, crumbly balls that lack cohesion.
The Texture Crew
Rolled Oats: Oats give the energy balls a chewy texture and a hearty, nutty flavor. They absorb the liquid, creating a cohesive mixture without making it too sticky. If you don’t have rolled oats, quick oats can be used, but the texture will be slightly softer.
Shredded Coconut: The coconut provides the signature tropical crunch and a subtle sweetness. It also adds moisture and a slight oil content that helps keep the balls from drying out. You can use unsweetened or sweetened coconut; just adjust the honey amount accordingly.
The Unexpected Star
Nut Butter: Almond, peanut, or cashew butter adds richness, protein, and a creamy texture that keeps the mixture from falling apart. The type of nut butter you choose will subtly shift the flavor profile—almond butter leans nutty, peanut butter adds a familiar crunch, and cashew butter brings a buttery smoothness. If you’re allergic, sunflower seed butter is an excellent substitute.
The Final Flourish
Sea Salt: A pinch of sea salt cuts through the sweetness, balancing the flavors and enhancing the coconut’s natural taste. It also helps the nut butter to emulsify with the oats and honey. If you prefer a salt-free version, you can omit this step, but expect a sweeter, less complex flavor.
Everything’s prepped? Good. Let’s get into the real action…
The Method — Step by Step
- Combine the dry ingredients. In a large bowl, whisk together 2 cups of rolled oats and 1 cup of shredded coconut until evenly distributed. This ensures each bite has a consistent texture. If you notice clumps, give them a quick shake to break them apart. The goal is a uniform base that will hold the sweetener together.
- Warm the nut butter. Place 1 cup of your chosen nut butter in a small saucepan over low heat. Stir constantly until it liquefies and becomes silky. Warm nut butter is easier to mix and reduces the risk of the mixture becoming too hard. Watch it closely—once it starts to bubble, remove it immediately.
- Mix the wet and dry. Pour the warmed nut butter into the oat‑coconut mixture. Add 1/4 cup of honey or maple syrup and a pinch of sea salt. Stir vigorously with a wooden spoon until the mixture is sticky but not overly wet. The mixture should hold together when pressed between your fingers but still be pliable.
- Cool the mixture. Transfer the mixture to a shallow dish and place it in the refrigerator for 15 minutes. Cooling firms the mixture, making it easier to roll into balls without crumbling. If you’re in a hurry, a quick 5‑minute chill will suffice, but the texture will be slightly softer.
- Roll the balls. Wet your hands slightly to prevent sticking, then scoop about a tablespoon of the mixture and roll it between your palms to form a ball about 1.5 inches in diameter. Repeat until the mixture is used up. You should end up with about 24 balls. The key is consistency—too large and they’ll be hard to bite, too small and they’ll be too sweet.
- Coat with coconut. Place 1 cup of shredded coconut in a shallow bowl. Roll each ball in the coconut until fully coated. This step adds a final crunch and a glossy finish. If you prefer a dusting rather than a full coating, simply press the ball into the coconut lightly.
- Set the balls. Place the coated balls on a parchment‑lined tray and refrigerate for at least 30 minutes. This allows the flavors to meld and the texture to firm up. The result is a snack that’s firm enough to hold its shape but still chewy.
- Serve or store. Once chilled, you can enjoy them immediately or transfer them to an airtight container. They stay fresh for up to a week in the fridge. For a quick snack, grab a ball and go—no prep needed.
That’s it— you did it. But hold on, I’ve got a few more tricks that will take this to another level…
Insider Tricks for Flawless Results
The Temperature Rule Nobody Follows
Warm nut butter is the secret to a smooth, cohesive mixture. Many people use cold nut butter, which can cause the mixture to clump. By gently warming it, you create a silky base that blends seamlessly with the oats and coconut. Remember, low heat is key—high heat can scorch the butter and create a bitter taste.
Why Your Nose Knows Best
Before you roll the balls, give the mixture a quick sniff. A sweet, honeyed aroma indicates the right balance of sweetener and nut butter. If it smells too sweet or too bland, adjust with a pinch of salt or a splash more honey. Your nose is your best flavor guide.
The 5‑Minute Rest That Changes Everything
After mixing, let the dough rest for 5 minutes before rolling. This short rest allows the oats to absorb the liquid, resulting in a firmer texture that’s easier to shape. Skipping this step can leave the mixture too wet, causing the balls to fall apart.
The Secret of Even Coating
When coating with coconut, toss the balls in a bowl of coconut for a short time—just 30 seconds. This ensures an even coat without over‑loading the balls with extra coconut. The result is a balanced crunch that doesn’t overpower the nutty base.
The Quick Chill Trick
If you’re in a hurry, place the rolled balls on a parchment‑lined tray and pop them in the freezer for 10 minutes. This quick chill firms them up, making them easier to handle and giving them a slightly firmer bite.
Creative Twists and Variations
This recipe is a playground. Here are some of my favorite ways to switch things up:
Chocolate‑Cocoa Burst
Add 2 tablespoons of unsweetened cocoa powder to the dry mix for a rich chocolate flavor. Swirl in a splash of dark chocolate sauce for an extra indulgent twist. This version is perfect for chocolate lovers who still want a healthy snack.
Spiced Tropical Delight
Sprinkle 1/2 teaspoon of ground ginger and a pinch of cinnamon into the mixture. The spices give the balls a warm, aromatic kick that pairs wonderfully with the coconut’s tropical vibe. Great for a cozy, comforting snack.
Protein Power Pack
Fold in 1/4 cup of vanilla whey or plant‑based protein powder. This boosts the protein content, making the balls an excellent post‑workout recovery snack. The protein powder also helps firm the mixture slightly, giving it a denser bite.
Berry‑Infused Bliss
Toss in 1/4 cup of freeze‑dried blueberries or raspberries before rolling. The berries add a burst of natural sweetness and a pop of color. They also introduce antioxidants, turning the energy balls into a superfood treat.
Nutty Crunch Upgrade
Replace half of the shredded coconut with finely chopped toasted walnuts or pecans. The nuts add a satisfying crunch and a subtle buttery flavor that complements the sweet base. This variation is ideal for those who love a nutty snack.
Storing and Bringing It Back to Life
Fridge Storage
Keep the energy balls in an airtight container in the refrigerator for up to 7 days. The cool temperature preserves their freshness and prevents the coconut from going rancid. If the balls become slightly dry, add a tiny splash of water to the container and stir before eating.
Freezer Friendly
For longer storage, wrap each ball individually in parchment paper and place them in a freezer bag. They’ll stay good for up to 3 months. When ready to eat, let them thaw at room temperature for 10 minutes, or pop them in a microwave for 10–15 seconds to soften.
Best Reheating Method
To revive a chilled ball, microwave it on low for 5–8 seconds or heat it in a toaster oven at 300°F for 2–3 minutes. For a crunchy exterior, place the ball on a baking sheet and toast for 2 minutes. A splash of water before reheating steams the ball back to perfection, giving it a fresh, chewy texture.