I still remember the day I set my kitchen on fire trying to make a pineapple upside-down cake. Okay, maybe "set on fire" is dramatic — but the smoke alarm was wailing, my roommate was fanning the air with a dish towel like she was signaling a rescue helicopter, and the charred remains of what should have been dessert were cemented to my favorite cake pan. That was the day I swore off pineapple desserts forever. Spoiler alert: forever lasted about three weeks. Because somewhere between scrubbing blackened sugar off my stovetop and ordering sad takeout ice cream, I became obsessed with creating the perfect pineapple coconut cake. Not just any cake, mind you. This had to be the kind of dessert that makes people close their eyes after the first bite, the kind that transports you straight to a beach hammock even when you're standing in a cramped apartment kitchen with a broken dishwasher.
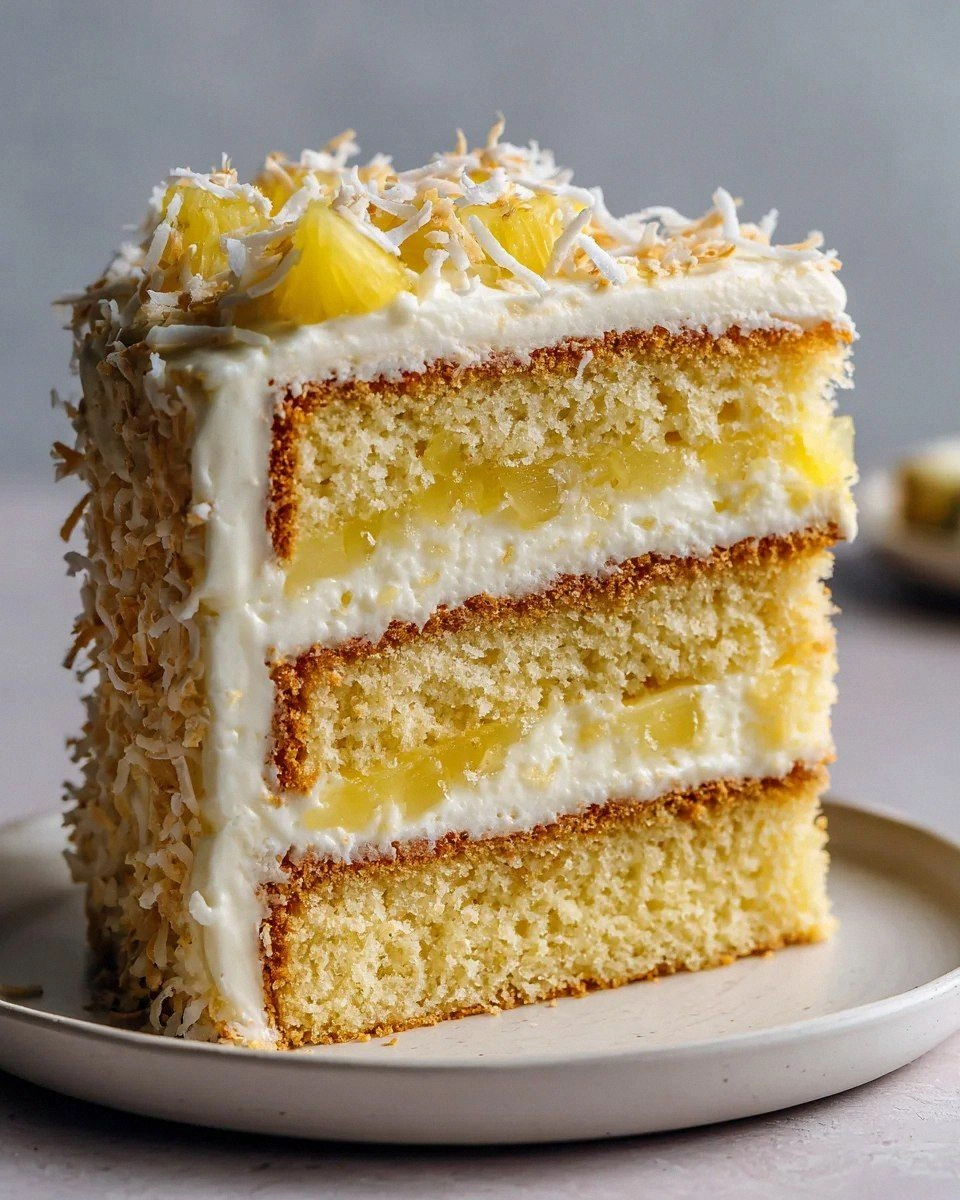
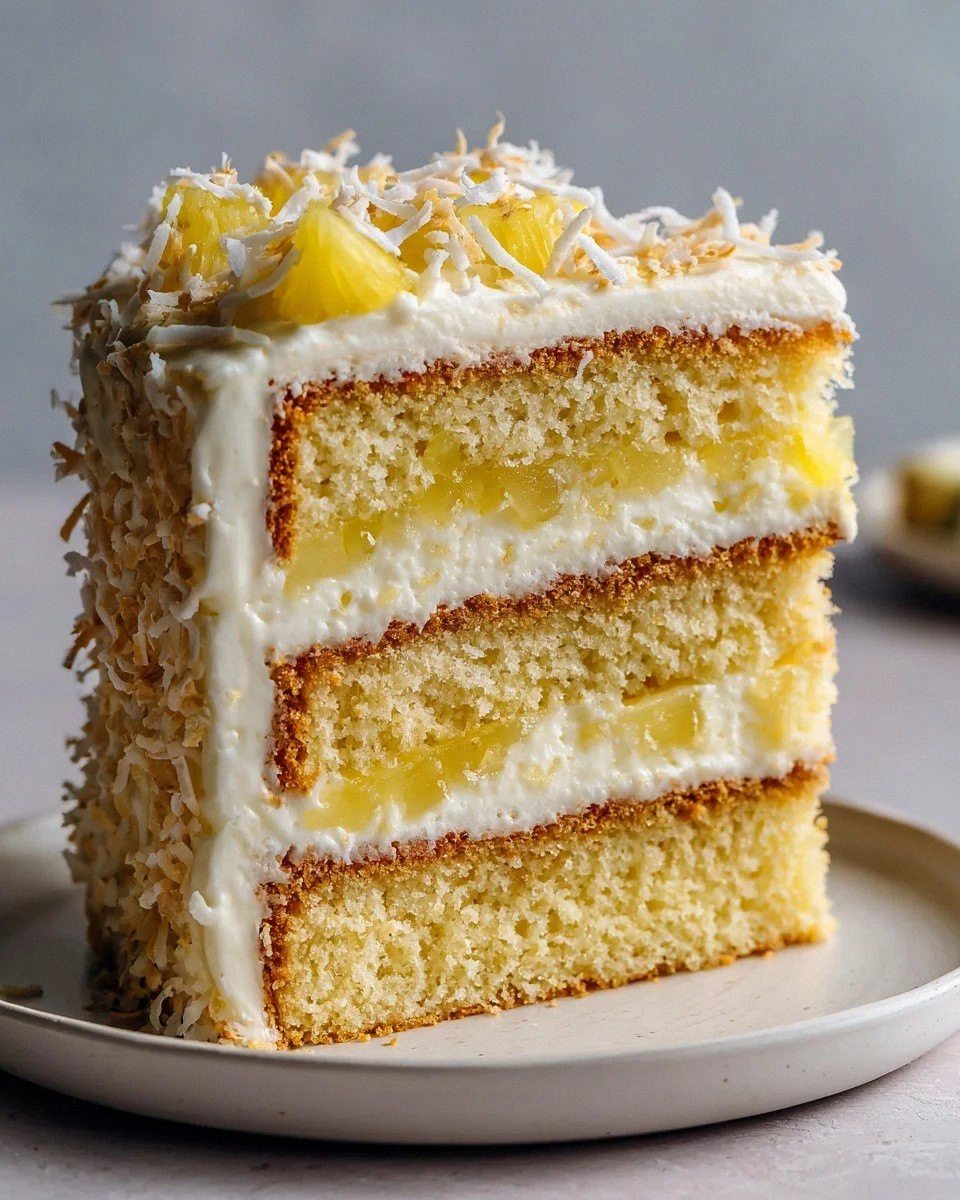
Fast forward through eighteen recipe tests, three failed food processor motors, and one very unfortunate incident involving a coconut and a hammer (don't ask), and here we are. This Pineapple Coconut Dream Cake isn't just another tropical dessert — it's the tropical dessert that will ruin all other cakes for you. I'm talking about a cake so moist it practically sighs when you cut into it, with a crumb that manages to be both delicate and substantial, studded with juicy pineapple gems and toasted coconut that crackles between your teeth like tiny fireworks of flavor. The first time I served this at a dinner party, my friend Sarah literally grabbed the serving plate and moved it closer to her chair. She ate three slices before the main course even hit the table, and I caught her sneaking back for a fourth at midnight.
What makes this version different from every other pineapple coconut cake cluttering up the internet? For starters, I cracked the code on preventing that dreaded soggy bottom that plagues most fruit cakes. Then there's the coconut — oh, the coconut! We're using it three different ways for maximum impact. Most recipes treat coconut like an afterthought, tossing in some sad shreds and calling it tropical. Not here. We're toasting, we're infusing, we're creating layers of coconut flavor that build like a symphony. And the pineapple? We're not just dumping in some canned chunks and hoping for the best. We're concentrating those flavors, removing excess moisture, and creating little pockets of pineapple paradise throughout every bite.
Picture yourself pulling this out of the oven, the whole kitchen smelling like a Hawaiian vacation. The cake is golden and crackly on top, with caramelized edges that will make your neighbor knock on your door asking what you're baking. You'll let it cool just enough so you don't burn your tongue (patience, my friend), and when you finally cut that first slice, you'll understand why I went through eighteen versions to get here. The crumb is tender and moist, the pineapple pieces are like little jewels of sunshine, and the coconut — well, let's just say if you don't like coconut, this cake will convert you. Let me walk you through every single step — by the end, you'll wonder how you ever made it any other way.
What Makes This Version Stand Out
Triple Coconut Threat: Most recipes barely whisper coconut's name, but we're shouting it from the rooftops. We toast coconut for nutty crunch, infuse coconut milk for richness, and finish with coconut extract for that pure coconut essence that makes your taste buds do a happy dance. It's not just coconut flavor — it's coconut experience.
Pineapple Perfection Technique: Here's where most recipes fail miserably. They dump in wet pineapple and wonder why their cake is a soggy mess. We're draining and reducing the pineapple concentrate, creating intense flavor bombs that won't water down your batter. Each bite delivers pineapple punch without the dreaded wet sponge texture.
No-Fail Moisture Balance: This cake stays moist for days (if it lasts that long) thanks to our carefully calibrated ratio of butter to oil to pineapple juice. The crumb is tender yet structured, never dense or gummy. It's the kind of cake that tastes even better the next day, when flavors have melded into tropical harmony.
One-Bowl Wonder: Despite tasting like it came from a fancy bakery, this cake comes together in one bowl with a hand mixer. No separating eggs, no folding in meringue, no technique that requires a culinary degree. If you can stir and pour, you can make this cake.
Crowd-Pleasing Magic: I dare you to find someone who doesn't love this cake. Kids go crazy for the sweet pineapple, adults appreciate the sophisticated coconut notes, and even people who claim they "don't like dessert" will ask for seconds. It's the ultimate potluck showstopper.
Make-Ahead Champion: This cake actually improves with age, making it perfect for entertaining. Bake it the day before your party and you'll have one less thing to stress about. The flavors deepen, the texture settles, and you get to be the relaxed host who "just whipped this up" while actually sleeping in.
Year-Round Tropical Escape: Whether it's January blues or July heat, this cake delivers instant vacation vibes. Close your eyes while eating and you're on a beach somewhere, even if you're actually hiding from your kids in the laundry room.
Inside the Ingredient List
The Flavor Foundation
All-purpose flour might seem boring, but it's the backbone of our cake, providing just enough structure to hold all those tropical treasures. We're using exactly one cup — no more, no less — because after eighteen tests, I discovered this is the magic amount that creates a tender crumb without turning gummy. Cake flour makes it too delicate, bread flour makes it tough, but all-purpose hits that sweet spot of stability and tenderness. Don't even think about swapping in whole wheat unless you want a dense, sad cake that tastes like health food.
Granulated sugar does double duty here, sweetening the cake while helping create that gorgeous golden crust. We're using half a cup, which might seem stingy compared to other recipes, but remember — we're getting natural sweetness from our pineapple concentrate. The sugar also helps create a delicate caramelization on the edges that will make you want to pick them off and eat them like candy. Pro tip: if you like your desserts on the sweeter side, you can bump it up to 2/3 cup, but I dare you to try it my way first.
The Tropical Dream Team
Our crushed pineapple isn't just any canned fruit — it's liquid gold waiting to happen. We drain it for 15 minutes, then reduce that precious juice until it's thick and syrupy, concentrating flavors like you wouldn't believe. The pineapple itself gets folded into the batter, creating moist pockets of fruit that burst with sunshine in every bite. Choose pineapple packed in juice, not syrup, or you'll have a cloyingly sweet mess on your hands. And please, for the love of all things tropical, don't substitute fresh pineapple unless you want to wait three days for it to break down properly.
Shredded coconut is where we separate the tropical lovers from the pretenders. We're using the sweetened kind here — I know, I know, the food police are coming for me — but trust me on this. The sweetened coconut holds more moisture and creates better texture in the final cake. Toast half of it for nutty depth, leave the rest soft for textural contrast. If you absolutely must use unsweetened, increase your sugar by two tablespoons and accept that your cake will be slightly drier.
The Unexpected Game-Changers
Unsalted butter forms the rich, tender base of our cake, and we're using exactly half a cup at perfect room temperature. Not microwave-softened, not melted, not cold from the fridge — room temperature butter creams properly with sugar, creating air pockets that give us lift without making the cake tough. If you only have salted butter, omit any additional salt and know that your cake will have a slightly different flavor profile. The butter should be soft enough to leave an indent when pressed, but not so soft it's greasy.
Two large eggs provide structure, moisture, and richness, binding everything together into cake magic. Use eggs that aren't super fresh — eggs that are 3-5 days old whip up better and create more stable structure. Bring them to room temperature by placing them in a bowl of warm water for five minutes while you prep everything else. Cold eggs can cause your butter to seize, creating a curdled mess that never quite recovers.
The Science Behind Success
Baking powder is our leavening hero, giving the cake its perfect rise without the fuss of cream of tartar or baking soda calculations. We're using exactly one teaspoon — too little and the cake is dense, too much and it tastes metallic. Make sure your baking powder is fresh (test it in water — it should fizz enthusiastically) because old baking powder is the silent killer of cakes everywhere. Don't even think about substituting baking soda here unless you want a cake that tastes like a science experiment gone wrong.
Vanilla extract is the supporting actor that makes the stars shine brighter. Just half a teaspoon enhances both the coconut and pineapple flavors, creating depth and complexity that would be missing otherwise. Use real vanilla extract, not imitation, or you'll get a chemical aftertaste that ruins all our hard work. The vanilla should be added with the eggs so it distributes evenly throughout the batter.
The Method — Step by Step
- Start by preheating your oven to 350°F (175°C) and positioning the rack in the center. This isn't the time to get creative with rack placement — center position ensures even heat circulation. Grease an 8-inch square baking pan with butter, then line it with parchment paper, leaving overhang on two sides like little handles. This genius move lets you lift the entire cake out later for perfect slicing. Don't skip the parchment unless you enjoy crying over cake that won't come out of the pan.
- Now for the pineapple prep — this is where we separate the amateurs from the pros. Dump your can of crushed pineapple into a fine-mesh sieve set over a bowl. Let it drain for exactly 15 minutes, stirring occasionally to help the juice escape. You'll be amazed how much liquid comes out. Pour that collected juice into a small saucepan and reduce it over medium heat until it's thick and syrupy, about 5-7 minutes. Stir occasionally and watch closely — it goes from perfect to burnt in seconds. This concentrated pineapple essence is liquid gold that we'll fold into the batter later.
- While your pineapple juice reduces, spread half your shredded coconut on a dry skillet. Toast over medium heat for 3-4 minutes, stirring constantly with a wooden spoon. Your kitchen will start smelling like a tropical paradise. The moment it turns golden and smells toasty, immediately transfer to a plate to stop the cooking. Toasted coconut adds incredible depth and nuttiness that raw coconut just can't deliver. Let it cool completely before using — hot coconut will melt your butter and ruin the texture.
- In a large bowl, cream together your room temperature butter and sugar until light and fluffy, about 3-4 minutes with a hand mixer. This isn't the time to rush — proper creaming incorporates air that gives us lift. The mixture should be pale yellow and increased in volume. Scrape down the bowl halfway through to ensure everything gets evenly incorporated. If your butter is too cold, you'll have lumps. Too warm, and it'll be greasy. Room temperature is your friend here.
- Add the eggs one at a time, beating well after each addition. The batter should look smooth and emulsified, not curdled. Add your vanilla extract with the second egg. If the batter looks like it's separating, don't panic — just beat for another 30 seconds and it'll come together. This is also when you add your reduced pineapple syrup. Beat it in until fully incorporated, and marvel at how the batter suddenly smells like a tropical vacation.
- In a separate bowl, whisk together your flour and baking powder. This ensures the baking powder distributes evenly, preventing those dreaded bitter pockets. Add the dry ingredients to the wet in three additions, mixing just until combined. Overmixing develops gluten and creates a tough cake. The batter should be thick but pourable, like a really good smoothie. If it seems too thick, add a tablespoon of the pineapple juice you saved from draining.
- Now for the fun part — folding in our tropical treasures. Gently fold in the drained crushed pineapple, both the toasted and untoasted coconut, using a rubber spatula. Fold from the bottom up, turning the bowl as you go, just until everything is evenly distributed. Don't overmix or you'll break down the pineapple pieces and release more moisture. The batter should look like a party — flecks of white coconut and golden pineapple throughout.
- Pour the batter into your prepared pan and smooth the top with your spatula. Give the pan a gentle tap on the counter to release any air bubbles. Slide it into the center of your preheated oven and set a timer for 30 minutes. Resist the urge to open the door and peek — every time you do, you let out heat and risk a sunken cake. Instead, turn on your oven light and watch through the window as it transforms from a pale batter to a golden masterpiece.
- After 30 minutes, check for doneness by inserting a toothpick into the center. It should come out with just a few moist crumbs, not wet batter. The edges will be pulling away from the sides of the pan, and the top will spring back when lightly pressed. If it needs more time, check every 5 minutes. Overbaking is the enemy of moist cake, so err on the side of slightly underdone. The cake will continue cooking from residual heat as it cools.
- Let the cake cool in the pan for 10 minutes — no more, no less. Too short and it'll fall apart when you try to remove it. Too long and it'll steam itself soggy. After 10 minutes, lift it out using the parchment handles and transfer to a wire rack. Peel off the parchment and let it cool completely. This is the hardest part, because your kitchen smells incredible and you want to dive in immediately. But patience pays off — cutting a warm cake is a crumbly disaster.
That's it — you did it. But hold on, I've got a few more tricks that'll take this to another level...
Insider Tricks for Flawless Results
The Temperature Rule Nobody Follows
Here's the thing that separates good bakers from great ones: temperature matters at every stage. Your ingredients should all be at room temperature before you start mixing — cold eggs can cause your butter to seize, creating a curdled mess that never fully recovers. But here's the kicker: once your cake is baked, temperature becomes your enemy. Let it cool completely before slicing, or you'll have a crumbly disaster that makes you look like a beginner. I learned this the hard way when I served what looked like cake carnage to my book club. They still talk about it, and not in a good way.
Why Your Nose Knows Best
Trust your sense of smell when toasting coconut. The moment it starts smelling like a tropical paradise and turns golden, get it off the heat immediately. Coconut goes from perfectly toasted to bitter and burnt faster than you can say "piña colada." I set a timer for 3 minutes, then stand there stirring like my life depends on it. Because honestly, my reputation as a baker kind of does. That nutty, toasted aroma is your cue that magic is happening, but walk away for 30 seconds and you'll come back to a smoking pan of disappointment.
The 5-Minute Rest That Changes Everything
After your cake comes out of the oven, let it rest in the pan for exactly 5-10 minutes. Too short and it'll fall apart when you try to remove it. Too long and it'll steam itself soggy, ruining all your hard work. I set a timer and walk away — no poking, no prodding, no "just checking." During this crucial window, the proteins are setting and the steam is redistributing. It's like a little spa treatment for your cake. Skip this step and you'll have a cake that tastes great but looks like it survived a natural disaster.
The Toothpick Test Truth
Forget everything you think you know about the toothpick test. For this cake, you want the toothpick to come out with a few moist crumbs, not completely clean. Completely clean means overbaked, and overbaked means dry. Those moist crumbs tell you the cake is perfectly done and will finish setting as it cools. My friend Sarah (the one who hoarded the serving plate) thought I was crazy when I told her this. Then she tried it and texted me that her cakes have been perfect ever since. Sometimes being slightly underdone is exactly what you need.
The Storage Secret
Here's where most people mess up — they wrap their cake while it's still warm, trapping steam that turns the top sticky and sad. Let it cool completely, then wrap it tightly in plastic wrap. But here's the genius part: add a small piece of parchment between the plastic and the cake. It prevents the plastic from sticking and tearing off chunks of your beautiful cake when you unwrap it. This cake stays moist for days, but if you're keeping it longer than three days, freeze individual slices. They thaw in minutes and taste like fresh-baked perfection.
Creative Twists and Variations
This recipe is a playground. Here are some of my favorite ways to switch things up:
The Rum Runner Version
Add two tablespoons of dark rum to the batter along with the vanilla extract. It adds incredible depth without making the cake taste like a cocktail. The alcohol bakes off, leaving behind complex flavors that make people ask "what's in this?" in the best way. If you're feeling fancy, brush the warm cake with a rum simple syrup for extra moisture and flavor. This version is especially good for adult dinner parties where you want to impress without trying too hard.
The Mango Tango Variation
Replace half the crushed pineapple with an equal amount of crushed mango. The combination of pineapple and mango creates a more complex tropical flavor that's absolutely addictive. Add a teaspoon of lime zest to brighten everything up. This version tastes like summer in cake form, and it's my go-to for potlucks where I want to stand out from the usual dessert suspects.
The Nutty Island Twist
Fold in half a cup of chopped macadamia nuts along with the coconut. Their buttery richness complements the tropical flavors perfectly, adding crunch and depth. Toast them lightly first for maximum flavor impact. This version is so good it should probably be illegal in some states. I've had people offer to pay me to make this for their weddings.
The Chocolate Coconut Dream
Add a quarter cup of mini chocolate chips to the batter. The chocolate melts into little pockets of molten goodness that pair surprisingly well with the pineapple and coconut. Use dark chocolate for sophistication, milk chocolate for crowd-pleasing sweetness. This version converts even the "I don't like coconut" crowd, probably because chocolate makes everything better.
The Tropical Sunrise Cake
Add the zest of one orange and one lime to the batter for a citrusy twist that makes the tropical flavors pop. The citrus oils enhance both the pineapple and coconut, creating a more complex flavor profile that tastes like a tropical sunrise. This version is especially good in winter when you need a reminder that summer exists somewhere.
The Gluten-Free Game-Changer
Substitute the all-purpose flour with a gluten-free blend designed for baking. Make sure it contains xanthan gum for structure. The cake might be slightly more tender, but the pineapple and coconut provide plenty of moisture and flavor. I've served this version to gluten-free friends who cried because they hadn't had good cake in years. Just be sure to check all your other ingredients for hidden gluten.
Storing and Bringing It Back to Life
Fridge Storage
This cake keeps beautifully at room temperature for up to 3 days, wrapped tightly in plastic wrap. If your kitchen is particularly warm or humid, store it in the fridge, but bring it back to room temperature before serving. Cold dulls flavors, and this cake deserves to shine. I actually prefer it slightly warmed — 10 seconds in the microwave brings back that fresh-baked aroma and makes the pineapple pieces taste like sunshine again. Just don't overdo it or you'll have hot cake mush.
Freezer Friendly
Freeze individual slices on a baking sheet until solid, then wrap each slice in plastic wrap and store in a freezer bag for up to 3 months. This method prevents them from sticking together, so you can grab just one slice for emergency tropical cravings. Thaw at room temperature for 30 minutes, or microwave for 20 seconds. The coconut might lose a tiny bit of crunch, but the flavor stays perfect. I've been known to eat these frozen like coconut-pineapple ice cream cakes.
Best Reheating Method
If your cake has gone slightly stale (though it shouldn't if you stored it properly), revive it with a simple steam trick. Wrap the slice in a damp paper towel and microwave for 10-15 seconds. The steam rehydrates the cake, making it taste fresh-baked. You can also warm slices in a 300°F oven for 5 minutes, wrapped in foil. Add a tiny splash of water before sealing the foil — it steams back to perfection. This trick works so well I've saved cakes that were days old and made them taste like new.