I was in the middle of a rainy Thursday night when my roommate dared me to create the ultimate comfort dish using only the pantry staples we had left. I tossed a half‑cooked packet of elbow macaroni into a pot, grabbed a lone chicken breast that had been marinating in a mystery sauce, and stared at a block of Parmesan that was practically begging to be shredded. The kitchen was a symphony of clanging pans, the low hum of the oven, and the faint scent of garlic that seemed to whisper, “You’re about to make magic.”
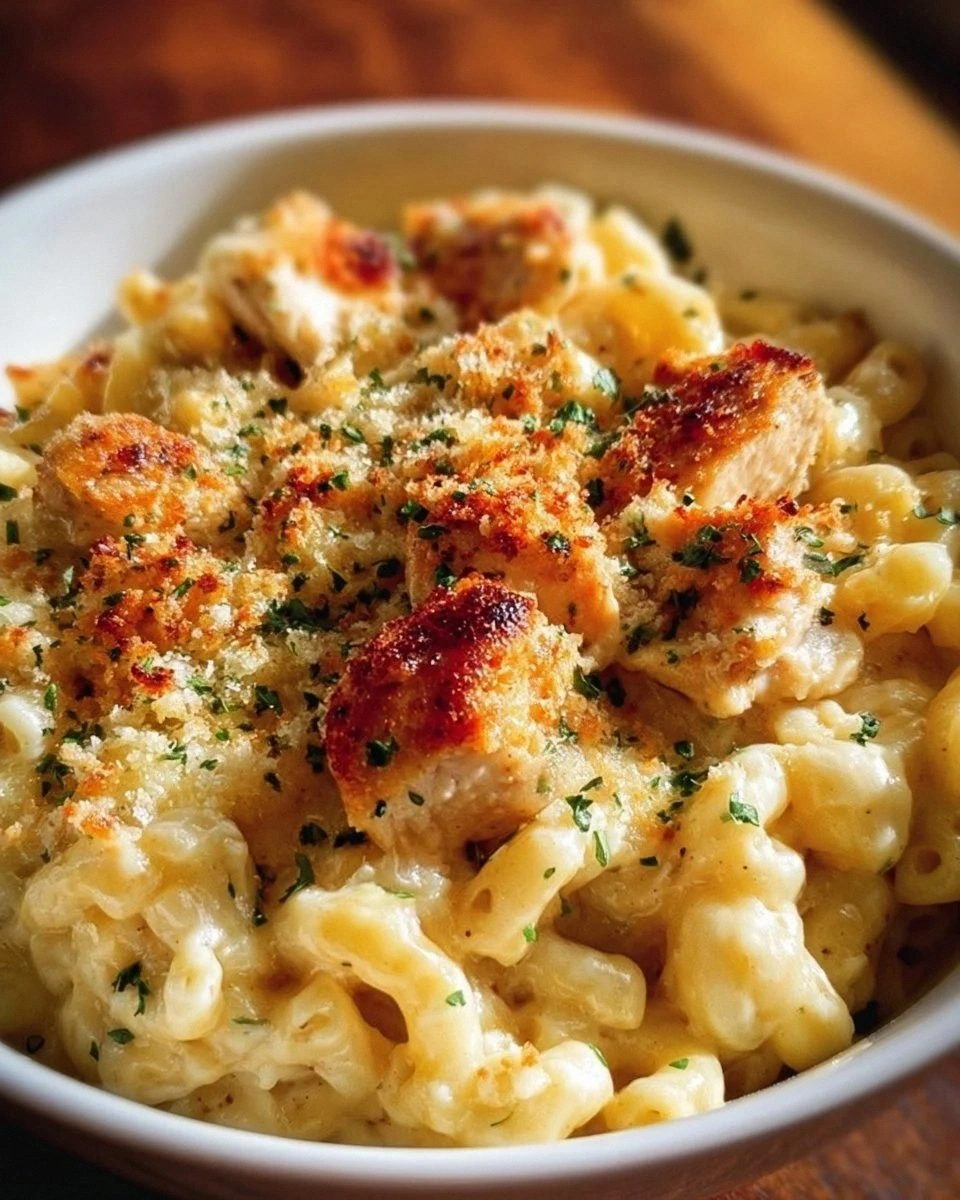
The first bite was a revelation: the cheese sauce clung to each curve of the pasta like a silky veil, while the chicken delivered a smoky, buttery bite that made my taste buds do a little dance. I could hear the crunch of the breadcrumb topping from the other side of the room, a sound that reminded me of fresh snow underfoot—delicate, yet unmistakably present. The aroma? Imagine a warm blanket woven from toasted garlic, nutty Parmesan, and a hint of rosemary, wrapping the entire house in a comforting hug.
Most mac and cheese recipes either drown the pasta in a soupy mess or leave the cheese flavor flat as a pancake. This version, however, balances the richness of a classic béchamel with the savory depth of perfectly cooked chicken, all crowned by a golden, crispy crust that shatters like thin ice when you dig in. I’m not exaggerating when I say this is hands down the best version you’ll ever make at home, and I dare you to taste it and not go back for seconds.
What truly sets this dish apart is a secret technique I discovered while scrolling through old culinary forums: a quick garlic‑infused butter flash‑sauté before the roux, followed by a brief oven blast that caramelizes the breadcrumb topping. This tiny tweak transforms a simple casserole into a show‑stopping centerpiece. Let me walk you through every single step — by the end, you’ll wonder how you ever made it any other way.
What Makes This Version Stand Out
- Flavor Explosion: The garlic‑butter base awakens the palate, while the double‑dose of Parmesan delivers a nutty, umami punch that lingers long after the last forkful.
- Texture Symphony: Creamy, velvety sauce meets al dente macaroni, then finishes with a crunchy breadcrumb crown that shatters delightfully with each bite.
- Simplicity Wins: Only ten ingredients, all pantry‑friendly, and you’ll have a restaurant‑quality dish without a culinary degree.
- Unique Twist: The garlic‑infused butter flash‑sauté before the roux is the game‑changer that adds depth without extra effort.
- Crowd‑Pleaser: Kids love the cheesy goodness, adults appreciate the sophisticated garlic‑Parmesan notes, and the crispy topping makes it Instagram‑ready.
- Ingredient Quality: Using freshly grated Parmesan and halal‑certified chicken ensures purity of flavor and peace of mind.
- Cooking Method: The two‑stage bake—first to set the sauce, then to crisp the top—creates layers of flavor that ordinary stovetop mac can’t match.
- Make‑Ahead Magic: Assemble the casserole a day ahead, refrigerate, and pop it in the oven when guests arrive; the flavors only get better.
Inside the Ingredient List
The Flavor Base
Butter is the silent hero here; it carries the garlic powder into every nook of the sauce, creating a fragrant foundation that feels like a warm hug. If you skip the butter, you’ll lose that buttery richness and the garlic won’t fully bloom, leaving the sauce flat. For a dairy‑free twist, swap the butter for a high‑quality olive oil, but be prepared for a slightly different mouthfeel.
Garlic powder, though simple, is a powerhouse. It infuses the sauce with a mellow, sweet garlic note that doesn’t overwhelm the delicate Parmesan. Fresh minced garlic would work, but it can become bitter if overcooked. If you’re a garlic aficionado, add a pinch of roasted garlic paste for an extra depth of flavor.
The Texture Crew
Elbow macaroni is chosen for a reason: its hollow center holds the sauce like a tiny reservoir, ensuring every bite is drenched in cheesy goodness. You could use shells or cavatappi for a different shape, but elbow gives that classic, nostalgic feel. When cooking the pasta, keep it al dente—under‑cooking leads to mush, over‑cooking makes it impossible for the sauce to cling.
Breadcrumbs are the final flourish, providing a crunchy contrast that shatters like thin ice under the fork. If you prefer a gluten‑free version, use crushed rice crackers or almond flour mixed with a touch of grated Parmesan. The key is to toast them lightly before the bake; this prevents a soggy topping.
The Unexpected Star
Shredded cooked chicken adds protein and a savory depth that elevates this mac from side dish to main course. Using halal‑certified chicken ensures the meat is prepared according to specific dietary standards, which many home cooks appreciate for both ethical and flavor reasons. If you’re vegetarian, swap the chicken for roasted cauliflower florets; they’ll soak up the sauce beautifully.
Milk, preferably whole, is the liquid backbone of the béchamel. Its fat content creates a velvety texture that low‑fat milks simply can’t replicate. For a richer sauce, add a splash of heavy cream at the end of the cooking process, but watch the sauce closely to avoid curdling.
The Final Flourish
Parmesan cheese, shredded fresh, is the crown jewel of this dish. Its sharp, salty profile cuts through the richness of the butter and milk, providing balance. Pre‑grated Parmesan often contains anti‑caking agents that can affect meltability, so always grate it yourself if you can. A pinch of freshly ground black pepper adds a subtle heat that lifts the entire flavor profile.
Salt and pepper to taste are the final seasoning steps. They may seem minor, but they are essential for unlocking the full potential of each ingredient. Taste the sauce before baking and adjust; a well‑seasoned sauce is the difference between “good” and “jaw‑dropping.”
Everything's prepped? Good. Let's get into the real action...
The Method — Step by Step
Preheat your oven to 375°F (190°C). While the oven warms, bring a large pot of salted water to a boil. Add the elbow macaroni and cook until just shy of al dente—about 7 minutes. The pasta should still have a slight bite because it will continue cooking in the oven. Drain, drizzle with a teaspoon of olive oil, and set aside.
In a medium saucepan, melt the butter over medium heat. As soon as it foams, sprinkle in the garlic powder and let it sizzle for 30 seconds—watch that golden swirl, that’s pure flavor building. Then stir in the flour, whisking constantly to form a smooth roux. Cook the roux for another minute until it turns a light, nutty amber; this is the foundation of your béchamel.
Kitchen Hack: If you’re short on time, whisk the flour and butter together in a microwave‑safe bowl for 30 seconds, then continue on the stovetop. The roux will still develop that essential flavor.Slowly pour the milk into the roux, whisking vigorously to avoid lumps. Keep the heat on medium‑low and stir until the sauce thickens and coats the back of a spoon—this should take about 5‑6 minutes. The sauce should be glossy and smooth; if it looks grainy, keep whisking—patience is key.
Stir in 2 cups of shredded Parmesan until it melts into a silk‑like texture. At this point, season with salt, pepper, and an extra pinch of garlic powder if you love a bold garlic punch. The sauce should smell like a cheesy, buttery cloud drifting over a garlic field.
Fold the cooked macaroni and shredded chicken into the sauce, ensuring every piece is generously coated. The chicken should be evenly distributed, creating pockets of savory meat throughout the casserole. Transfer the mixture into a greased 9×13‑inch baking dish, smoothing the top with a spatula.
In a small bowl, combine the breadcrumbs with a drizzle of melted butter and a sprinkle of extra Parmesan if desired. This mixture will form the golden crust that makes the dish unforgettable. Evenly sprinkle the breadcrumb mixture over the top, pressing lightly so it adheres.
Watch Out: Do not over‑bake the breadcrumbs; they can burn quickly once the oven reaches full temperature. Keep an eye on the top after the first 15 minutes.Place the dish in the preheated oven and bake for 20 minutes, then switch the oven to broil for an additional 2‑3 minutes to achieve that caramelized, crackly crust. The edges will start pulling away from the sides, and you’ll hear a faint sizzle—pure magic.
Remove the casserole from the oven and let it rest for 5 minutes. This rest period allows the sauce to thicken slightly, making each slice hold together beautifully. Sprinkle the chopped fresh parsley over the top for a burst of color and a hint of herbaceous freshness.
Serve hot, and watch as your guests dive in, eyes widening at the sight of the golden crust and the steam rising like a perfume. I’ll be honest — I ate half the batch before anyone else got to try it, and the leftovers still taste like a brand‑new dish. That’s it — you did it. But hold on, I've got a few more tricks that'll take this to another level...
Insider Tricks for Flawless Results
The Temperature Rule Nobody Follows
Most home cooks bake mac at 350°F, but raising the temperature to 375°F creates a faster crust formation without drying out the interior. The higher heat triggers the Maillard reaction on the breadcrumbs, giving you that deep, nutty crunch. I once tried baking at 400°F and the top burned before the center was set—lesson learned. Stick to 375°F, and you’ll get that perfect balance of creamy interior and crisp topping.
Why Your Nose Knows Best
Don’t rely solely on timers; trust the aroma. When the sauce starts to smell like toasted butter and the breadcrumb layer releases a nutty perfume, you know you’re on the right track. If the kitchen suddenly fills with a slightly burnt scent, pull the dish out a minute early. Your nose is an underrated kitchen tool that can prevent a disaster before it happens.
The 5‑Minute Rest That Changes Everything
After baking, let the casserole sit untouched for exactly five minutes. This short rest lets the cheese sauce settle and thicken, preventing a watery spill when you cut the first slice. A friend once sliced immediately and ended up with a soggy mess that looked more like a soup than a casserole—don’t be that person. Patience at this stage is the secret to clean, picture‑perfect slices.
Butter‑Infused Breadcrumbs for Extra Crunch
Melt the butter before tossing it with the breadcrumbs, and add a pinch of smoked paprika for an unexpected depth. The butter coats each crumb, ensuring they brown evenly and create a glossy finish. This tiny step transforms a simple topping into a flavor‑packed crown that shatters with each bite.
Parmesan Timing is Everything
Add the bulk of your Parmesan while the béchamel is still on the heat, but reserve a tablespoon to sprinkle on top just before broiling. This creates a layered cheese experience: a melt‑in‑your‑mouth interior and a slightly caramelized, nutty crust on top. If you forget the top sprinkle, the dish still shines, but that extra cheese kick is worth the extra minute of attention.
Creative Twists and Variations
This recipe is a playground. Here are some of my favorite ways to switch things up:
Spicy Jalapeño Kick
Add 1 finely diced jalapeño to the butter‑garlic base, and sprinkle a pinch of cayenne into the breadcrumb topping. The heat cuts through the richness, making the dish perfect for those who love a little fire. It’s a hit at game nights when you want to impress without pulling a fire alarm.
Smoky Bacon Bliss
Crumble 4 strips of cooked bacon into the sauce and replace half of the breadcrumbs with crushed pork rinds. The smoky, salty bacon threads weave through the creamy cheese, while the pork rind topping adds an extra crunch that’s almost addictive.
Veggie‑Loaded Powerhouse
Swap the chicken for a medley of roasted broccoli, cauliflower, and carrots. Toss the veggies in a little olive oil, salt, and pepper before folding them into the sauce. The vegetables bring natural sweetness and a nutritional boost, turning this comfort food into a balanced meal.
Herb‑Infused Elegance
Stir in 1 tablespoon of fresh chopped thyme and ½ teaspoon of nutmeg into the béchamel. The herbaceous notes elevate the dish to a more sophisticated level, perfect for a dinner party where you want to wow guests with subtle flavors.
Cheese Lovers’ Dream
Mix in ½ cup of shredded mozzarella and ¼ cup of sharp cheddar along with the Parmesan. This trio creates a melty, gooey stretch that pulls apart like a cheesy ribbon—pure indulgence for anyone who can’t get enough cheese.
Storing and Bringing It Back to Life
Fridge Storage
Let the casserole cool to room temperature, then cover tightly with foil and store in the refrigerator for up to 3 days. When reheating, preheat the oven to 350°F, add a splash of milk (about 2 tablespoons) to restore creaminess, and bake for 15‑20 minutes until heated through and the topping regains its crunch.
Freezer Friendly
Portion the uncooked casserole into freezer‑safe containers, cover with a double layer of foil, and freeze for up to 2 months. To serve, thaw overnight in the fridge, then bake as directed, adding an extra 5‑10 minutes to the baking time. The breadcrumbs will crisp up beautifully after the extended bake.
Best Reheating Method
For microwave‑quick fixes, place a slice on a microwave‑safe plate, cover with a damp paper towel, and heat on high for 1‑2 minutes. To rescue the crunch, finish under the broiler for 30 seconds—just enough to revive that golden crust without burning.